Extra Credit 9 - Text Files 2
- Extra Credit 9 - Text Files 2
What will you learn
- Learn how to search for specific text patterns using
grep - Practice extracting and displaying specific columns of data using
awk - Learn how to modify and replace text using
sed - Develop the ability to process structured text files from the Linux terminal
- Practice combining multiple text-processing commands to solve real-world problems
Required files
To download the required files, clone the following repository:
git clone https://github.com/linuxworkshop67/text-processing-files
Review
GREP
- The
grepcommand is used to search for text that matches a pattern.Grepwill search for a specified pattern line by line in a given file(s) or from the output of a command when using the pipe. You should usegrepany time you need to read a file line by line in search of a given string. - For example:
- John needs a list of all email addresses in a csv file that are gmail.com
grep "gmail.com" users.csv
- John needs a list of all email addresses in a csv file that are gmail.com
Usage/Formula
- With a file(s)
grep+option+search string+file(s)
- With the pipe
command+|+grep+option
Basic Examples
- Get a list of all users in your machine that have the
/bin/bashshell as the login shellgrep '/bin/bash' /etc/passwd
- Find out in which lines does the PATH variable gets exported in your bashrc file
grep -n 'PATH' ~/.bashrc
- Get a list of all the ip addresses found in the
ip addrcommand’s outputip addr | grep 'inet'See more examples in the presentation
AWK
- The
awkcommand is a powerful text-processing utility used to read, filter, extract, manipulate, and analyze structured text.awkprocesses a file line by line, treating each line as a record and dividing it into fields. By default, fields are separated by whitespace, but you can specify a different field separator. You should useawkwhenever you need to extract specific columns, perform calculations, filter records based on conditions, or generate reports. - For example:
- John needs a list of usernames and their corresponding login shells from the
/etc/passwdfile.awk -F ':' '{print $1, $7}' /etc/passwd
- John needs a list of usernames and their corresponding login shells from the
Usage/Formula
- With a file(s)
awk+option+'pattern { action }'+file(s)
- With the pipe
command+|+awk+option+'pattern { action }'
- With a custom field separator
awk+-F+separator+'pattern { action }'+file(s)
Basic Examples
- Get a list of all usernames from the
/etc/passwdfile.awk -F ':' '{print $1}' /etc/passwd
- Display usernames and their login shells.
awk -F ':' '{print $1, $7}' /etc/passwd
- Display users with a UID greater than or equal to 1000.
awk -F ':' '$3 >= 1000 {print $1, $3}' /etc/passwd
- Calculate the average of a column of numbers.
awk '{sum += $1} END {if (NR > 0) print sum / NR}' numbers.txt
Understanding AWK Fields and Variables
$0- Represents the entire current record (line).$1- Represents the first field.$2- Represents the second field.$NF- Represents the last field.NF- Represents the number of fields in the current record.NR- Represents the total record number processed so far.FS- Represents the input field separator.OFS- Represents the output field separator.BEGIN- Executes commands before processing input.END- Executes commands after processing all input.
See more examples in the presentation
SED
- The
sedcommand (Stream Editor) is a text-processing utility used to search, replace, insert, delete, and transform text.sedreads input line by line, applies the specified editing instructions, and sends the modified output to standard output by default. Unlike a traditional text editor,seddoes not require you to open a file interactively. You should usesedwhenever you need to make automated changes to text files, replace strings, remove specific lines, or transform command output. - For example:
- John needs to replace every occurrence of the word
LinuxwithDebianin a text file.sed 's/Linux/Debian/g' notes.txt
- John needs to replace every occurrence of the word
Usage/Formula
- With a file(s)
sed+option+'command'+file(s)
- With the pipe
command+|+sed+option+'command'
- Basic substitution
sed 's/search/replace/flags' file.txt
Basic Examples
- Replace all occurrences of
LinuxwithDebian.sed 's/Linux/Debian/g' file.txt
- Delete all lines containing the word
ERROR.sed '/ERROR/d' system.log
- Display only the first five lines of a file.
sed -n '1,5p' file.txt
- Modify a file directly by replacing an old hostname with a new one.
sed -i 's/old-server/new-server/g' config.txt
Understanding SED Commands and Options
s- Performs a substitution.d- Deletes the matching line.p- Prints the selected line.i- Inserts text before a selected line.a- Appends text after a selected line.c- Replaces an entire selected line.g- Replaces all occurrences on a line instead of only the first.-n- Suppresses automatic printing; use it withpwhen selecting specific lines.-i- Modifies the original file directly (in-place editing).-E- Enables extended regular expressions.
Important:
sed -imodifies the original file. Make a backup or redirect the output to a new file when experimenting.
See more examples in the presentation
Practice Time
Scenario 1
A server administrator receives an alert that a filesystem is approaching capacity. The administrator must inspect a simulated filesystem report and identify the largest consumers.
Files
df-report.txt- simulateddf -houtputdu-report.txt- simulated directory size report
Steps to complete
- Use
grepto display the filesystems mounted on/and/var. - Use
grep -vto exclude temporary filesystems from the report. - Use
awkto display filesystem, usage percentage, and mount point. - Use
awkto identify filesystems at or above 80% usage. - Use
sedto change the report’sMounted onheading toMount Pointand save the result todf-report-clean.txt.
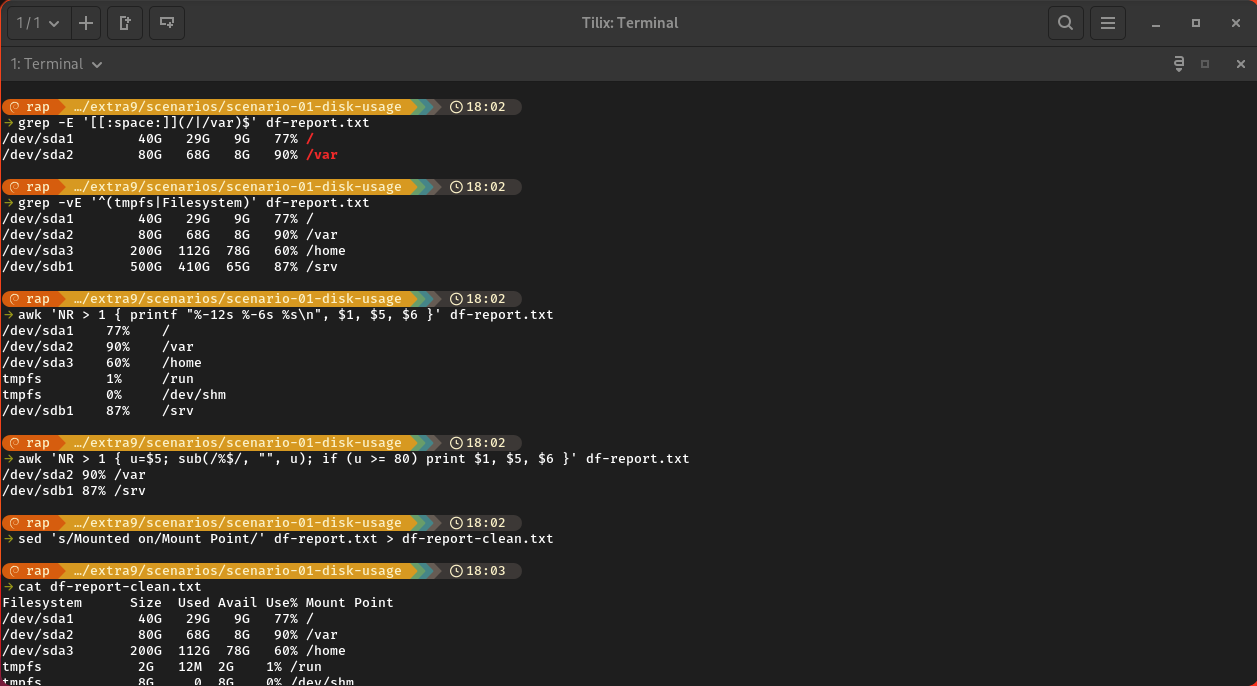
Take a screenshot showing all the commands you used to solve this scenario. More than 1 screenshot may be needed
Scenario 2
Users report failed logins and the security team asks for a quick review of a system authentication log.
Files
auth.log- representative Debian-style authentication messages
Steps to complete
- Use
grepto find all failed password attempts. - Use
grep -iandgrep -Eto find failed authentication and invalid-user events. - Use
awkto extract the source IP address from eachFailed passwordline. (The log format is deliberately consistent for this exercise.) - Use
awkto count failed attempts by source IP address. - Use
sedto redact IPv4 addresses in a copy of the log before sharing it, replacing each address with[REDACTED].
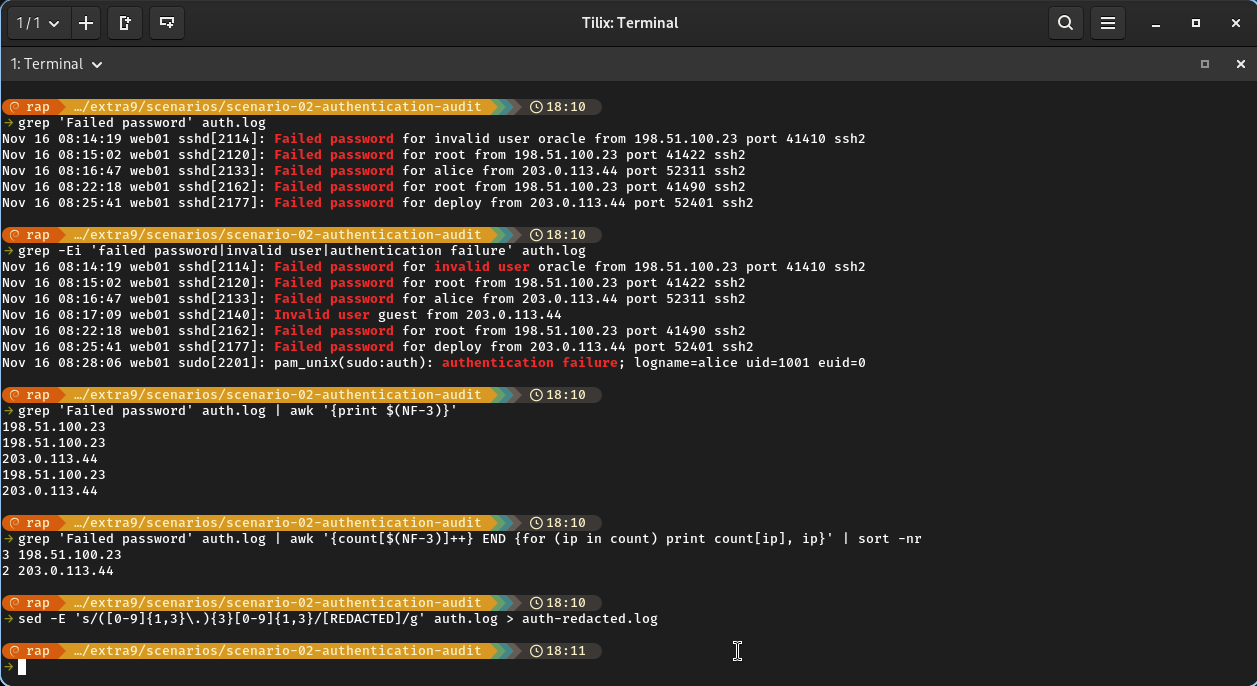
Take a screenshot showing all the commands you used to solve this scenario. More than 1 screenshot may be needed
Scenario 3
During a routine access review, the administrator must identify interactive accounts, review account metadata, and prepare a report of users with administrative privileges.
Files
passwd.sample- representative/etc/passwdentriesgroup.sample- representative/etc/groupentriesaccount-review-notes.txt- review notes containing inconsistent labels
Steps to complete
- Use
grepto find accounts whose login shell is/bin/bashor/bin/sh. - Use
awk -F: '$3 >= 1000 ...'to list regular user accounts (the sample includes a Debian-style UID range). - Use
awkto print username, UID, home directory, and shell in aligned columns. - Use
grepandawkto identify members of thesudogroup fromgroup.sample. - Use
sedto normalize the inconsistentREVIEW:label inaccount-review-notes.txttoSTATUS:and save a cleaned copy.
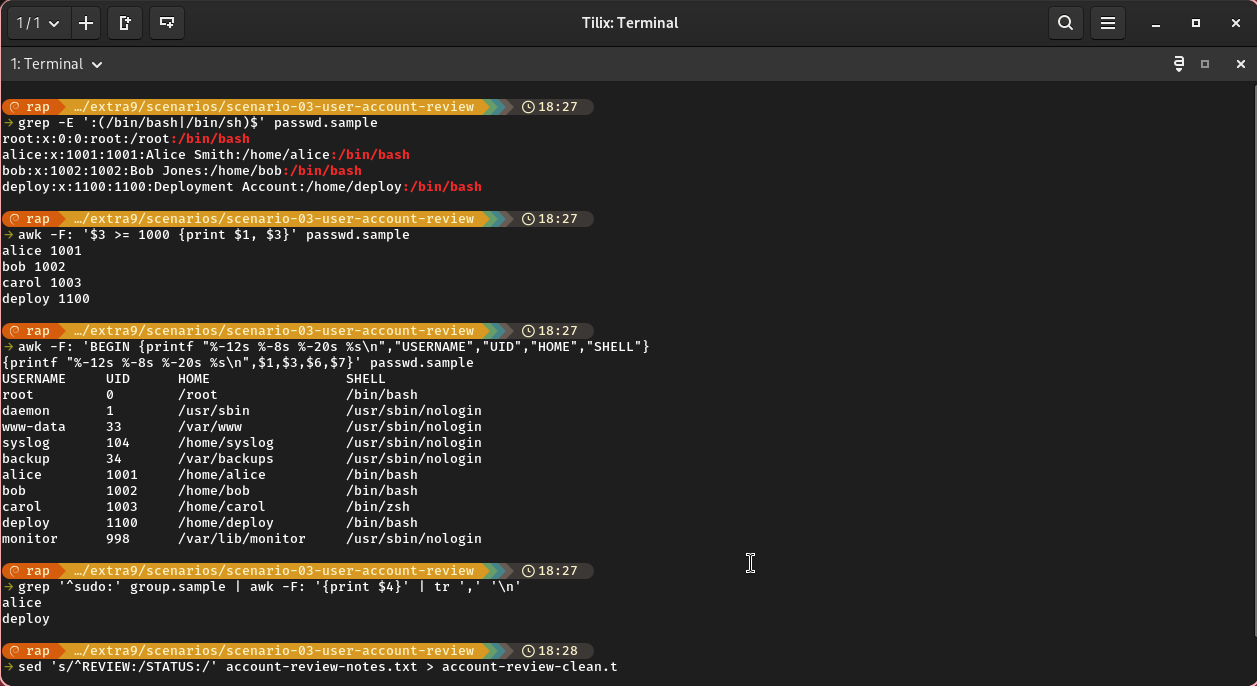
Take a screenshot showing all the commands you used to solve this scenario. More than 1 screenshot may be needed
Scenario 4
A web application is intermittently returning errors. The administrator must inspect access and error logs, summarize HTTP responses, and prepare a filtered incident extract.
Files
access.log- simplified combined-style web access logerror.log- sample web server error log
Steps to complete
- Use
grepto isolate requests that returned HTTP status codes 500, 502, or 503. - Use
grepto find requests to/loginand/api/endpoints. - Use
awkto count requests by HTTP status code. - Use
awkto calculate the number of requests and total bytes served for each client IP address. - Use
sedto replace the hostnameapp01.example.testwithweb01.example.testin a copy oferror.log, preserving the original.
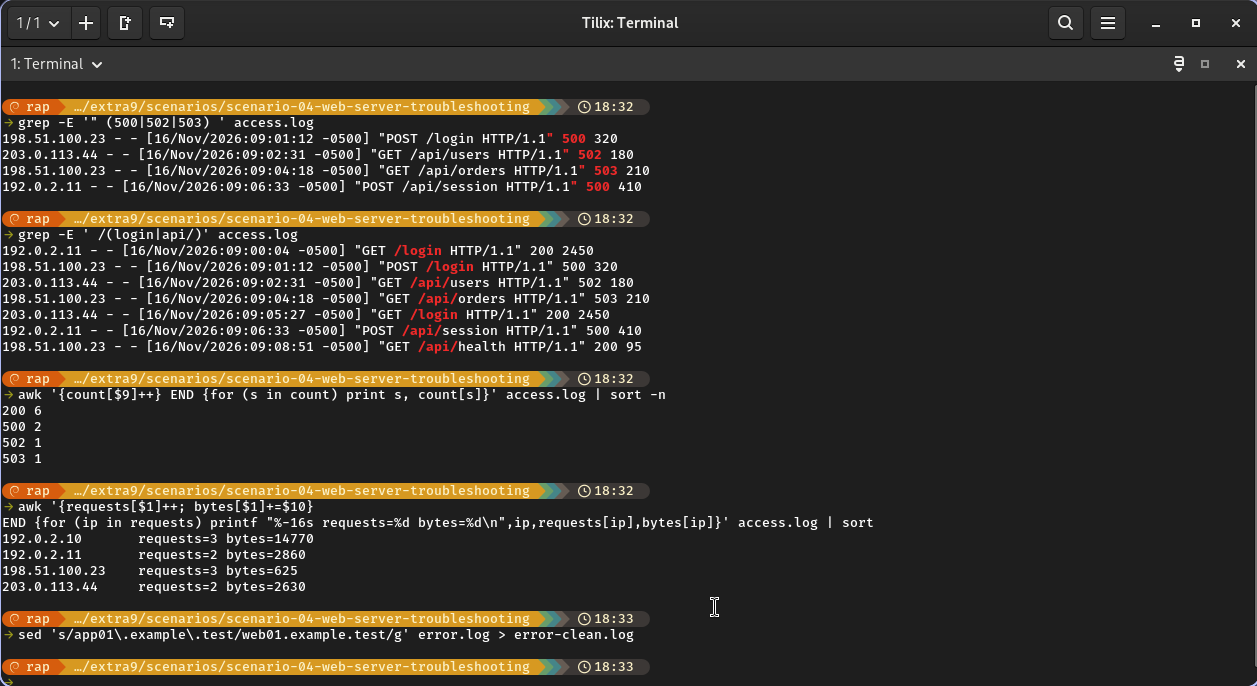
Take a screenshot showing all the commands you used to solve this scenario. More than 1 screenshot may be needed
Scenario 5
A production server reports elevated load, repeated service failures, and a growing application queue. The administrator has been given a bundle of snapshots and must correlate evidence into an incident summary.
Files
services.txt- service status snapshotprocesses.txt- process snapshotapplication.log- application eventsdisk-inodes.txt- inode utilization snapshotincident-notes.txt- draft notes with inconsistent wording
Steps to complete
- Use
grep -Eto identify failed or inactive services inservices.txt; distinguish them from active services. - Use
awkto list processes consuming at least 10% CPU or 10% memory, then sort the results by CPU usage. - Use
grepto isolate queue, timeout, and database errors inapplication.log; useawkto count events by severity. - Use
awkto identify filesystems with inode usage at or above 80% indisk-inodes.txt. - Use
sedto standardize the incident-note terms (CRIT,WARN,INFO) to their full labels, then combine your findings intoincident-report.txt.
Final deliverable:
incident-report.txtmust contain:
- Failed/inactive services
- Top resource-consuming processes
- Application error counts
- Filesystems with high inode usage
- A short evidence-based incident summary
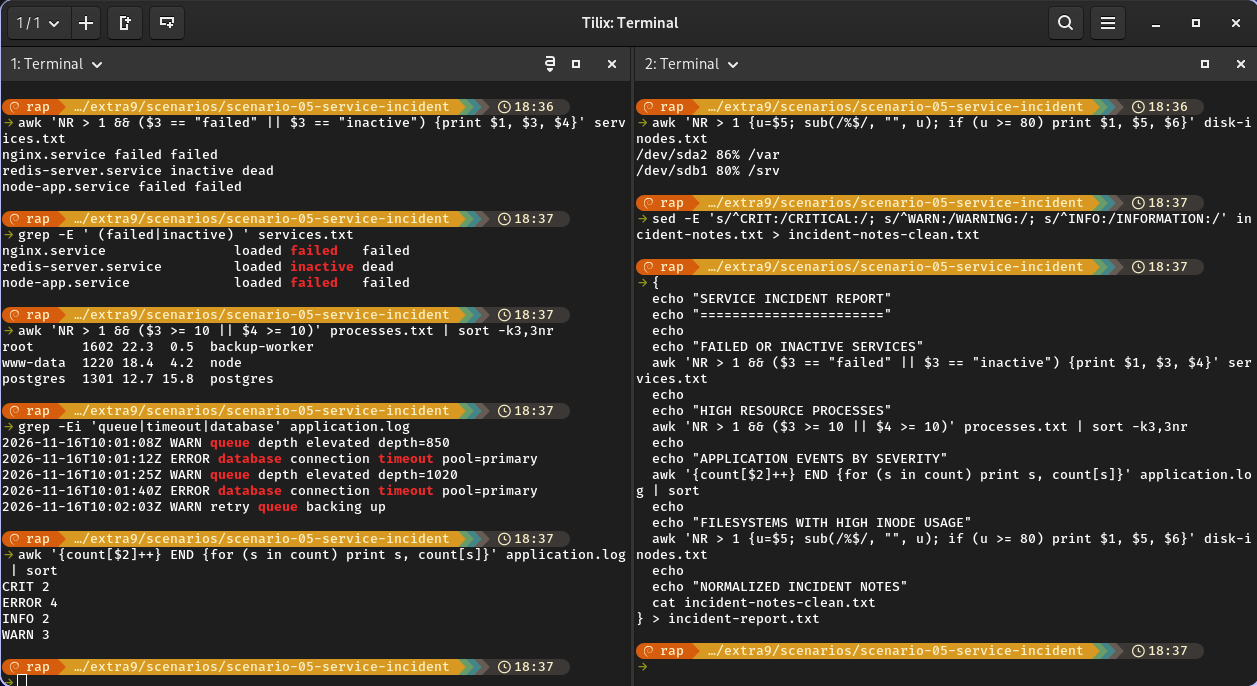
Take a screenshot showing all the commands you used to solve this scenario. More than 1 screenshot may be needed
What will you submit for extra credit
If this is your first extra credit assignment, you will need to create the necessary parent directory structure. In your
cis106directory (local repository), create a new directory calledExtraCredit(Use one word with no spaces in directory names.)
- Inside
ExtraCredit, create another directory calledextra9 - Open your
cis106local repository in VS Code - Inside
extra9, create a Markdown file calledextra9.md - Add all the screenshots you took earlier to
extra9.mdusing proper Markdown syntax and label each screenshot using Heading 2 Markdown headings. Save the Markdown file. - Your Markdown document should start with the following Heading 1:
# Extra Credit 9: text files 2 - Convert your file to PDF
- Run the following GitHub commands in the VS Code terminal, to push all your changes to GitHub:
git add .git commit -m "Completed Extra 9"git push
- In Blackboard, submit the following:
- The URL of
extra9.md - The PDF file
extra9.pdf
- The URL of