Extra Credit 4 - Shell Scripting
- Extra Credit 4 - Shell Scripting
What will you learn
This extra credit assignment is designed to help you practice the fundamentals of shell scripting.
- Creating and executing a basic script
- Using the
mancommand to get help
This activity uses the following commands:
echo: to display textdate: to manipulate datesdf: disk space usagefree: memory usageuname: basic system informationclear: clear screen
How to write and execute a basic script step by step
1. The tools:
- To write the script you will need a text editor. These text editors are easy to use:
- GNOME Text Editor: GNOME’s default text editor
- Geany: More advanced and feature-rich but still easy enough for beginners
- There are many more. A simple Google search will help you find additional options. However, the specific text editor you choose is not important, so select one that you feel comfortable using.
- In this guide, I will be using GNOME Text Editor and Geany.
- A terminal emulator to run the script. Any terminal emulator will work, but in this guide, I will be using Tilix.
2. Write the script
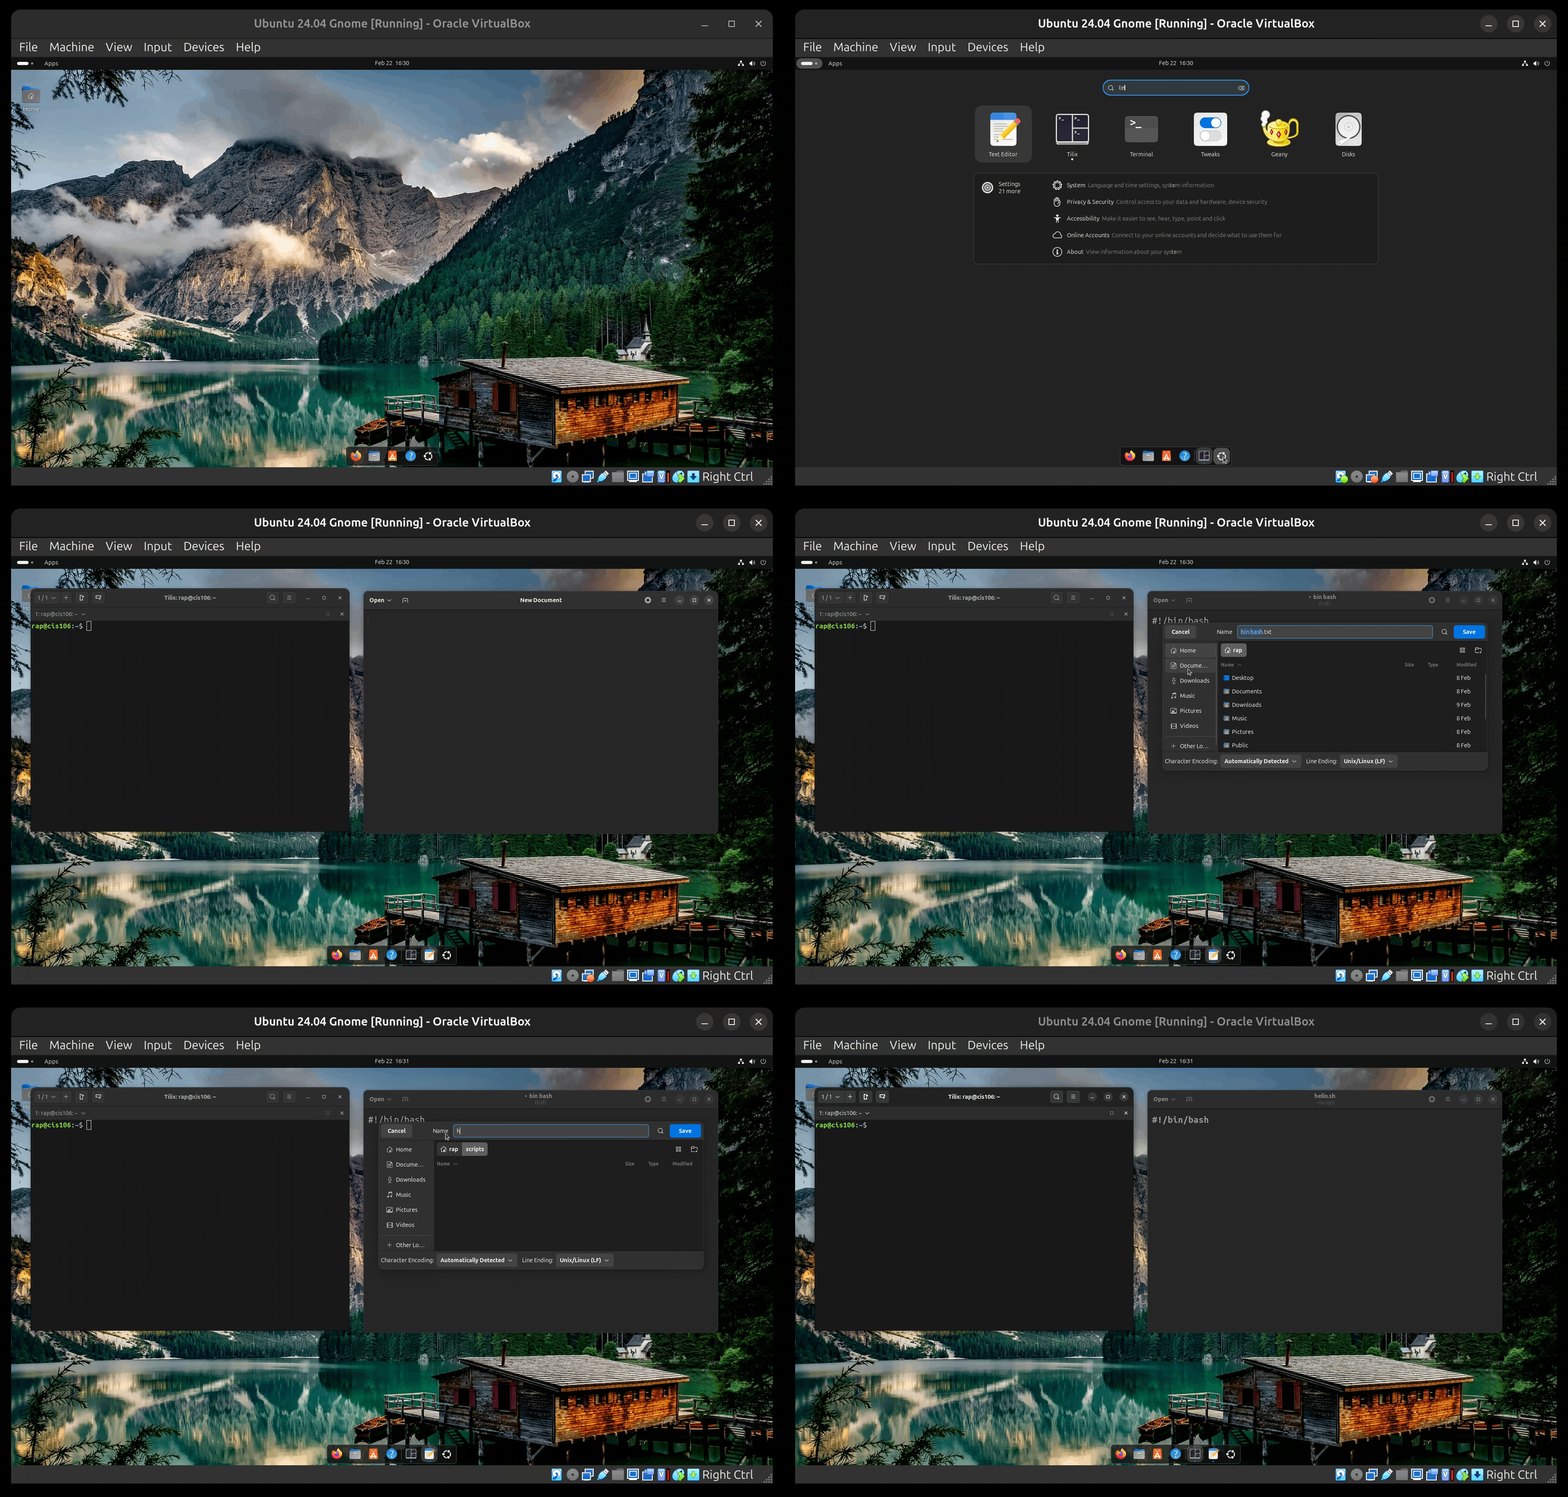
- Open your text editor
- The first line of code is the shell declaration, also known as the shebang:
#!/bin/bash. This line tells the operating system which interpreter should run the script. This line is important because without it, the system may not know which shell or interpreter should execute the script. - Save your file with the file extension
.sh. The.shfile extension is not required but it is good practice. - In this guide, we will be placing all our scripts in a folder/directory called
scriptsin your home directory. This will make your scripts easier to organize and locate.
3. Execute the script
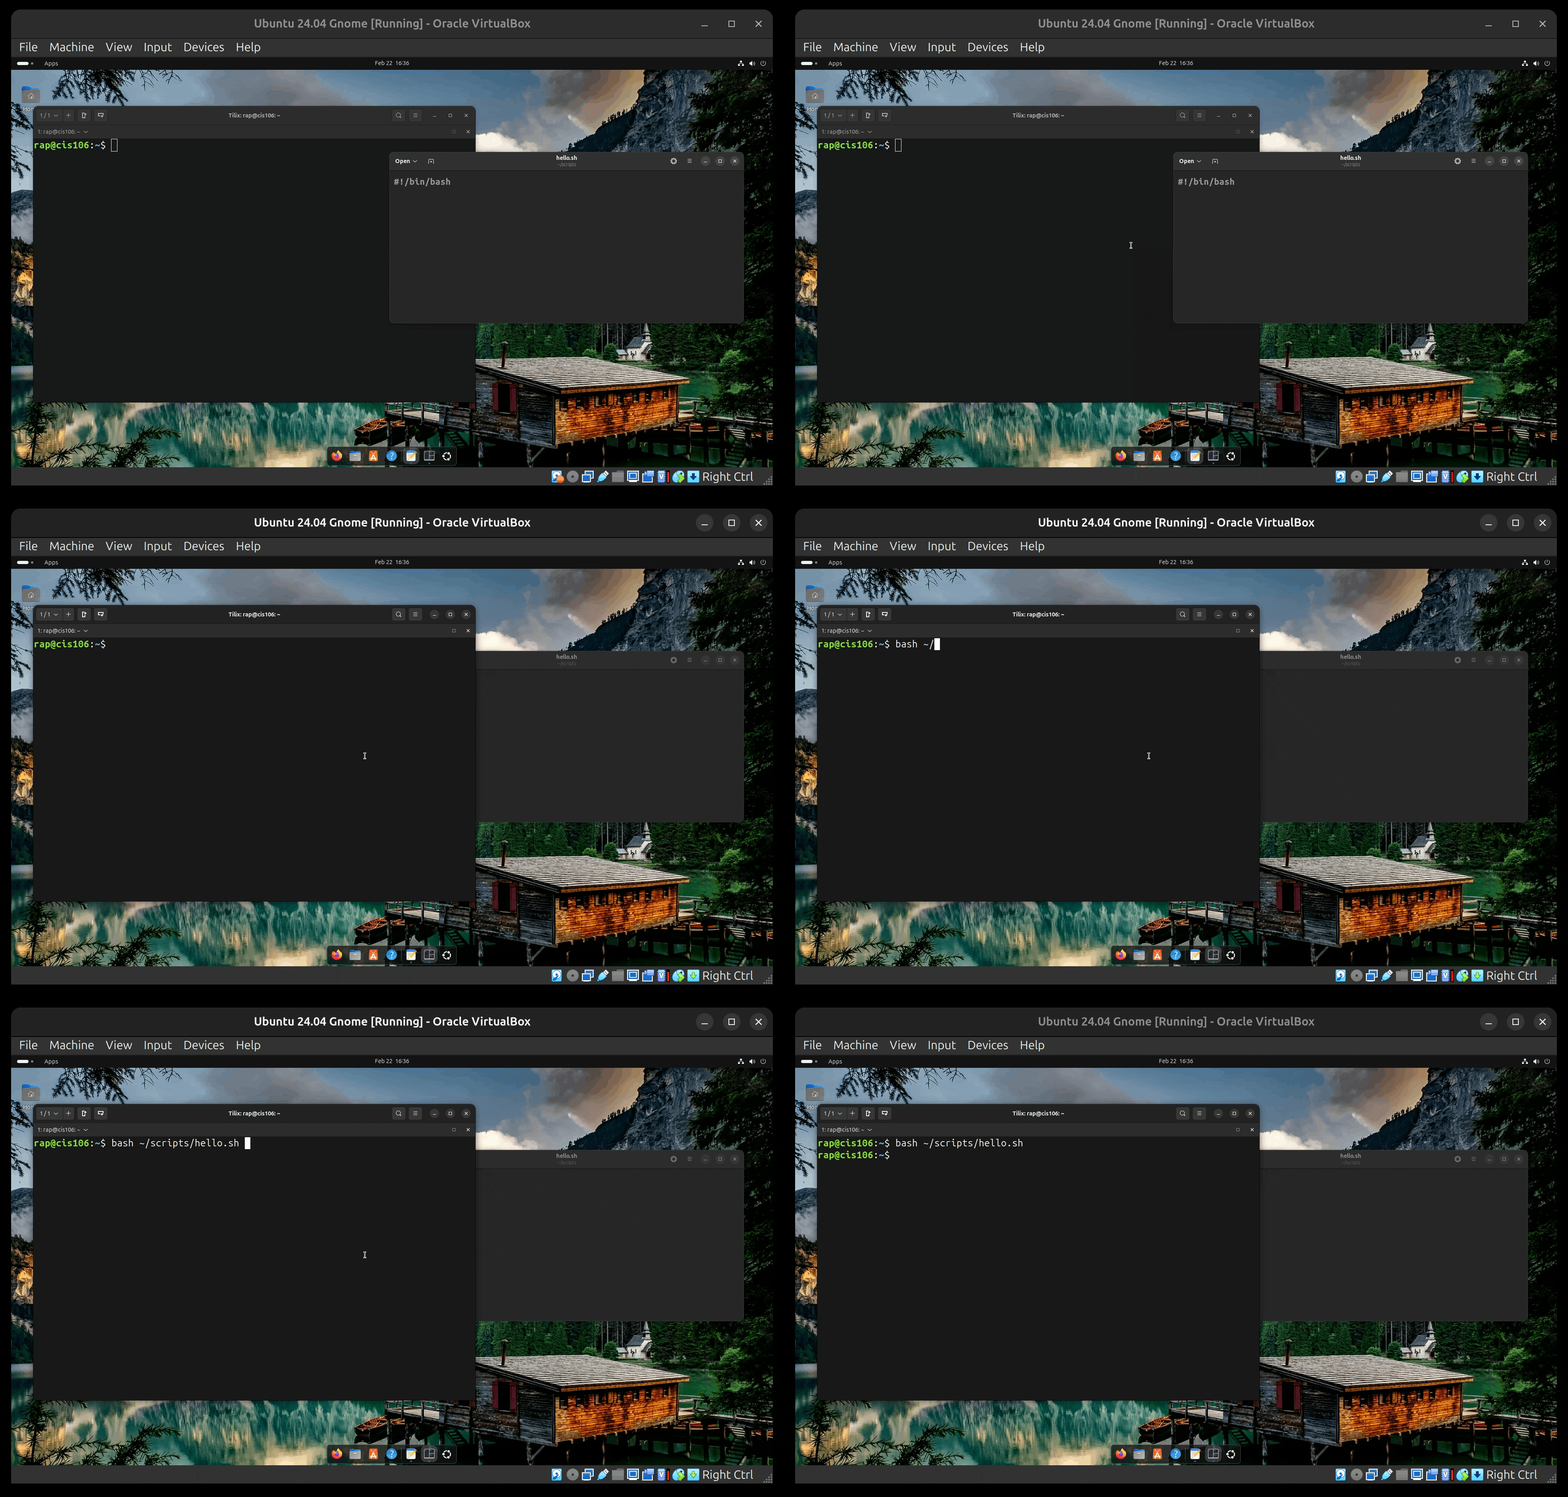
- Open your terminal emulator.
- The most basic way of running a script is using the following formula:
shell+path/to/script
- For example, we know that our shell is
bashand we placed our script in~/scripts/therefore the command to execute our script will be:bash ~/scripts/hello.sh
- This part of the path:
~is a shorthand for/home/$USERwhich is the current user’s home directory. If you want to learn more about this, read the presentation The Linux Filesystem or the article The Linux FS. For now, every script will be placed in~/scripts/so you should not worry about it.
4. Add more code to the script
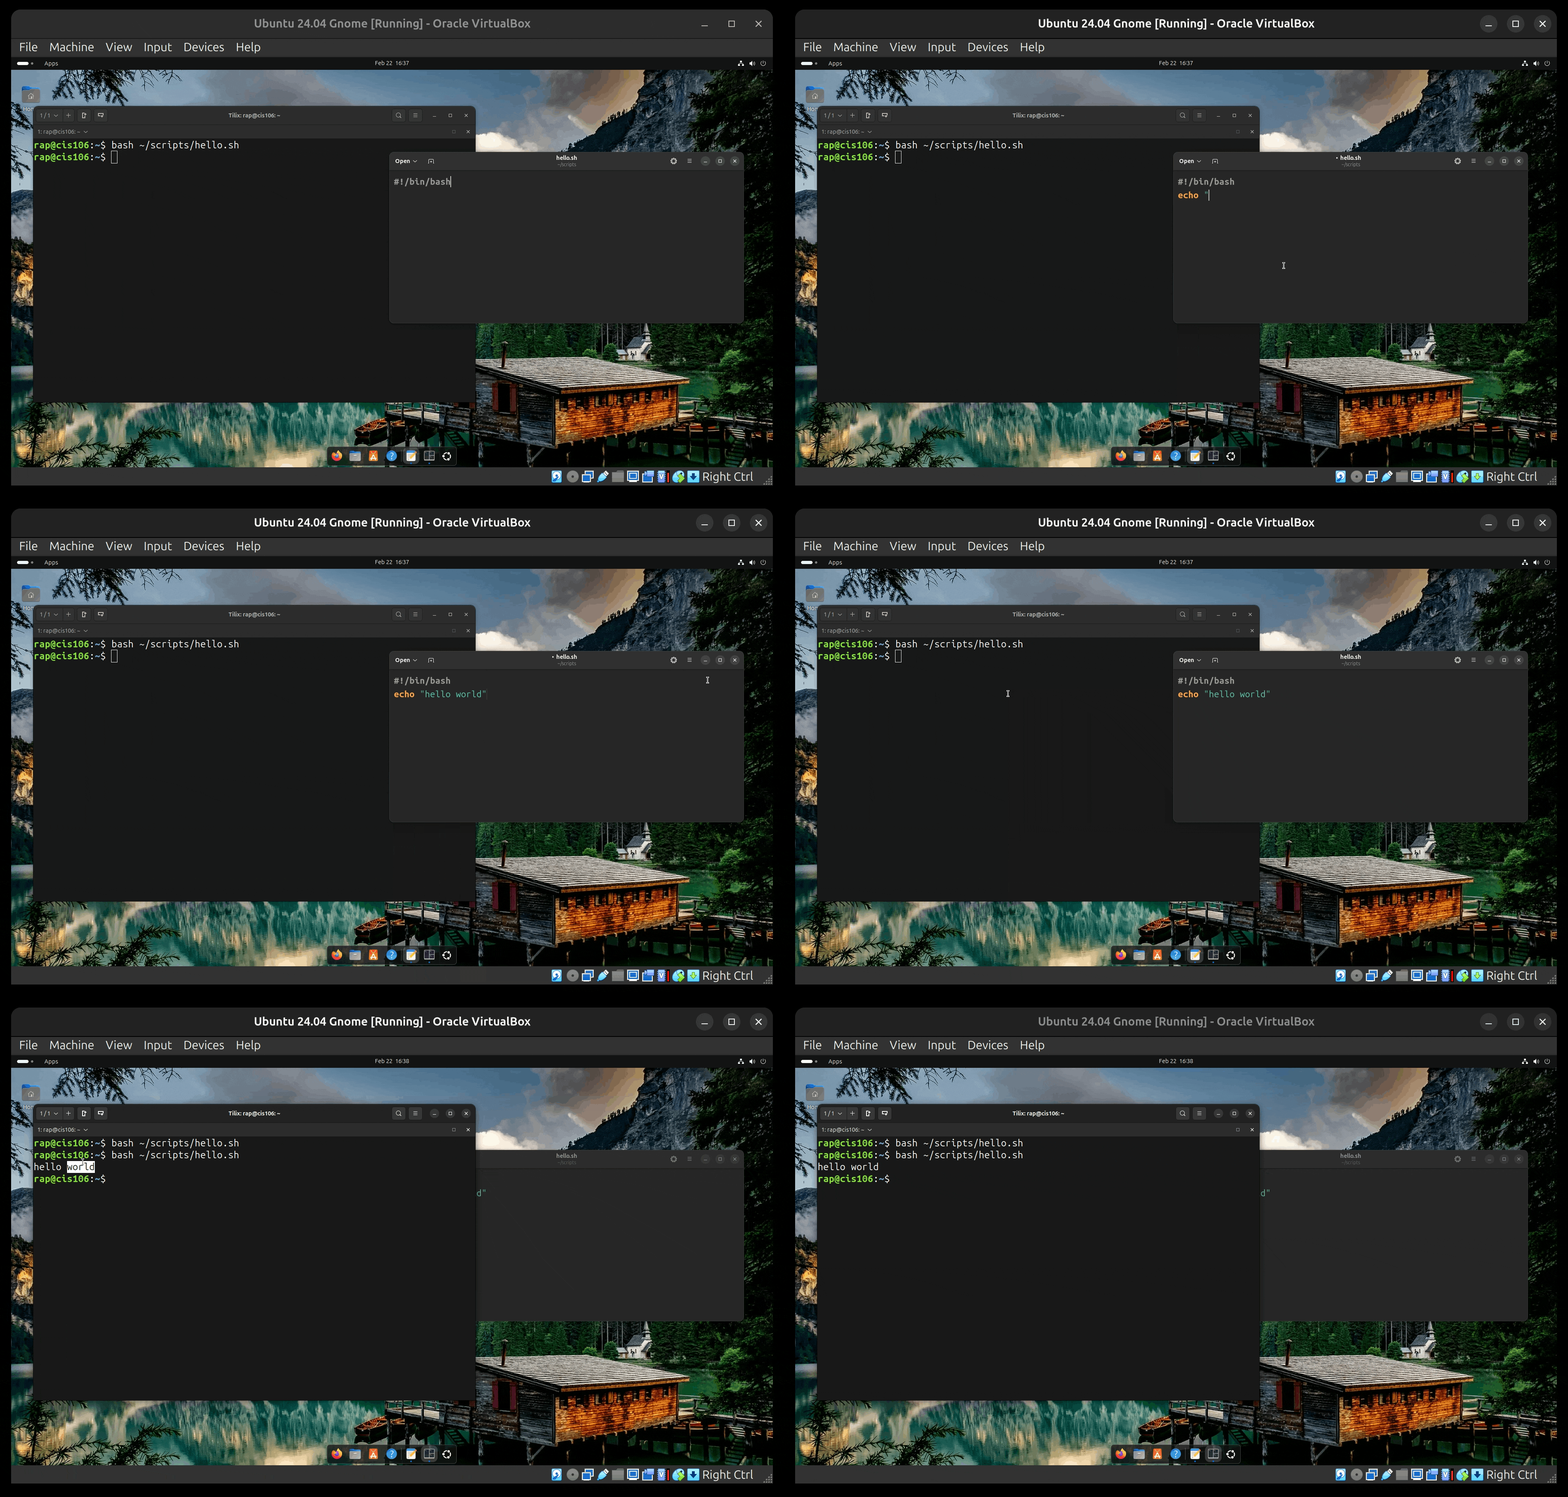
- Notice that when you ran the script, nothing happened. That is because there are no commands inside the script.
- Let’s write some basic commands in the script. Use
echoto print/display a line of text:echo "hello world" - Save and run the script. Notice that the line “hello world” is displayed in the terminal.
Let’s Practice!
You should now be comfortable writing and executing a basic script. However, before we practice, let’s make our environment more comfortable.
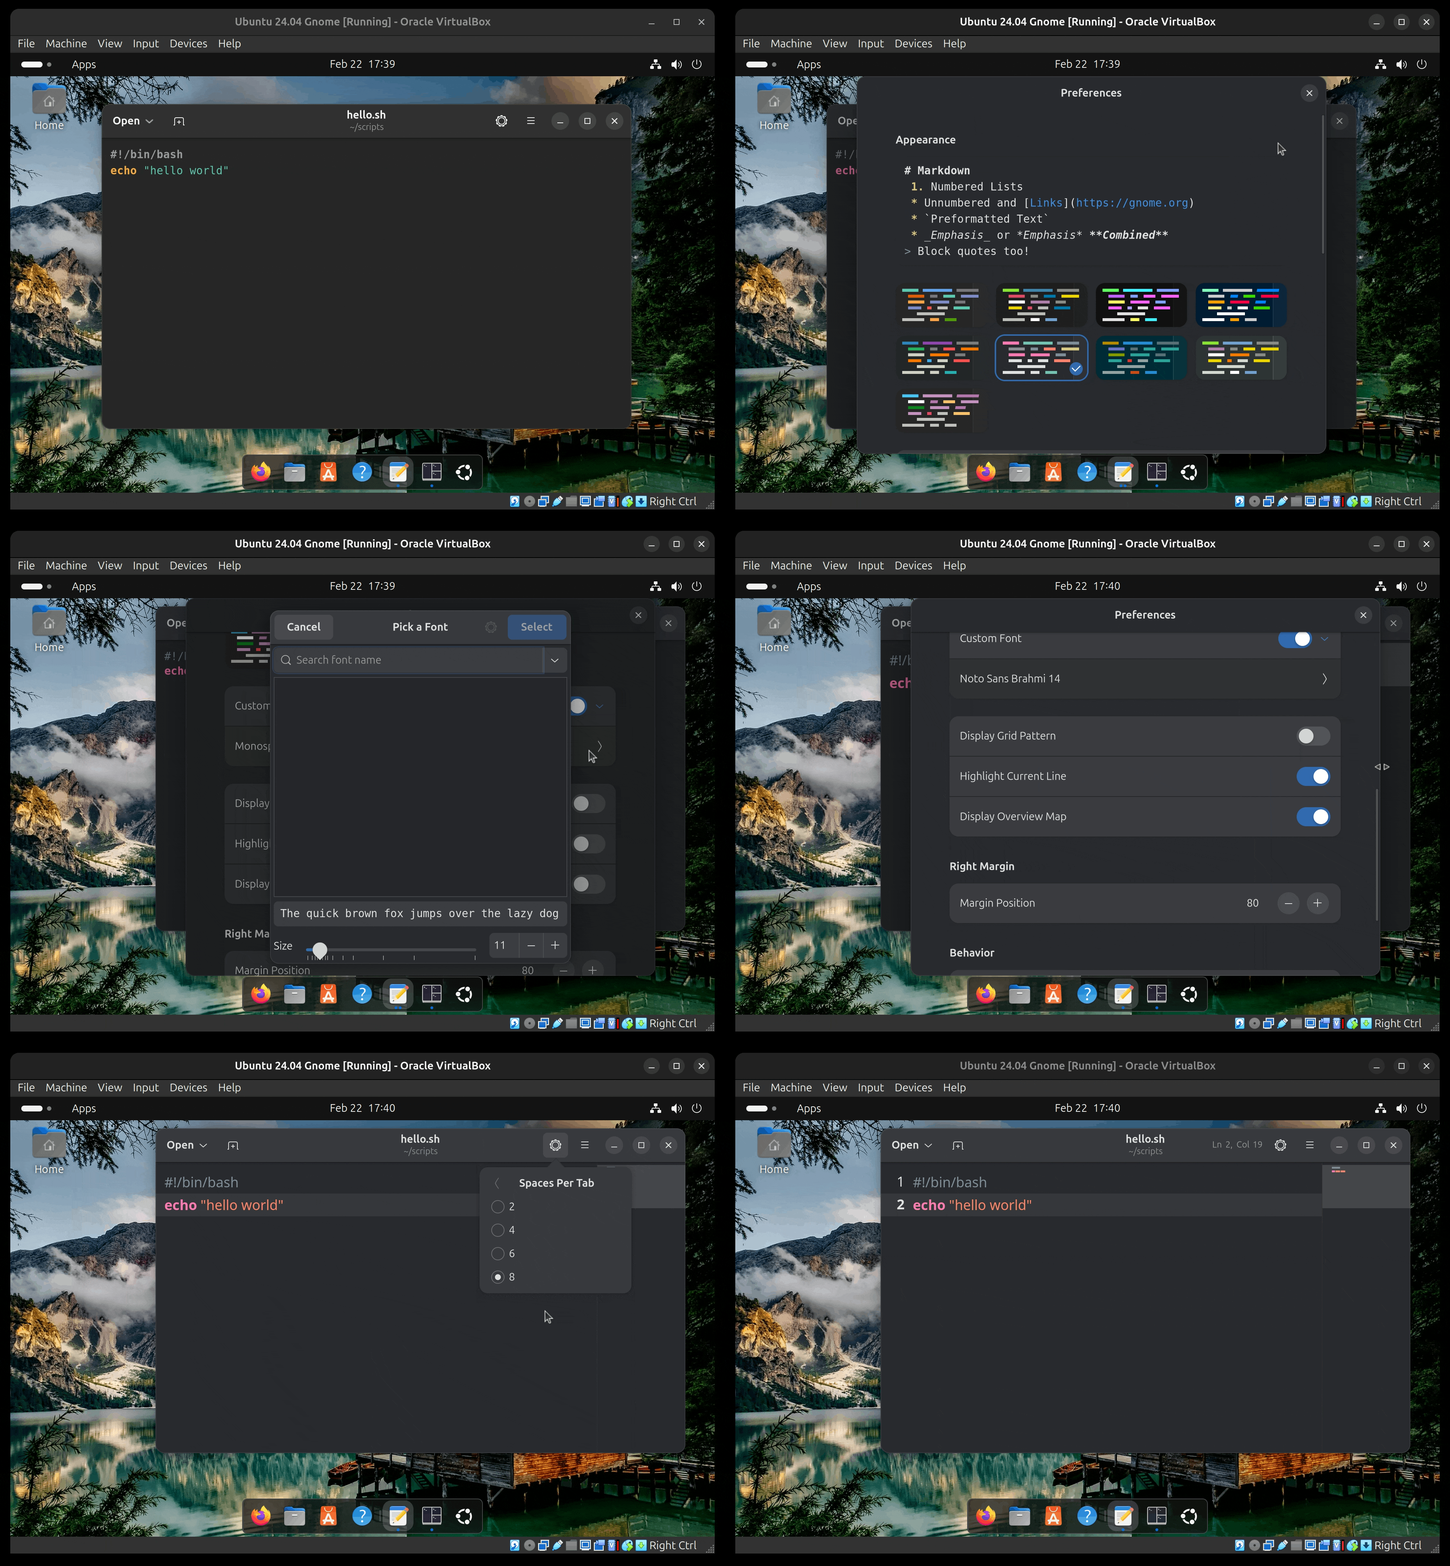
Customize GNOME Text Editor:
- Open the Text Editor Preferences:
- Choose a theme you like
- Enable custom font and increase the size to a size you are more comfortable with
- Enable “Highlight Current Line”
- Enable “Display Overview Map”
- Disable “Restore Session”
- In the Options menu:
- Enable line numbers
- Change the “Spaces per tab” to 4
- Disable “Check Spelling”
Now, let’s place the terminal emulator and text editor side by side. Use the Super key (Windows key) + Right Arrow to snap one window to the right, then select the terminal emulator to snap it to the left. This will allow us to work more efficiently
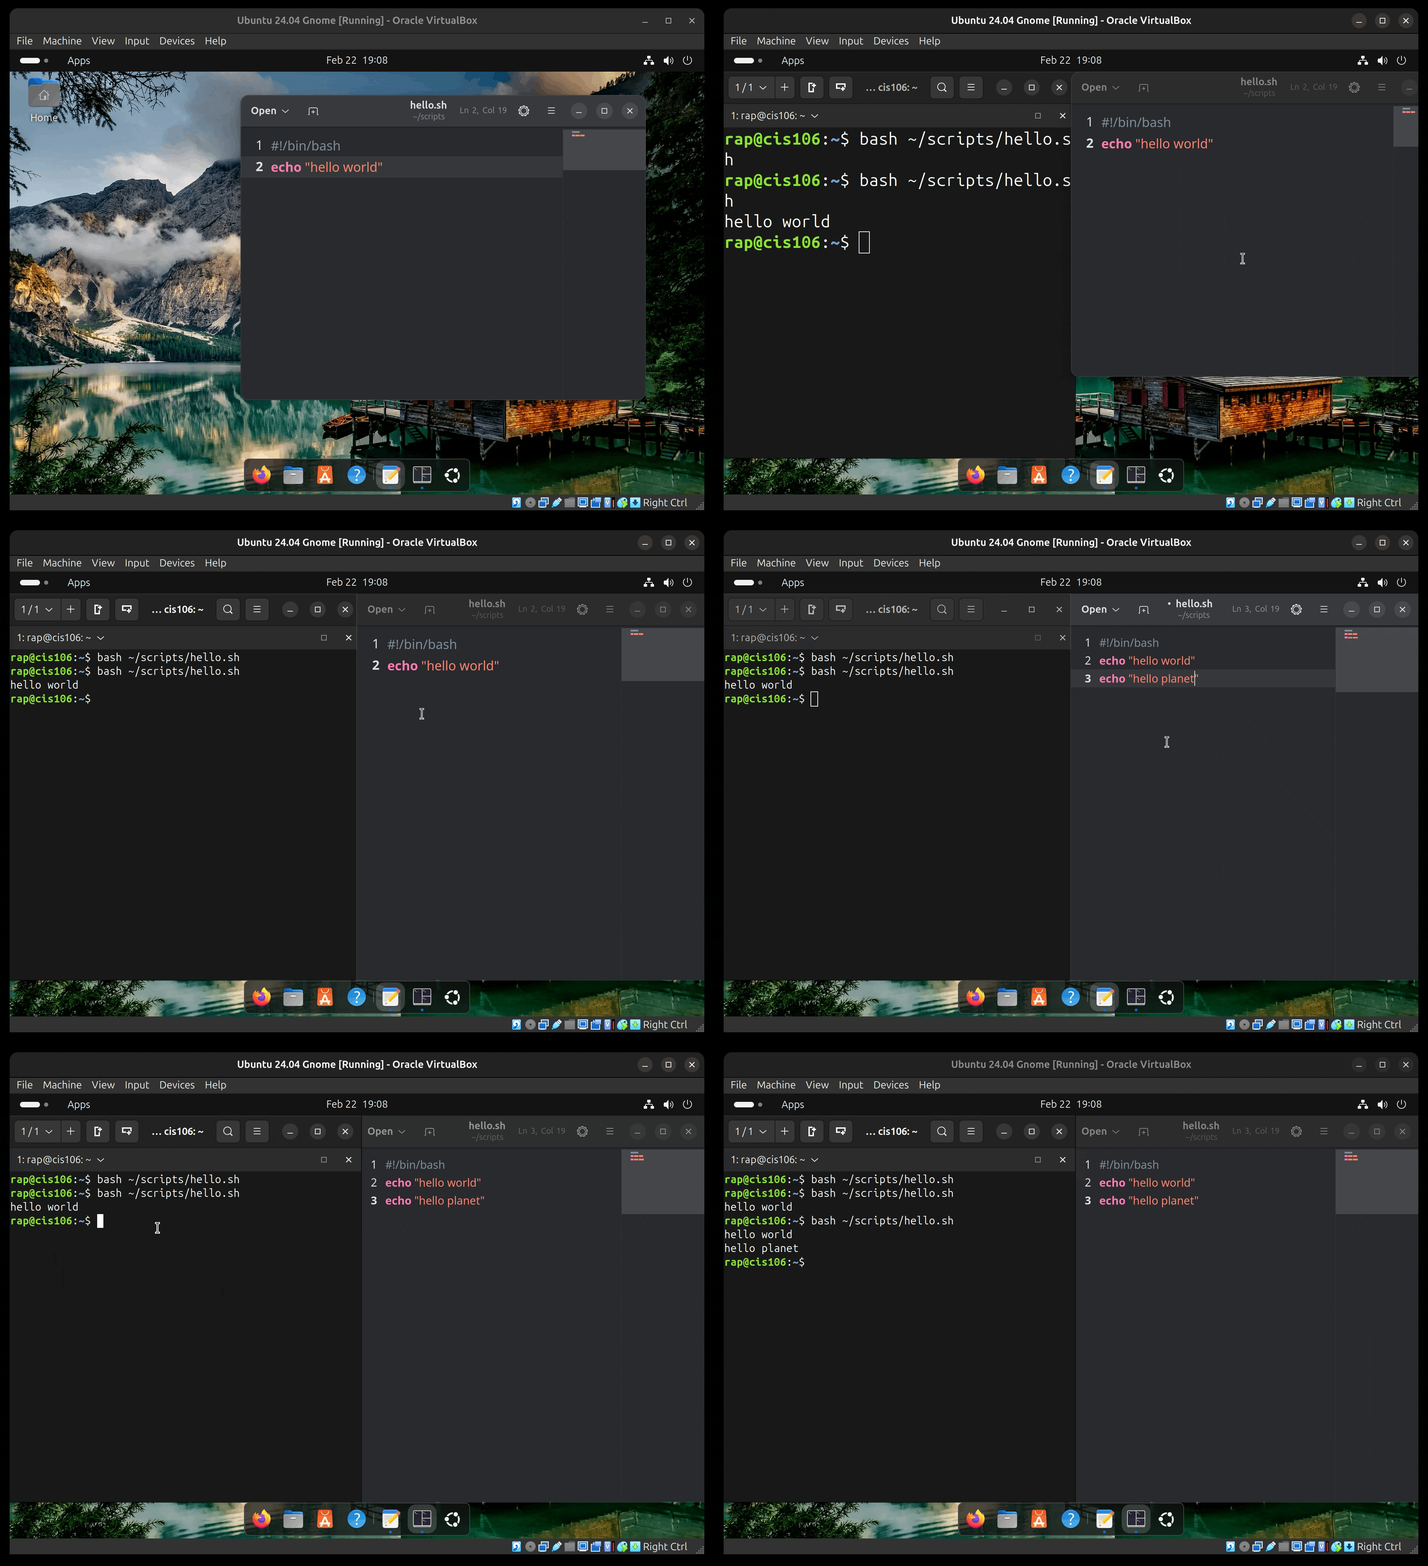
Practice 1: Learning more about echo
The echo command is used to display/print text to the screen. The formula for the command is:
echo+option+"String you want to display"
Where the option can be one of the following:
-n: Do not output a trailing newline.-e: Enable interpretation of backslash escapes. See theechoman page for a list of backslash escapes-E: Disable interpretation of backslash escapes (this is the default behavior)
In a terminal emulator, practice the echo command. You may need to open the man page of echo for reference. To practice echo, complete the following tasks:
- Display a line of text.
- Display a line of text while suppressing the trailing newline
- Display a line of text with a tab at the beginning of the line
- Display multiple lines of text in a single echo command
- Display multiple lines of text in a single command including horizontal and vertical tabs
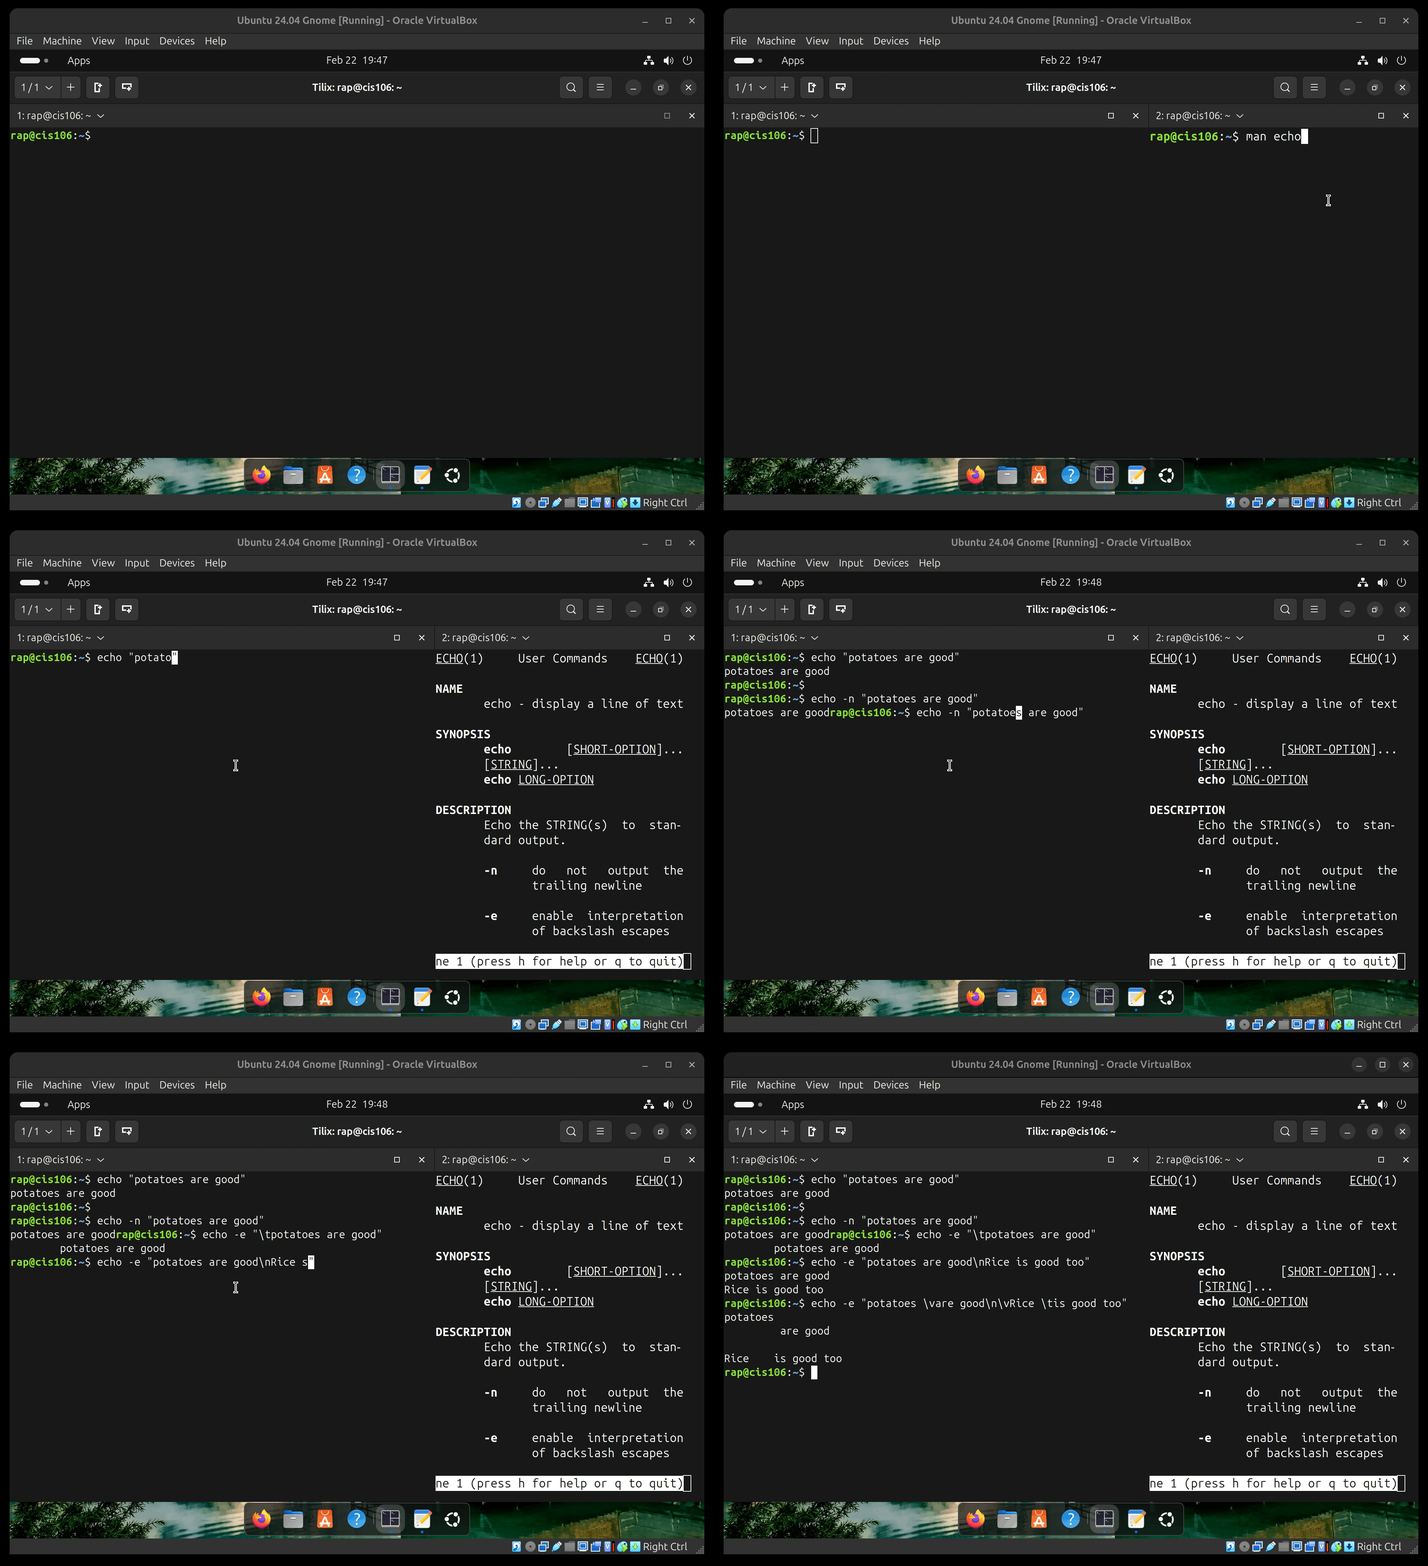
Practice 2: Working with more than just echo
NOTE: At the top of this guide, you have a short description of some basic commands. When needed, use the man command to read the man page of any of those commands |
- Create a shell script named
systemInfo.shand save it in thescriptsdirectory/folder. - This script should output the following information about your system:
- Current date in UTC
- Disk space usage in human-readable format
- Memory/RAM usage in human-readable format
- System hostname (computer name)
- Basic information about the operating system and system architecture
- Make sure that each part is described before it is printed to the screen. This is an example output of your program:

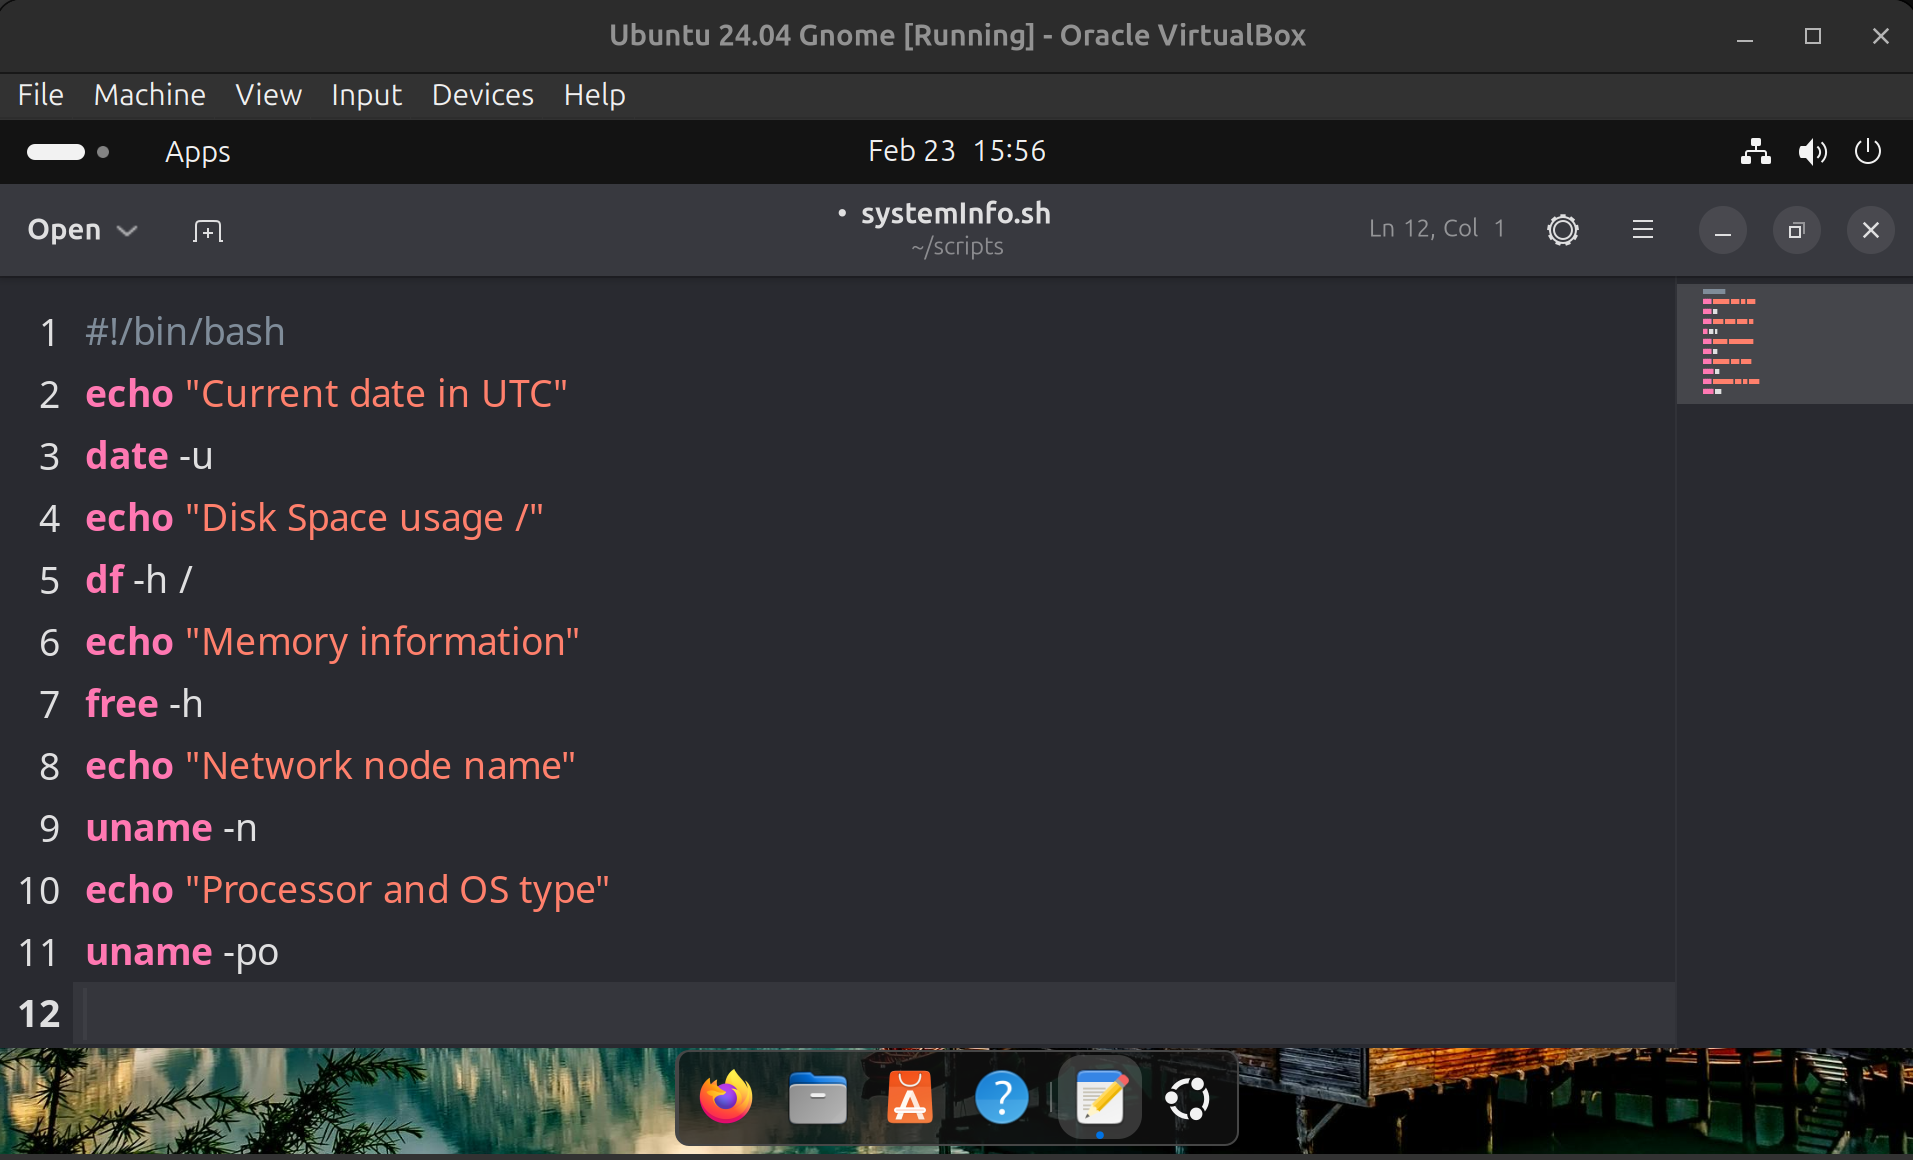
If you are completing this activity for extra credit. Take a screenshot of the output of your script (terminal)
Practice 3: More on Echo!
In this practice, use what you have learned about echo to improve the script’s output.
- Make a copy of
systemInfo.shcalledsystemInfo2.sh - Your goal is to use
echoto make the information more presentable. You may need to move some parts around. - Here are some tips:
echocan insert new empty linesechocan insert tabs within textechocan suppress the newline, allowing the next command’s output to appear on the same line.
- You should review the man page of
echoand practice some of those commands. - This is how the output of your script should look:

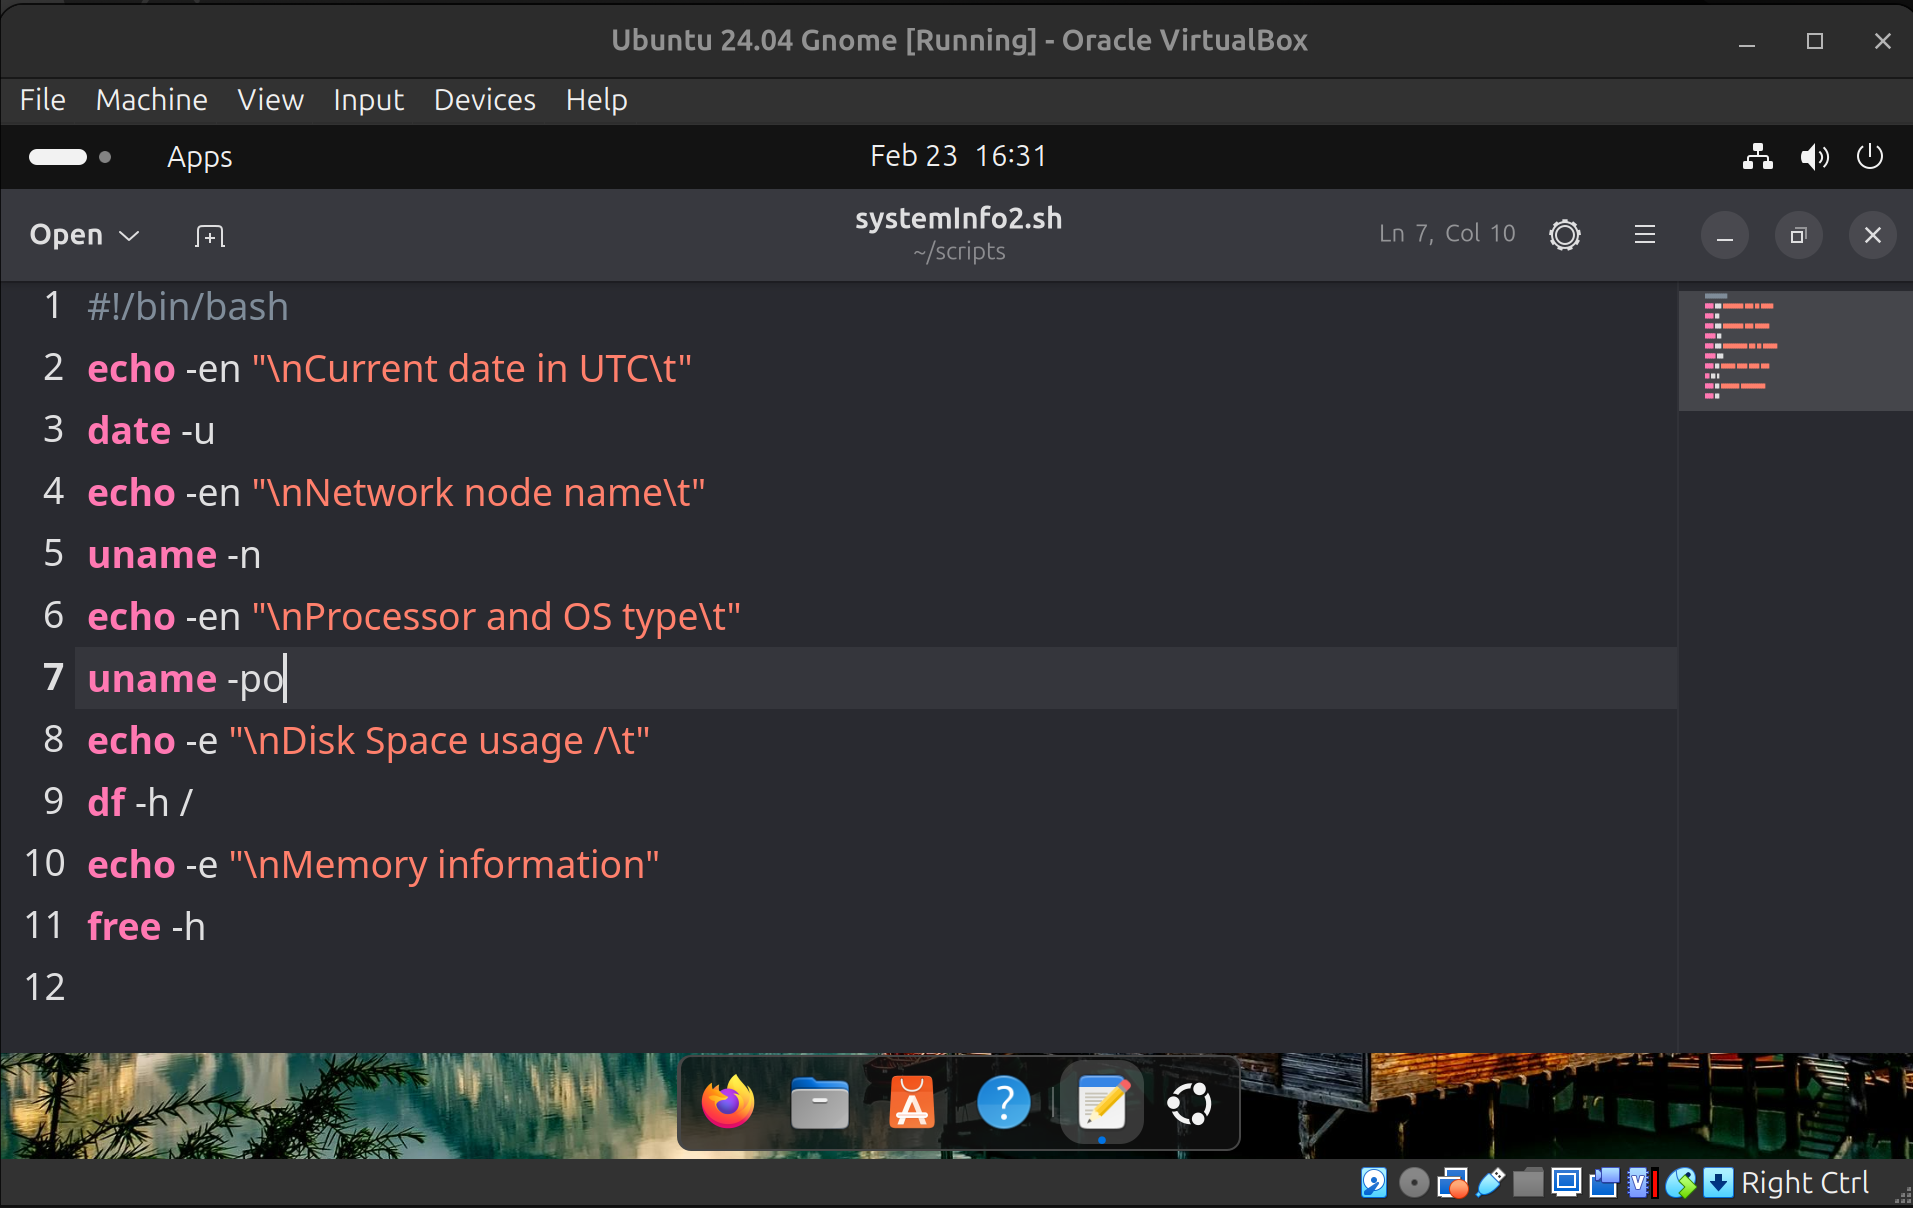
If you are completing this activity for extra credit. Take a screenshot of the output of your script (terminal)
What will you submit for extra credit
If this is your first extra credit assignment, you will need to create the necessary parent directory structure. In your
cis106directory (local repository), create a new directory calledExtraCredit(Use one word with no spaces in directory names.)
- Inside
ExtraCredit, create another directory calledextra4 - Open your
cis106local repository in VS Code - Inside
extra4, create a Markdown file calledextra4.md - Add all the screenshots you took earlier to
extra4.mdusing proper Markdown syntax and label each screenshot using Heading 2 Markdown headings. Save the Markdown file. - Your Markdown document should start with the following Heading 1:
# Extra Credit 4: Shell Scripting - Convert your file to PDF
- Run the following GitHub commands in the VS Code terminal, to push all your changes to GitHub:
git add .git commit -m "Completed Extra 4"git push
- In Blackboard, submit the following:
- The URL of
extra4.md - The PDF file
extra4.pdf
- The URL of