Final Project Deliverable 2 Port Forwarding
Note: This is the hands on tutorial. Read the project description to know what to submit.
Part 1 Virtual Machine
Create a virtual machine that meets the following specifications:
- CPU: 1 Core
- RAM: 1 GB
- HDD: 10 GB
These are the recommended system requirements for Ubuntu Server 22.04. 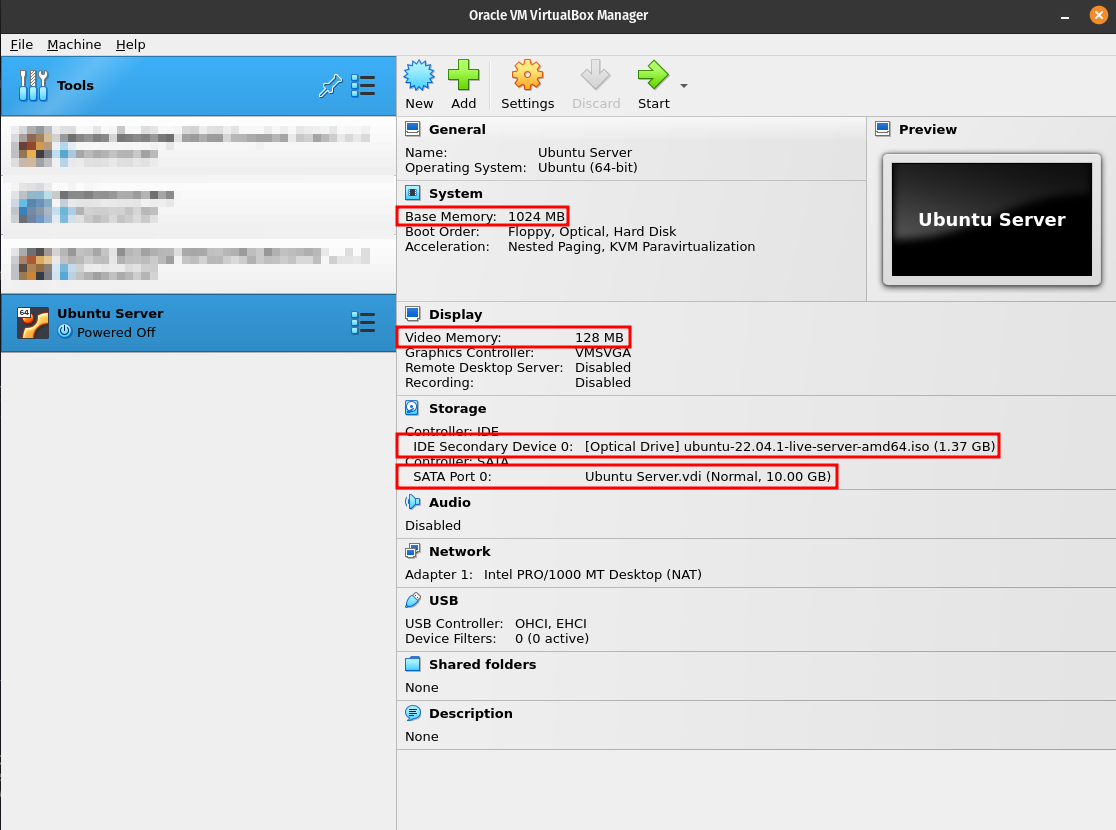
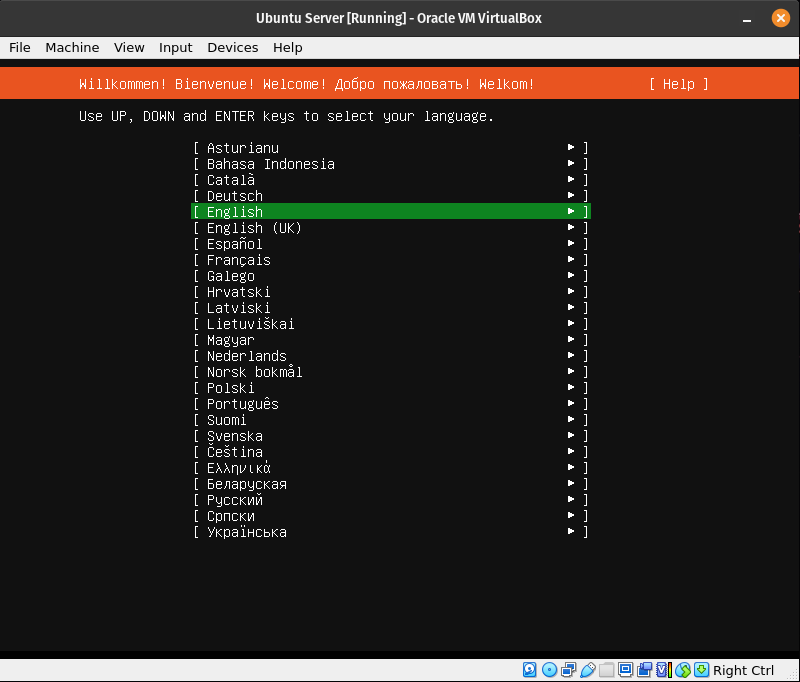
Part 2 Install Ubuntu Server
Step 1
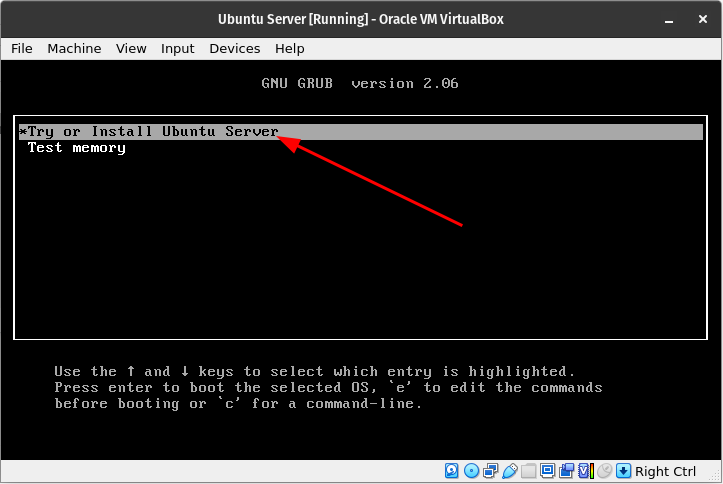
Step 2
Step 3

Select Update to the new installer. This will update the Ubuntu installer and proceed with the installation.
Step 4
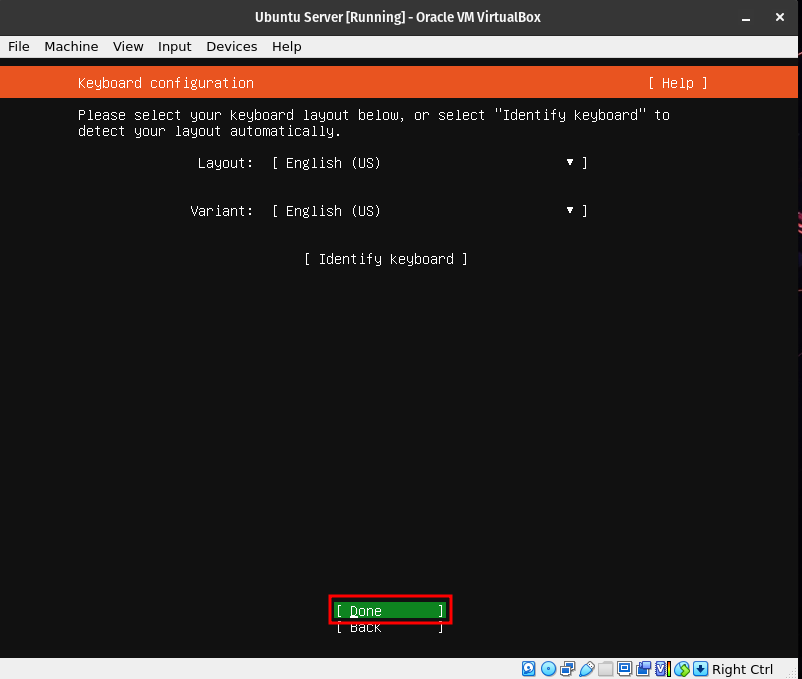 This step will automatically select the language layout of your keyboard. If for whatever reason it is different than what your physical keyboard has, then manually adjust it.
Step 5
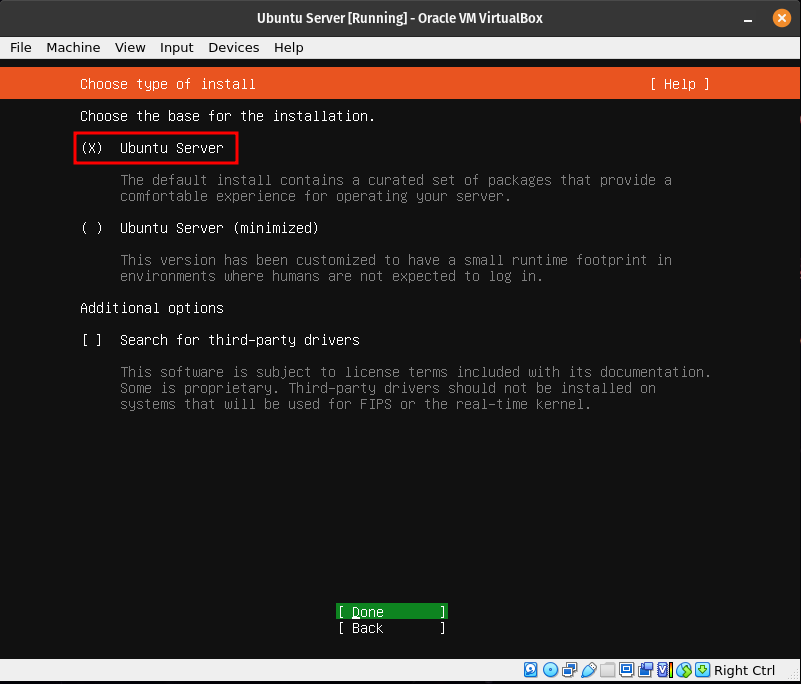
Choose the default Ubuntu Server installation. We will need some of the repositories in the default installation.
Step 6
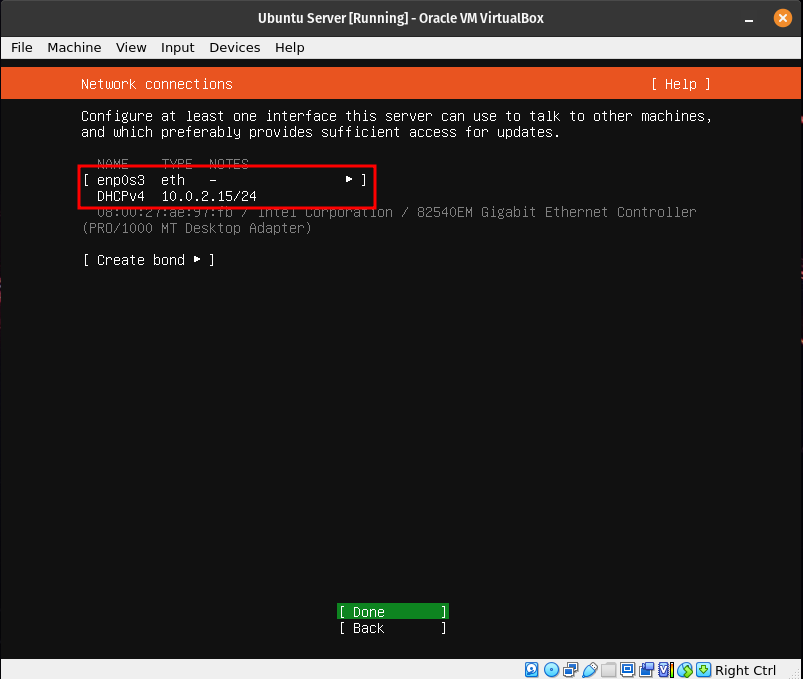
Since we are installing Ubuntu in a virtual machine that at the moment is configured to have a NAT network interface card, as long as your host PC has internet connection, you should automatically get an IP address. If you don’t, something is wrong with your VM, Host Machine, or Internet Connection.
Note: If you are doing this project in the school’s network, be aware that the school’s routers are configured to block Bridged Ethernet adapters.
Step 7
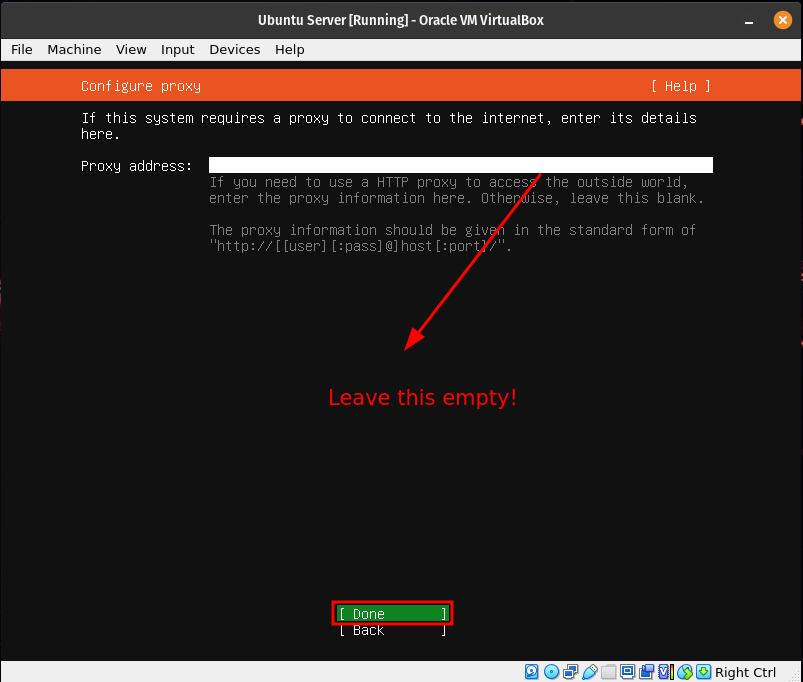
Leave this part empty as we are not using a proxy.Step 8
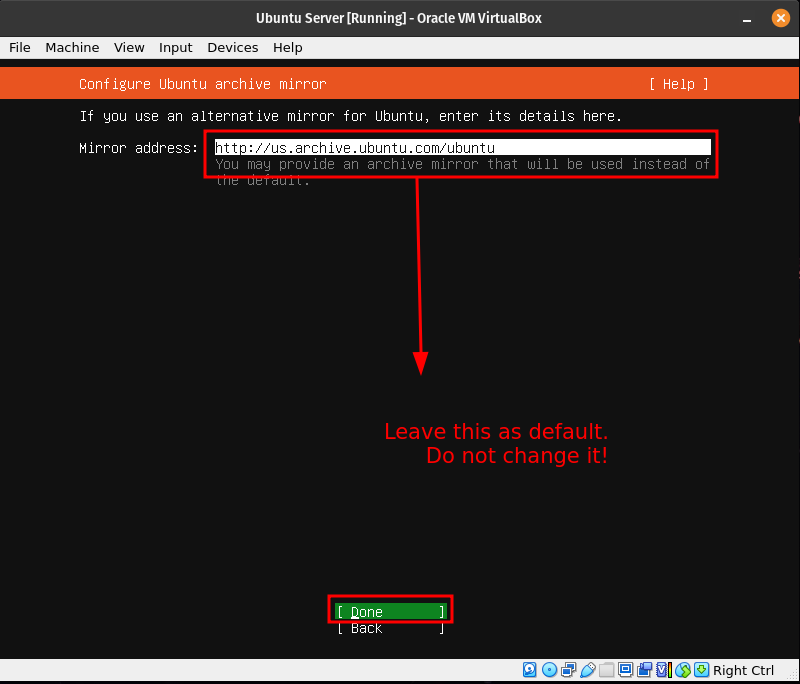
We will use the default mirror so there is no need to change this
Step 9
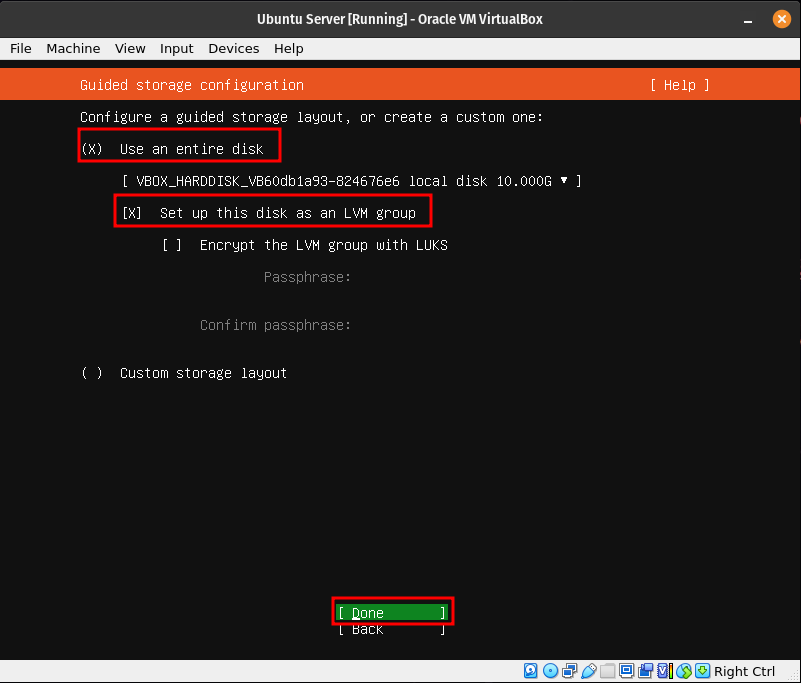
This step is to format our disk. Here we will select the entire disk. To move around here use either the arrow keys or the tab key.
Step 10
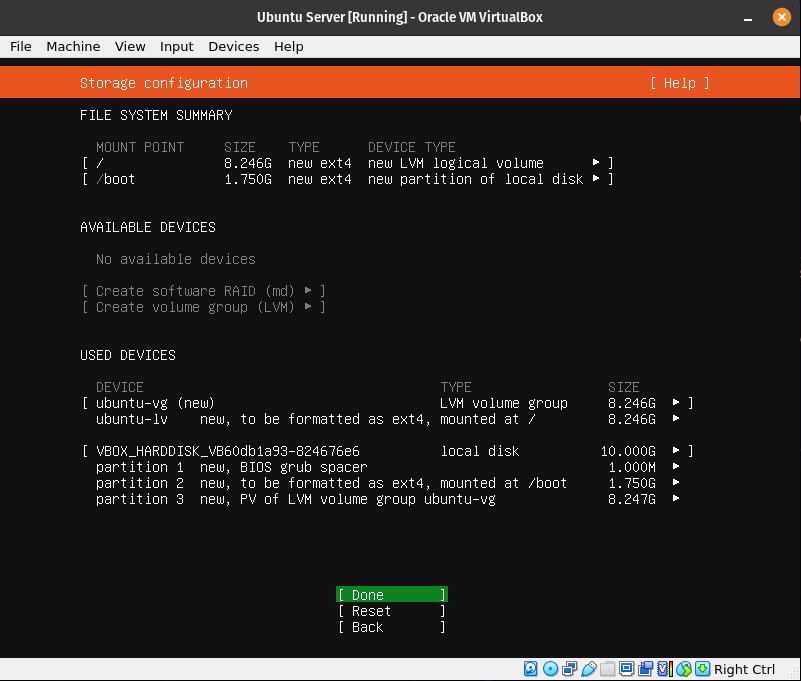
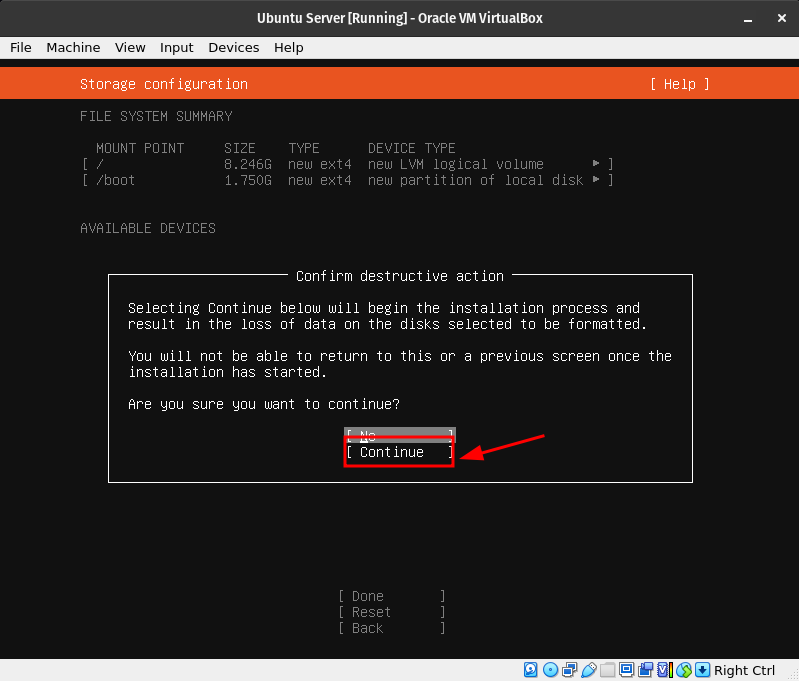
This step is just to let you know the changes that will be made to the server’s virtual hard drive.
Step 11
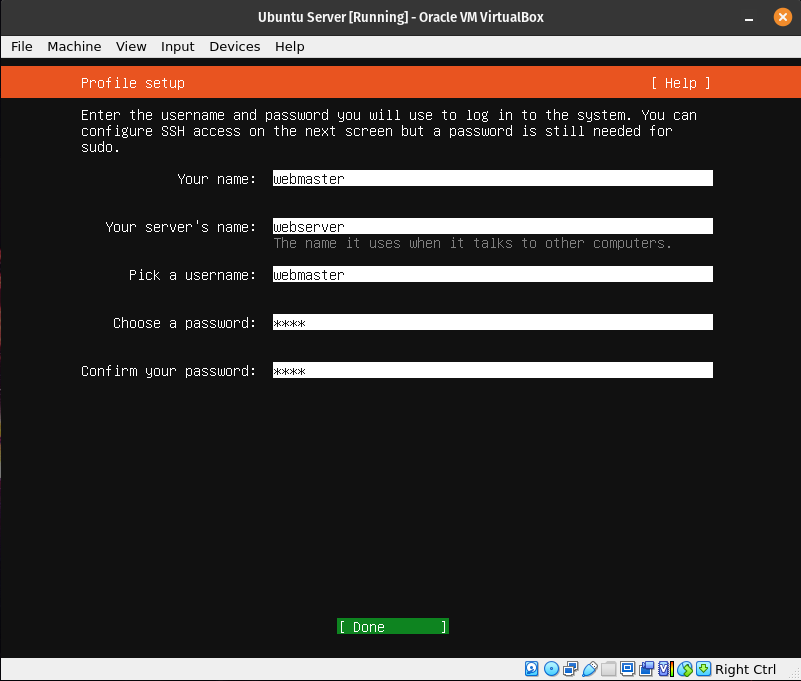
Here you will enter the information about your computer. Write this information down because you will needed it later.
Step 12
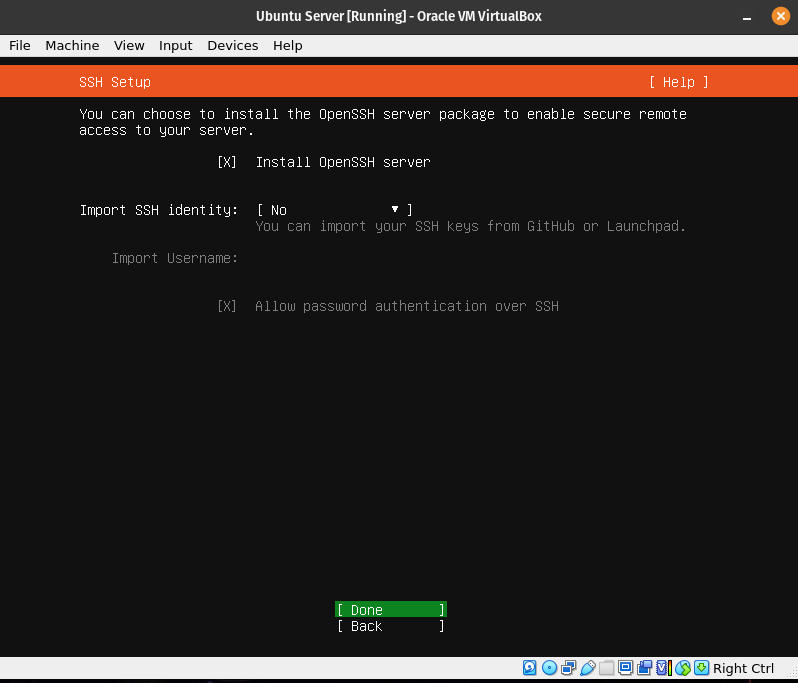
It is a good idea to install ssh now as we will use it later on. Do not import SSH keys. We will do that manually later.
Step 13
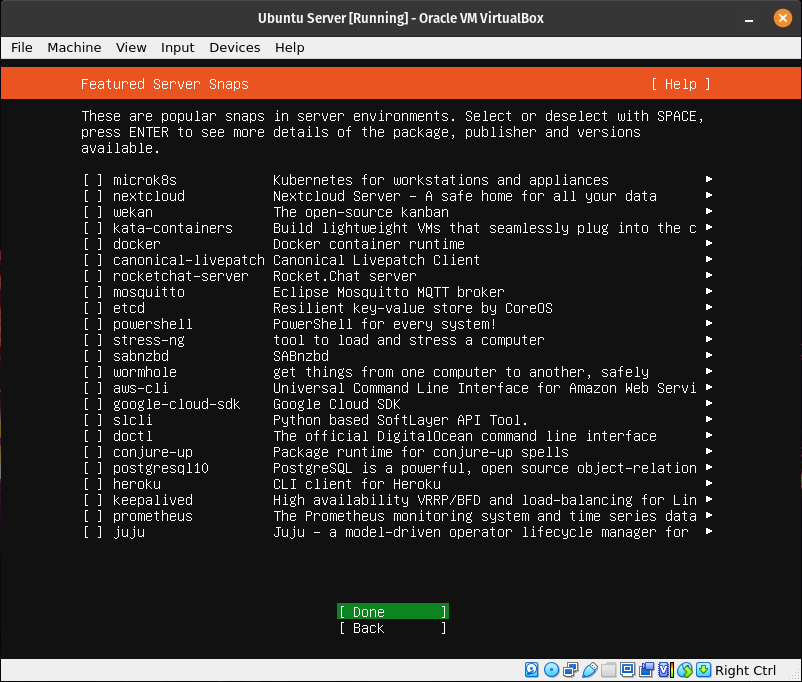
Do not select these services. We won’t be using them.
Step 14
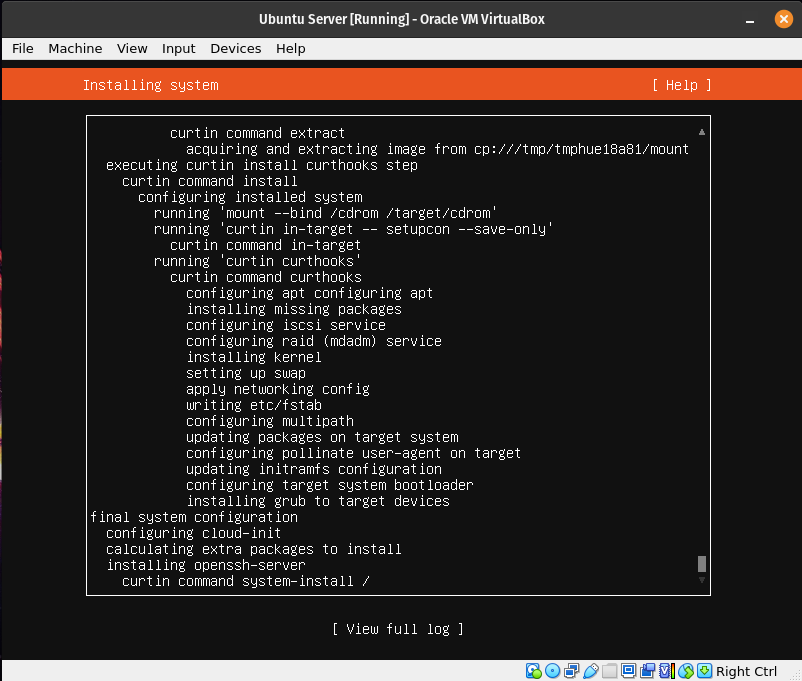
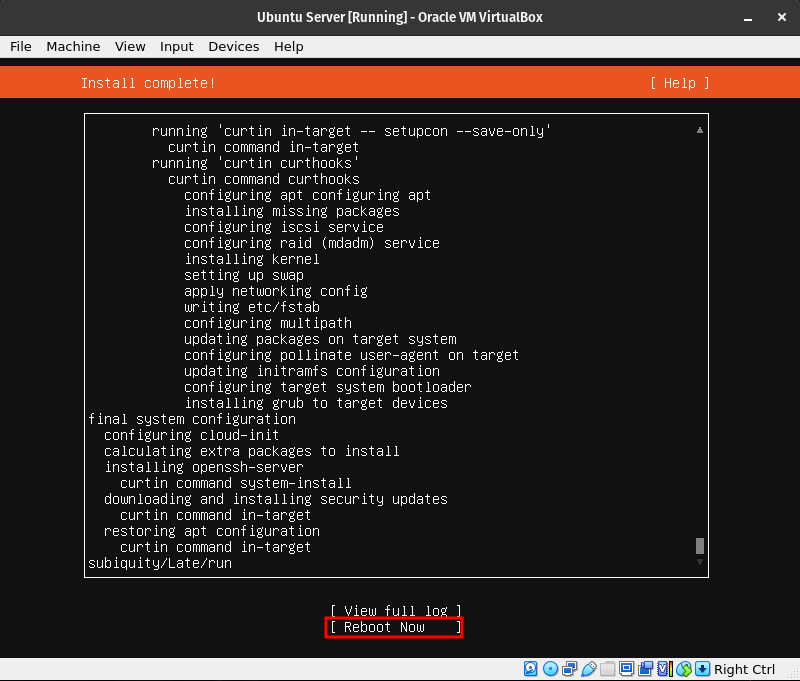
This is the installation process. Once it is done it will start updating the system. Once the update is done, it will ask you to reboot.
Step 15
Step 16
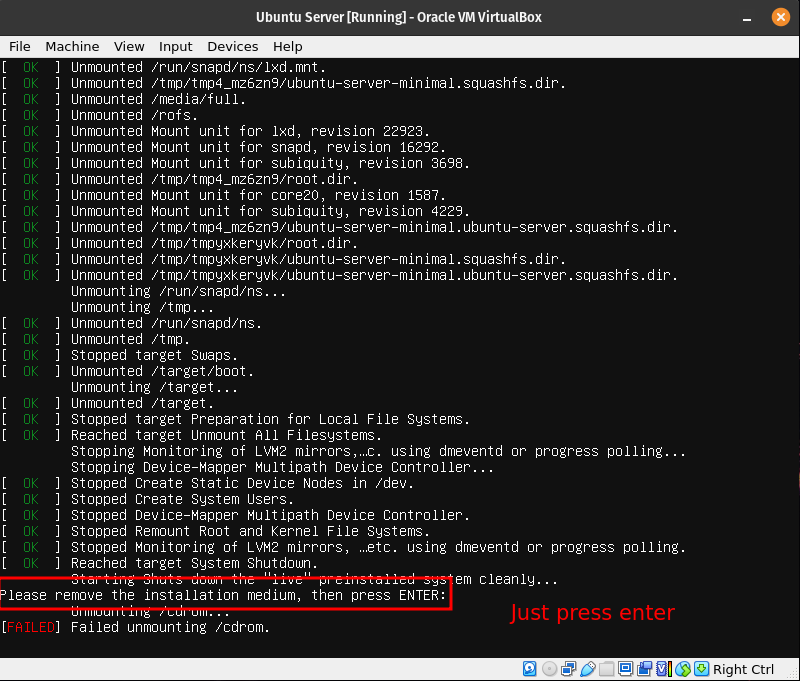
Here Just press enter. Virtualbox will unmount the installation disk for you
Part 3 Install Apache
First, login to the server. You will need to type your username and password. Here is an example: 
Notice that the password is hidden while typing just like when you are typing it in the terminal emulator. Be aware that during the upgrade, Ubuntu will ask you to restart some services.
Apache is available in Ubuntu’s default repositories. However, before we can start installing new packages, let’s update the system:
sudo apt update; sudo apt upgrade -y
To install Apache use:
sudo apt install apache2 -y

Be aware that here you will also need to restart some services here.
Part 4 Setup SSH
Before Setup
Before we can setup SSH, we need to enable the firewall. Use this command:
sudo ufw enable
Now lets configure ufw to allow Apache and SSH traffic:
sudo ufw allow 'Apache'
sudo ufw allow 'OpenSSH'
Now check the status of the firewall:
sudo ufw status

Now lets check the status of Apache and SSH to make sure they are running:
systemctl status apache2 --no-pager
systemctl status ssh --no-pager
Both commands should return active (running) if they do not, restart the services with the command:
sudo systemctl restart apache2 ssh
Setup Port forwarding
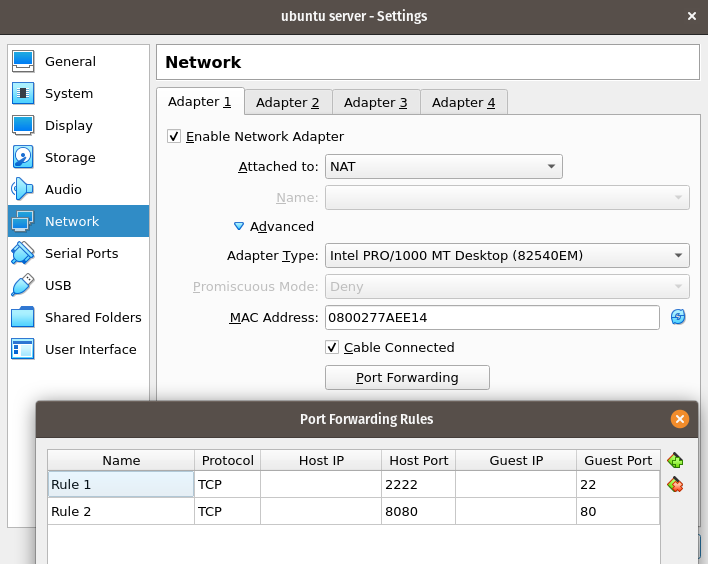
- Turn off the server virtual machine if it is on.
- Go to the network virtual machine configuration for the server. There add port forwarding to the NAT configuration. You will need to forward port 22 to 2222 and port 80 t0 8080. Here is a screenshot:
- Turn on the server. Make sure that the ssh server program is installed in the server virtual machine:
sudo apt install openssh-server -y - Enable and start ssh in the server:
sudo systemctl enable ssh; sudo systemctl start ssh - Test the connection by logging in to the server from the client. In this case, your client is your Host computer terminal application (in Windows, it is the CMD or powershell)
ssh -p 2222 username_of_the_server@127.0.0.1
- Read and answer the questions and you will connect sucessfully.
Part 5 Setup virtual hosts
Virtual host allows us to serve more than one website in a single web server. By default, Apache has one server block enabled. This server block is served from the directory: /var/www/html. For a single website, all the files are placed within this directory. When we setup virtual hosts, each site has its own directory. The recommendation is to leave the default html directory and for each site a new directory inside /var/www. In this project, we will have one virtual site called myresume. You are welcome to use a different name just remember to adjust every command where the word myresume is reference for your preferred website domain name.
Follow These Steps
- Create the directory for
myresumeas follows:sudo mkdir /var/www/myresume - Modify the ownership of
myresumeso that it is now owned by your user instead of rootsudo chown -R $USER:$USER /var/www/myresume - Now let’s change the file permission so that the owner can read, write, and execute the files while granting only read and execute permissions to groups and others:
sudo chmod -R 755 /var/www/myresume - Now lets create a simple html document to be served from our new virtual host. Create a document with the nano text editor called
index.htmlin the/var/www/myresume/directory:sudo nano /var/www/myresume/index.html. - Once the new document opens, type the following text:
<html>
    <head>
        <title>My Resume Website</title>
    </head>
    <body>
        <h1>This is a sample document!</h1>
    </body>
</html>
- Save and close the file when you are finished. You can do this by pressing
CTRL + X, thenYandENTER.
NOTE: If you don’t want to use Nano, you can also do this in a single command
sudo echo "<html><head><title>My Resume Website</title></head><body><h1>This is a sample document!</h1></body></html>" > /var/www/myresume.index.html
- Now we need to create a virtual host file so that this new content can be served. The default configuration is located in
/etc/apache2/sites-available/000-default.confHowever, we do not need to touch this file, we can instead create a new one as it is best practice. To create a new config file, we are going to use nano again:sudo nano /etc/apache2/sites-available/myresume.conf - Add the following text to the domain config file:
<VirtualHost *:80>
    ServerAdmin webmaster@localhost
    ServerName myresume
    ServerAlias www.myresume
    DocumentRoot /var/www/myresume
    ErrorLog ${APACHE_LOG_DIR}/error.log
    CustomLog ${APACHE_LOG_DIR}/access.log combined
</VirtualHost>
- Save and close the file when you are finished. You can do this by pressing
CTRL + X, thenYandENTER. - Now enable the site with the following command:
sudo a2ensite myresume.conf - Now lets disable the default domain:
sudo a2dissite 000-default.conf - Before we can refresh the configuration, we need to add a configuration line to the
apache2.conffile. Open the file in nano:sudo nano /etc/apache2/apache2.conf - Add the following line at the end of the file:
ServerName 127.0.0.1 - Save and close the file when you are finished. You can do this by pressing
CTRL + X, thenYandENTER. - Now you can test the configuration for errors:
sudo apache2ctl configtest - The output of the command should look like this:
Syntax OK
- If there are no errors, restart Apache to apply the changes:
sudo systemctl restart apache2
- Now, if you open a web browser in your host computer and go the URL:
http://localhost:8080/yourindex.htmldocument should load.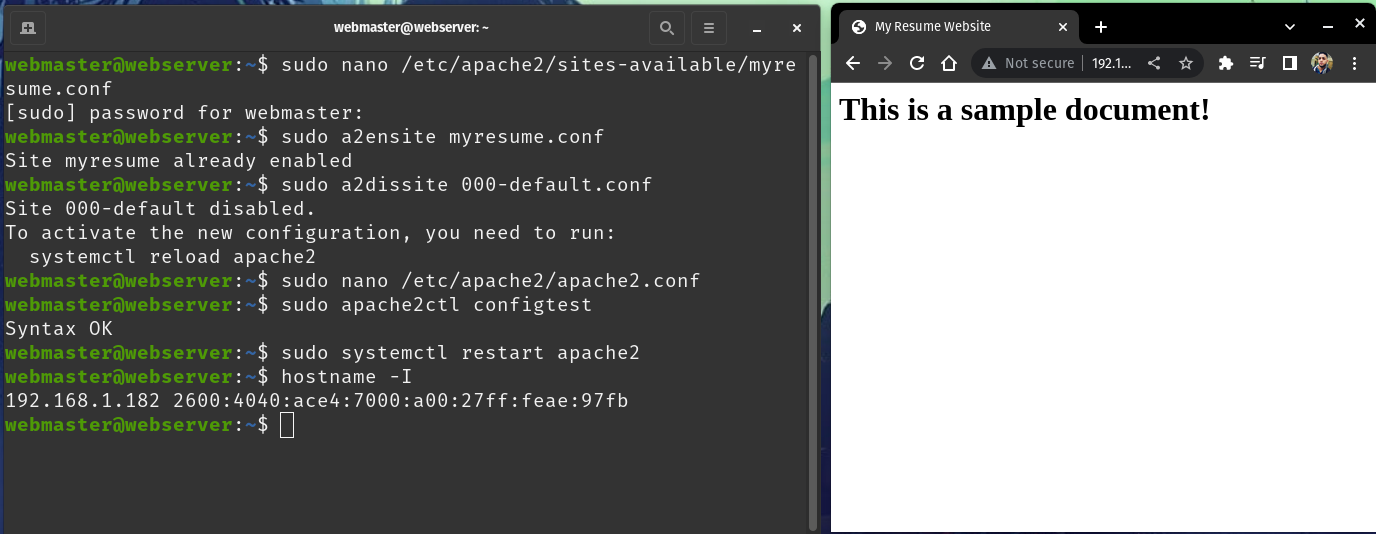
Note: This is the hands on tutorial. Read the project description to know what to submit.