Lab 6 - Managing files and directories
Learning outcomes
- How to work with files and directories in the command line (Creating, deleting, moving and copying files & directories)
Reference
| Command | Purpose | Example |
|---|---|---|
mkdir | makes directories | mkdir old_movies |
touch | creates empty files | touch old_movies/list.txt |
rm | removes files | rm old_movies/list.txt |
rm -r | removes files and directories | rm -r old_movies |
rmdir | removes empty directories | rmdir dir_name |
Question 1
To review the commands, complete the practice exercises from the presentation.
Take a screenshot of your terminal at the end of every practice.
Challenge Question 1
Rudy needs your help organizing his project directory. You will clone the repository and then use the commands you learned in the lecture to organize the repository.
This is how the final result must look like: 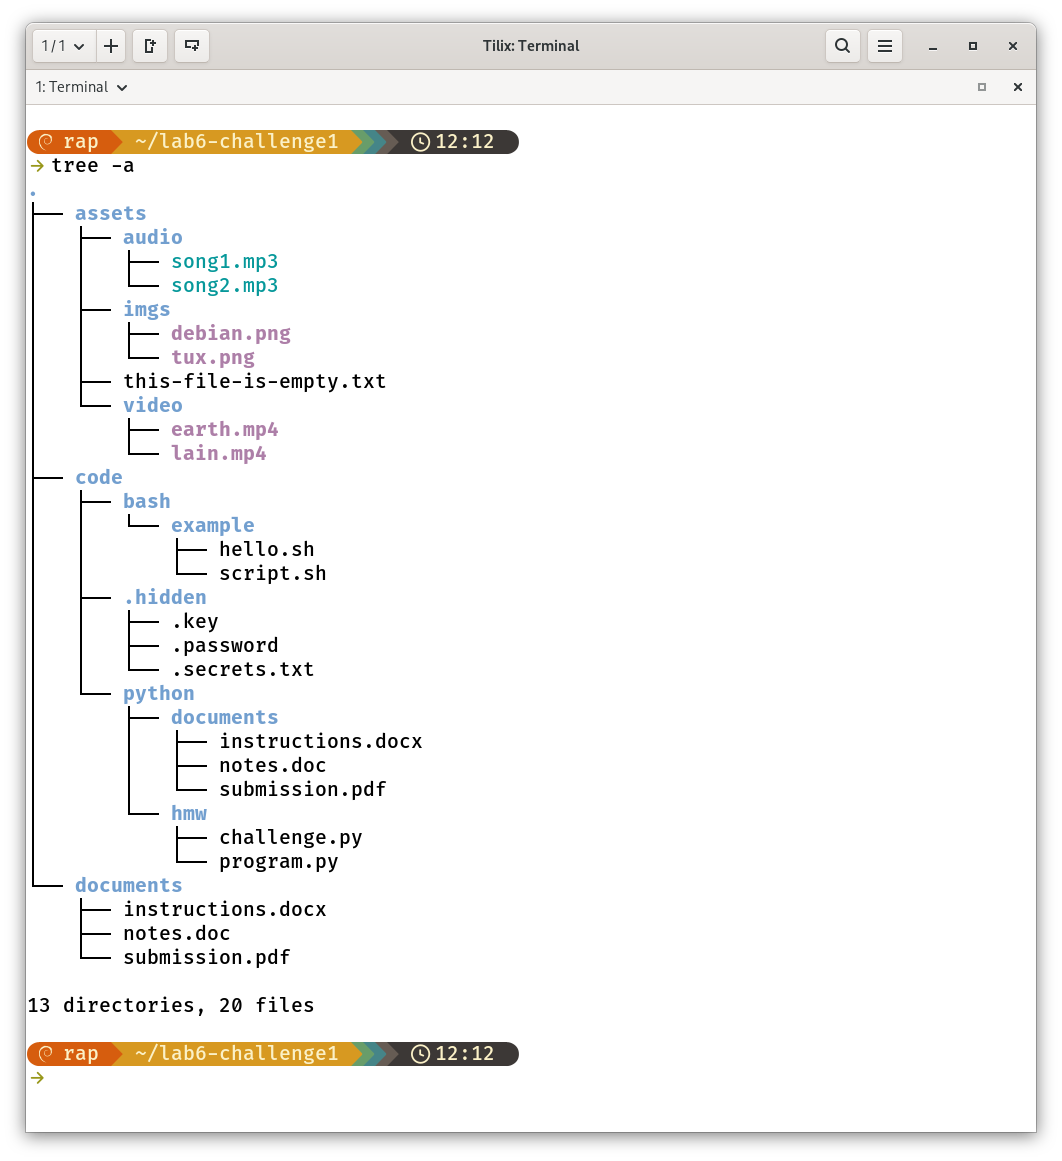
This is the repository you need to clone. Please clone the repository in your home directory. After you finish this lab, the directory can be deleted.
https://github.com/linuxworkshop67/lab6-challenge1
This is the command you can use to clone the repository: git clone repository/url/here.
Ex: git clone https://github.com/linuxworkshop67/project1
Tips:
- You will need
sudoto remove the hidden.gitdirectory. - You will need to work with multiple terminals open to view your progress
- You will use
mkdir,cp,mv,rm, andtouch
Deliverable for challenge question 1
- Take a screenshot of the terminal showing all the commands you used to organized the directory:
lab6-challenge1. - Take a screenshot of the output of
tree -a ~/lab6-challenge1. Your output should be identical to mine.
Challenge Question 2
Problem Description:
Joe is working on a web development assignment. The goal is to create a slide show that can show different images when the user clicks the next and previous button. He has sent you the code that makes the website. Your job is to test it to make sure it works.
Here is the repository that contains the index.html file Joe created.
https://github.com/linuxworkshop67/lab6-challenge2
Here are the steps to complete this challenge:
- Clone the repository in your home directory. That will create the
~/lab6-challenge2. That containsindex.html. There is no need to edit this file. If you open the site, you will notice that the site is just a black screen. That is because the directorylab6-challenge2is missing 3 image files that you need to test it. - Download 3 images from Pexels.com. Make sure the images are horizontal and the file format is jpg
- Rename and move the images using the following naming convention. You have to rename and move using 1 command. This part should take 3 commands because there are only 3 files.
- old_name1.jpg -> img1.jpg
- old_name2.jpg -> img2.jpg
- old_name3.jpg -> img3.jpg
-
List the
~/lab6-challenge2directory. It should look like this:
- Open the
index.htmlfile in firefox and take a screenshot. Test the slideshow by clicking the next and previous buttons. The images you downloaded should be shown there.
Deliverable for challenge question 2
- Take a screenshot of the commands you used to answer this question
- Take 3 screenshots of Firefox showing the index.html file open.
- Alternatively, you can just record a gif of navigating the images using this tool: gifcap
What will you submit:.
- Place and properly label (using headings) all the screenshots
- Convert the file to pdf
- Push everything to github
- In Blackboard, submit the pdf file
lab5.pdf
How I will grade you:
- Question 1: 50 pts
- Question 2: 25 pts
- Question 3: 25 pts
Special Note 1 - Practice navigating the file system
- Focus on the steps you took to answer the challenge questions. You will have 1 question in the final that requires the same workflow.
Special Note 2 - Git Command Quick Reference
You’ll be using Git frequently this semester. Here’s a quick reminder of the most common commands:
| Command | Purpose |
|---|---|
git clone repository/url/here | Download a GitHub repository to your computer. |
git pull | Synchronize your local repository with the latest changes from GitHub. Always run this before starting work in VS Code. |
git add . | Track all changes made to your files. |
git commit -m "description here" | Save a snapshot of your tracked changes with a short description. |
git push | Send your committed changes to GitHub. |
Command Order:
git pull
git add .
git commit -m "message"
git push
⚠️ Warning: ⚠️
Avoid making changes directly in the GitHub website unless you:
- Know exactly what you are doing, and
- Remember to run git pull before working locally.
Special Note Regarding the Final Exam
- The final exam will be in person.
- It is performance-based and requires access to a Linux Virtual Machine.
- If you do not have a laptop/computer you can bring to school:
- A Linux workstation will be available on campus.
- Request it early—available computers are limited.