Lab 4 - Software Installation and Shell Scripting
- Lab 4 - Software Installation and Shell Scripting
Video
Learning outcomes
- How to search, install, and remove software using APT
- How to create and run a basic shell script
Question 1: Using APT
General formula of the apt command:
- (
sudowhen installing/removing)apt+apt commandpackage name(s) - Available apt commands:
- search
- install
- remove
- purge
- show
- clean
- See
man aptandman apt-getfor a comprehensive list
Searching for packages
- Open Tilix (terminal application) and search for a tetris clone using the search string
"tetris clone". The command should return 3 packages:bastet, ltris, tint - Now, use the search string
"tetris"to search for all packages related totetris - Repeat the previews search but this time use packages name only. Use the command:
apt search --names-only "tetris". Notice that this command only returned packages whose name include the word tetris - Take a screenshot of your terminal. Name your screenshot
q1.1.pngand place it in yourlab4/directory/folder
So Whats the difference?
apt search "tetris"searches for the pattern “tetris” in both package names and their descriptions (and other searchable metadata).apt search --names-only "tetris"restricts the search so that “tetris” is matched only in the package names, not in descriptions. There is a caveat: in some versions,--names-onlyalso matches the Provides (virtual package) fields.
Installing packages
- Install the packages
bastetandblockattack - Split Tilix in 2 and show the package information for both packages. Compare the output of each command. Press letter
qwhen you are done reading. - Install the package
blockout2,cuyoand remove the packageblockattack.
Use the command:sudo apt install blockout2+ cuyo+ blockattack- - Take a screenshot of your terminal. Name your screenshot
q1.2.pngand place it in yourlab4/directory/folder
So what’s up with those + and - signs?
APT can install and remove applications in a single command. Simply mark the packages you want to install with a+sign and those you want to remove with a-
Removing packages
- Remove the package
cuyo - Purge the package
cuyo - Take a screenshot of your terminal. Name your screenshot
q1.3.pngand place it in yourlab4/directory/folder
So what was the difference?
sudo apt remove cuyo:
- Removes the package’s installed files (binaries, libraries, etc.).
- Retains system-wide configuration files in
/etcand any user-specific config files under$HOME.- Reinstalling the same package later will reuse those retained configuration files.
sudo apt purge cuyo:
- Performs the same removal, plus deletes all system-wide configuration files.
- Equivalent to
apt remove --purge cuyo.- Leaves only user-specific files under
$HOME. It is important to remember that purging a package does not remove user level configurations under$HOMEthat means that we must delete those manually whenever that applies.
Cleaning the system
For cleaning the system we use the following commands:
| Command | Function | Removes Packages | Removes Config Files | Affects Cache | Notes |
|---|---|---|---|---|---|
sudo apt clean | Deletes all .deb files from /var/cache/apt/archives/ | No | No | Yes | Clears the entire local package cache (both used and unused files). |
sudo apt autoclean | Deletes only obsolete .deb files (no longer available for download) | No | No | Yes | Keeps cache clean without wiping current packages. |
sudo apt autoremove | Removes packages installed automatically as dependencies but no longer needed | Yes | No | No | Safe cleanup of unused dependencies. |
sudo apt autopurge | Combines autoremove and purge | Yes | Yes | No | Removes unused dependencies and purges their config files. |
If you want to clean your system, you can use the following 1-liner:
sudo apt clean && sudo apt autoclean && sudo apt autoremove && sudo apt autopurge
- Take a screenshot of your terminal. Name your screenshot
q1.4.pngand place it in yourlab4/directory/folder
Question 2 - Shell Scripting - Part 1
Creating a shell script
A shell script is just a plaintext file that contains commands that the shell will execute line by line. Therefore, to create a shell script, all you need is a text editor. In your virtual machine, you have 3 text editors installed:
- Gnome Text
- Geany
- Vs Code
Since we will be creating simple shell scripts, you can use Gnome Text or Geany. Please try not to use VS Code for scripting. If you prefer a simpler/cleaner interface, use Gnome Text. If you want a light yet powerful editor, use Geany. I will be using Gnome Text for the most part.
- Open Gnome Text (text editor)
- Save the file as:
lab4-script1.shin thescripts/directory/folder located in your home directory/folder. If you do not have the directory, make it. - The first line of your script is the shebang or shell declaration:
#!/bin/bash
You may also find it written like this:
#!/usr/bin/env bash
For the sake of this exercise, we will stick to:#!/bin/bash. - Save your file.
- Currently, you have a script that does nothing. Let’s execute:
- Open your Terminal Application (Gnome Terminal or Tilix)
- Navigate to the directory that contains your script. In our case, it is
scripts/. Use the command:cd scripts/ - Run the script using this command:
bash lab4-script1.sh - Notice that nothing was displayed on the screen because our script does nothing.
- Take a screenshot of your text editor. Name your screenshot
q2.1.pngand place it in yourlab4/directory/folder
If you need to know:
#!/bin/bash: Executes the script using the Bash binary located specifically at /bin/bash. This assumes that bash is installed in the system but can fail in systems that install bash in a different path.#!/usr/bin/env bash: Uses theenvcommand to locate Bash in the user’s PATH. This makes the script portable and will make sure that bash runs the script regardless of where it is installed (as long as it is in the PATH)
Printing text to the screen
Simplest thing to do in a shell script is to print text to the screen. This is achieved with the command echo. The command printf can also be used but that command is outside of the scope of the course.
- Create a new script called:
lab4-script2.sh - Use the
echocommand to print the sentence:"Hello World"(without the quotes) - Save and run the script the same way you did before. Keep in mind that the name is different and that if you are already in the
scripts/folder/directory you do not need to use the cd command. - Alternatively, we can run the script using the following command:
bash ~/scripts/lab4-script2.sh- There are other ways to run the script but for now, let’s keep it simple.
- The output of the script should be “Hello World”. If you do not see anything, it is likely that you did not save the file.
- Use the
echocommand again to add the following:- A line of text with a horizontal tab
- 2 lines of text in a single
echocommand
- Save and run the script
- Take a screenshot of your text editor. Name your screenshot
q2.2pngand place it in yourlab4/directory/folder
Running other commands in a script
Of course, printing text is not the only thing we can do. In reality, bash is a complete programming language that you can use to do anything (some things you should not do in Bash). So now lets add a couple of more commands to our script.
- Create a new shell script and save it in the
scripts/directory. Call the scriptlab4-script3.sh - Use the
echoanddatecommand to print the following lines:today's date is:and in a new lineWed Oct 8 08:24:37 PM EDT 2025
- Use the
echoandwhoamicommand to print the following lines:the current user is:and in the same line:username of current user
- Use the
echoandfreecommand to show how much used and free memory the system has:Memory usage:andthe output of free -h
- Take a screenshot of your text editor and your terminal. Name your screenshots
q2.3pngandq2.4png. Place them in yourlab4/directory/folder
Challenge question
Write a shell script that displays the following output:
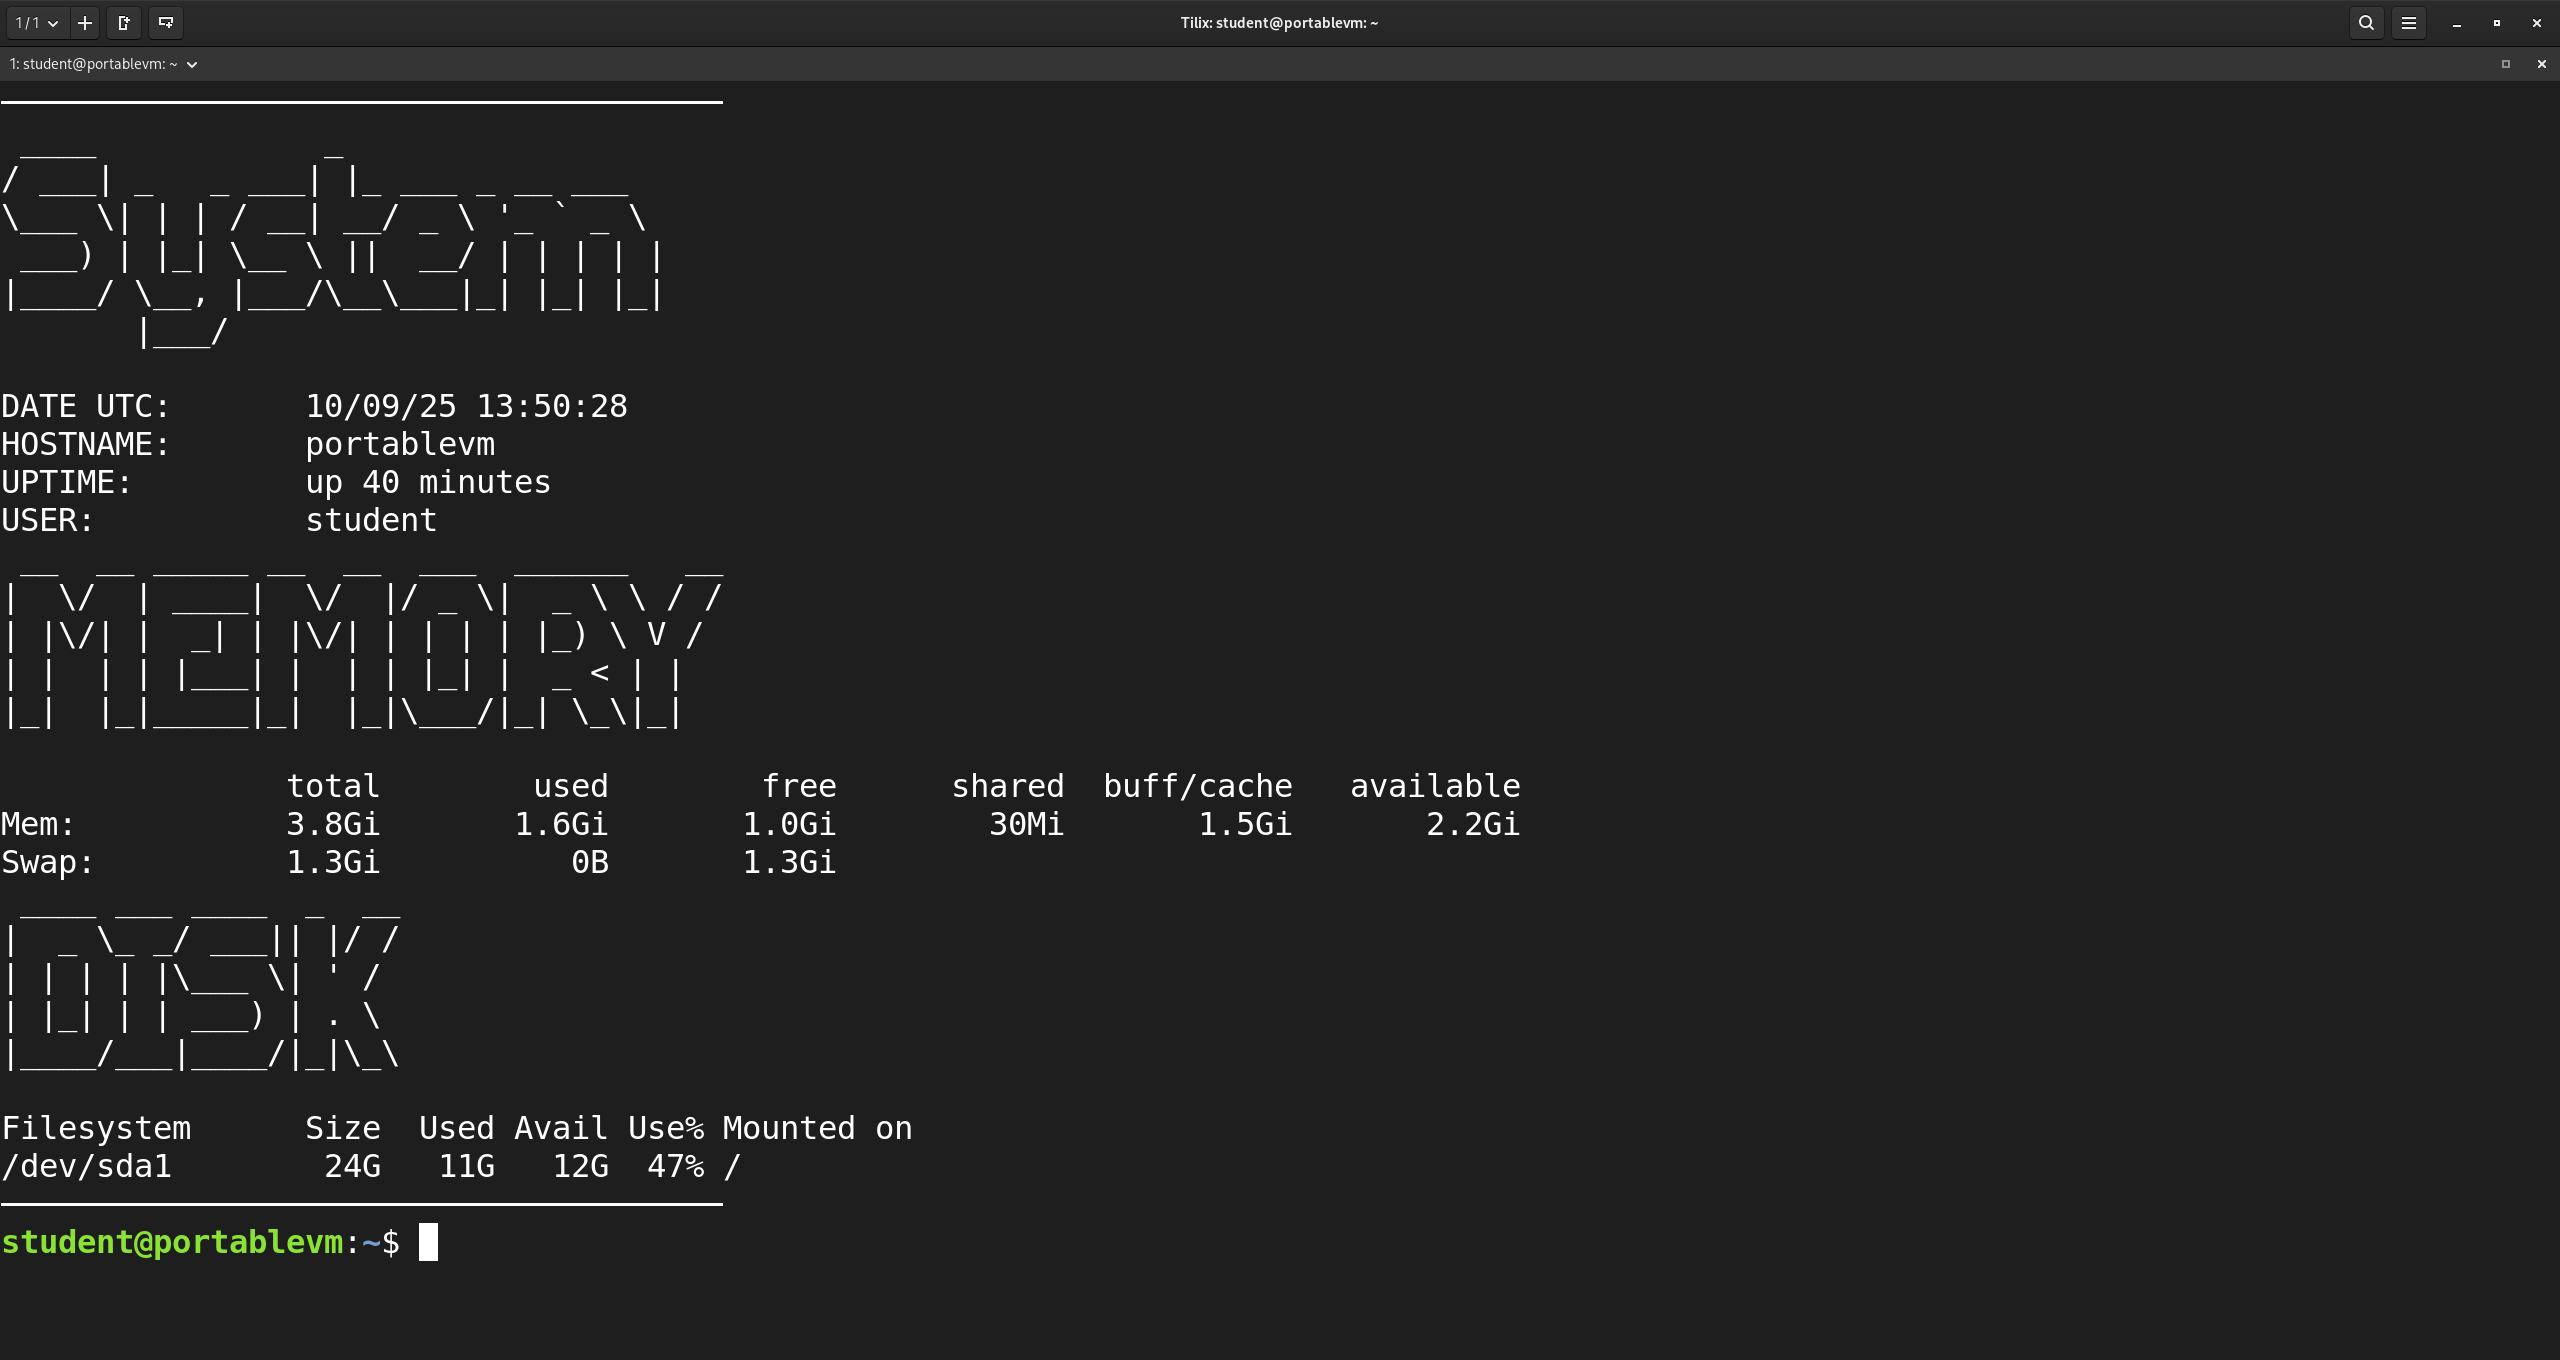
- Take a screenshot of your text editor and your terminal after you run the script. Name your screenshots
q3.1pngandq3.2png. Place them in yourlab4/directory/folder
Tips:
- This is the line character I use to generate the horizontal line you see: “
─” - You will need the man page of the following commands:
echo,hostname(oruname),uptime,figlet,free,dfanddate. You can also look at the “What is a shell” presentation from the previous lab which contains examples of these commands. - The date format can be achieved using the format control characters.
- Save the script in the lab4 directory/folder
- Name the script
challenge_lab4.sh - The command to run the script is
bash ~/cis106/labs/lab4/challenge_lab4.shif this does not work, it is because you saved the script in the wrong folder. Retrace your steps to troubleshoot. - You must complete this question alone. I cannot provide assistance here. Everything you need to complete this challenge has been covered in this lab/presentations/practice.
- See the What is a Shell? and Shell Scripting Chapter 1 presentations.
What will you submit:.
- Place and properly label (using headings) all the screenshots
- Convert the file to pdf
- Push everything to github
- In Blackboard, submit the pdf file
lab4.pdf
Note: I will read your script from github. If the script is not there, you will not receive credit.
How I will grade you:
- I will navigate to your GitHub repository and read your script. I will download your script and run it on my machine. If your script runs and I get the same output as the screenshot, you will get full credit for the challenge question.
- Question 1: 25 pts
- Question 2: 25 pts
- Question 3: 50 pts
Special Note 1 - Practice creating a basic script
The challenge question in this lab is similar to the type of questions you will see in your final exam. There you will create a script and just being able to create and run the script gives you points. Make sure you understand the concepts here. Practice! Practice! Practice!
Special Note 2 - Git Command Quick Reference
You’ll be using Git frequently this semester. Here’s a quick reminder of the most common commands:
| Command | Purpose |
|---|---|
git clone repository/url/here | Download a GitHub repository to your computer. |
git pull | Synchronize your local repository with the latest changes from GitHub. Always run this before starting work in VS Code. |
git add . | Track all changes made to your files. |
git commit -m "description here" | Save a snapshot of your tracked changes with a short description. |
git push | Send your committed changes to GitHub. |
Command Order:
git pull
git add .
git commit -m "message"
git push
⚠️ Warning: ⚠️
Avoid making changes directly in the GitHub website unless you:
- Know exactly what you are doing, and
- Remember to run git pull before working locally.
Special Note Regarding the Final Exam
- The final exam will be in person.
- It is performance-based and requires access to a Linux Virtual Machine.
- If you do not have a laptop/computer you can bring to school:
- A Linux workstation will be available on campus.
- Request it early—available computers are limited.