Lab 3 - Desktop Environment, Terminal Emulator, and Bash
Video here
Pre Work:
- Open the file manager and navigate to the
labsfolder/directory inside the cis106 repository(~/cis106/labs/) - Create a folder/directory called
lab3 - Open VS Code and open the cis106 folder inside VS Code
- Create a file called
lab3.mdinside thelab3folder/directory - Add the following markdown:
---
Student: your name
semester: Spring 24
Assignment: Lab 3
---
# Lab 3 Submission
## Question 1


## Question 2

## Question 3

## Challenge Question

## Script Source code:
[lab3](lab3-script.sh)
- Close VS Code and start the lab.
Desktop Environment: Question 1
Step 1.1
Note: Students who did lab 2 alternatives 3 and 4 (underpowered PCs or Ubuntu Server installation) should skip step 1.1. Simply move along to step 1.2. Also, students who prefer Gnome 42 because their virtual machine already performs well, should also skip this question to save time. Keep in mind that I will be using Gnome Classic for the remaining of the course so my environment will look different to yours
- Open a terminal window and type the following command. This is going to take some time. Once the installation is done, restart the virtual machine
sudo apt update && sudo apt install gnome-session-flashback lightdm -y
- Click the Ubuntu icon located to the right of your user name and select Gnome Flashback (Metacity) and log in
Notice that your desktop environment looks very different. This is Gnome Session Flashback. We will be using this version of Gnome as it is lighter and will benefit the performance of the VM. However, if you want, you can switch back to Gnome 4 if you have a good PC/Mac.
- Open the settings application and re-create the flameshot keyboard shortcut if it stopped working. See the section “Replace the current screenshot tool with flameshot” from lab 2.
Take a screenshot of the gnome 2 desktop environment with a file manager and a terminal open. Save your screenshot as q1.png. If you skipped this question feel free to skip this screenshot as well.
Step 1.2
- Download a wallpaper that you like. You can use this website for downloading wallpapers: wallheaven.cc
- Create a directory/folder in the
Picturesdirectory calledwallpapers - Save the file in this newly created directory. Make sure to change the name to something more descriptive of the image.
- Right-click on the desktop and change the wallpaper to the one you downloaded recently.
- Press and hold the SUPER and ALT keys and right-click on an empty area of the top panel. In the menu, click on Panel Properties. Increase the size of the icons to a size that you prefer.
- From the bottom panel, we are going to move the show desktop icon to the top panel and the open applications lists as well. The Show desktop icon will be next to the notification area, and the applications list next to the Places menu. To move items in the panel, press the SUPER and ALT keys and right-click, and a menu with the move option will appear. After clicking on move, move the mouse to the desired location and use the left click to place the item.
- Find the applications VS Code, tilix, and Firefox and drag them to the desktop
Take a screenshot of the desktop environment. Save your screenshot as q1.2.png
Working on the shell and terminal emulator: Question 2
- Let’s set Tilix as the default terminal emulator. Open tilix and type the following command:
sudo update-alternatives --install /usr/bin/x-terminal-emulator x-terminal-emulator /usr/bin/tilix 1
- Open the keyboard preference and add replace the shortcut for the gnome-terminal with tilix. The shortcut is
CTRL+ALT+T - Open Tilix and then click on the hamburger menu and then on preference. Ignore the error message
- Click on appearance. Enable “Use a wide handle for splitters”
- Split the terminal in 2 horizontally. Open the man page of the
echocommand in one of the terminals. - Resize the terminal window so that you have enough space to work on both.
- Using the man page of echo figure out how to do the following:
- Display a line of text without the new line
- Display a line of text that includes a horizontal tab
- Display 2 lines of text in a single echo command
- Display 2 lines of text in a single echo command, with the second line starting with a tab
- Display 2 lines of text in a single echo command that starts with a tab
Take a screenshot of the terminal showing all the commands that you used and the man page open. Save your screenshot as q2.png
Write a basic shell script: Question 3
- Open a text editor (Gedit (text editor) or Geany)
- Type the following line: #!/bin/bash (double-check your spelling)
- Save the file as:
lab3-script1.sh - Save the file in the
lab3folder insidecis106/labs/ - Add the following lines:
echo “This is a shell script,”
echo -n “This script will print the current date”
date
echo “This is the machine's name:”
echo $HOSTNAME
echo “This is the current user:”
echo $USER
- Save the script.
- Add the following comments at the top
#Author: your name
#Date: current date in format mm/dd/yy
#Description: This is a basic script that
#uses environment variables and the date command
- Save the script and close the text editor
- Open a terminal and type the following commands to execute the script: bash ~/cis106/labs/lab3/lab3-script.sh
Take a screenshot of the terminal showing the output of the script. Double-check your spelling and follow every step correctly if you get any error messages.
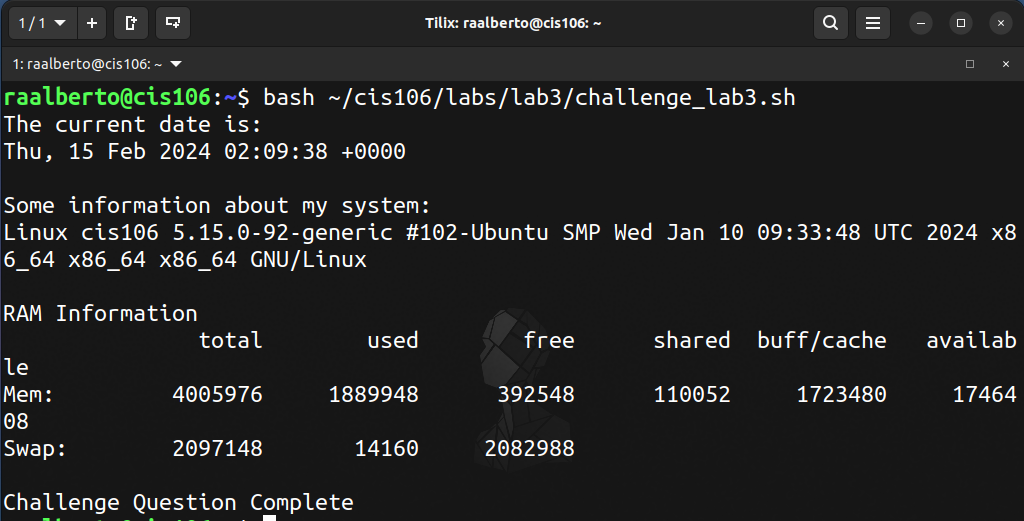
Question 4: Challenge Question
Write a shell script that displays the following output:
Tips:
- You will need to read the man page of the
echo,uname, anddatecommands - The date format in the screenshot is
RFC 5322 - Save the script in the same directory/folder as you save the question 3 script
~/cis106/labs/lab3/ - Name the script
challenge_lab3.sh - The command to run the script is
bash ~/cis106/labs/lab3/challenge_lab3.shif this does not work, it is because you saved the script in the wrong folder. Retrace your steps to troubleshoot. - You must complete this question alone. I cannot provide assistance here. Everything you need to complete this challenge has been covered in this lab.
What will you submit:
- place and properly label (using headings) all the screenshots you took. See the markdown I gave you at the beginning of this document
- Convert the file to pdf
- Push everything to github
- In Blackboard, submit the pdf file
lab3.pdf
Note: I will read your script from github. If the script is not there, you will not receive credit.
How I will grade you:
- I will navigate to your GitHub repository and read your script. I will download your script and run it on my machine. If your script runs and I get the same output as the screenshot, you will get full credit for the challenge question. Otherwise, partial credit will be awarded.
- Every question in this lab is worth 25 points.
Special Note
You are going to be using the git commands a lot. Here is a quick reference:
git clone repository/url/here: is the command to clone a repository where cloning means downloading a repository to your computergit pull: to pull/synchronize your repository from github to your local machine. Always run this command BEFORE you start working VS Codegit add .: to track all the changes made to your file.git commit -m "label for your changes here": this command will label all the changes you added with theaddcommandgit push: will send all your changes to your github repository
Always run the commands in this order:
pull=>add=>commit=>pushNever use the github website to make changes to your repository unless you know what you are doing and can remember to pull the changes before working on your local repository!