Lab 2 - Installing Ubuntu 24.04 in M1, M2 and M3 Macbooks
Video Here
Lab 2 Installing Ubuntu M Series Macs (M1/M2 CPUS)
- Lab 2 - Installing Ubuntu 24.04 in M1, M2 and M3 Macbooks
- Video Here
- Note
- Step 1: Download Hypervisor
- Step 2: Create the virtual machine
- Step 3: Install Ubuntu Server
- Step 4: Update the system and install a desktop environment
- Step 5: Install essential software
- Step 6: Setting up Gnome Screenshot Tool
- Step 7: Setup VS Code
- Step 8: Setup Git and Github
- Time to submit this lab
- Known issues:
- Special Note
- Special Note Regarding the final exam:
Note
This Lab is exclusive for students using M1/M2 Series Macbooks/Mac Mini. This lab assumes the following about your computer:
- CPU: M1 or M2
- Ram: 16 GB
- OS: Mac OS Sonnoma Latest version
This lab assumes the following about you:
- You can follow instructions
- You have basic understanding of your computer’s hardware
Step 1: Download Hypervisor
Download the following applications:
- Install UTM.
- Do not touch/open/mount the Ubuntu ISO file.
Step 2: Create the virtual machine
Create a virtual machine for Ubuntu Server
- Launch UTM. Select “Create a New Virtual Machine”
- Here you will have 2 options.
- Emulate: This is for x86_64. This option is slower but it will give you the same version of Ubuntu that the Windows users virtualize in Virtualbox. We will not be using this option on Mac.
- Virtualize: this is for ARM64 operating system like the Ubuntu Server ISO we downloaded earlier. Most of the software we are going to use is available for ARM so there should not be much difference in the Labs for you
- Select “Virtualize”
- Select “Linux” for the Operating System options
- In the “Boot ISO Image” section, click on the browser button and select the Ubuntu Server ISO you downloaded earlier.
- In the “Hardware” configuration window, select the following:
- RAM: 4096 MB
- CPU Cores: 2
- Note: *We won’t be using OpenGL hardware acceleration for now, but if you start having graphics issues, enable this feature and see if it helps. This is an experimental feature so for now let’s keep it safe. *
- In the “Storage” section, set the disk size to 50Gb. That is just enough for our class. If you want to give it more storage, you can.
- In the “Shared Directory” section, keep the defaults as is. We will not be needing a shared directory. But if you want to have a shared directory between then Host (mac) and Guest(Ubuntu), go ahead and play around with it. I leave this up to you. There are tons of guides on how to do this.
- In the “Summary” Section, set the Name to Ubuntu Desktop
- The Virtual Machine settings window will open.
- Add the following in the notes:
- Hostname: cis106
- username: your blackboard username - or a preferred username
- password: pccc (we are going to keep things simple to help troubleshooting)
Step 3: Install Ubuntu Server
- Start the VM by pressing the Play button
- If you see a message screen that reads “Display Output is not active” ignore it. The VM is just starting
- Follow the steps to install Ubuntu server as laid out in the guides: How to install Ubuntu Server 24.04
Notes: 1. We will install the Server Edition of Ubuntu. The server does not have a graphical installer but it is easy anyways. 2. Later we will install a graphical desktop environment
- Once the OS has been installed, reboot the VM. If the VM seems to be hanging, manually reboot it. Before the disk boots the installer again, turn off the VM.
- Remove the Ubuntu Server ISO file from the virtual DVD Drive.
- Turn on the Virtual Machine and sign in. Use your username and password you set during the installation process
Step 4: Update the system and install a desktop environment
Run these commands one at the time:
sudo apt update
sudo apt upgrade -y
sudo apt install ubuntu-desktop -y
sudo reboot now
Note: We will be using Gnome but you are welcome to use any other desktop environment. This will install Ubuntu’s spin of the Gnome Desktop environment. A lot of packages will be installed, so this step will take time
Now that you have a desktop environment, let’s configure the rest of the system:
- Do not enable Ubuntu Pro
- Ignore any error reporting. We will disable this anyway
- Some users have reported issues with full screen so if you are having issues, just don’t use full screen.
- Open a terminal window. Type this command to disable animations:
gsettings set org.gnome.desktop.interface enable-animations false - Remove the error reporting software and other applications we won’t need:
sudo apt purge apport aisleriot gnome-mahjongg gnome-sudoku
Step 5: Install essential software
- Install the curl command which will then use to download a couple of script files.
sudo apt install curl -y - Use curl to download and run the following script:
essentials.sh
curl https://cis106.com/assets/scripts/essentials.sh -o essentials.sh
chmod +x essentials.sh
./essentials.sh
rm essentials.sh
- Install VS Code:
curl https://cis106.com/assets/scripts/vscode.sh -o vscode.sh
chmod +x vscode.sh
./vscode.sh
rm vscode.sh
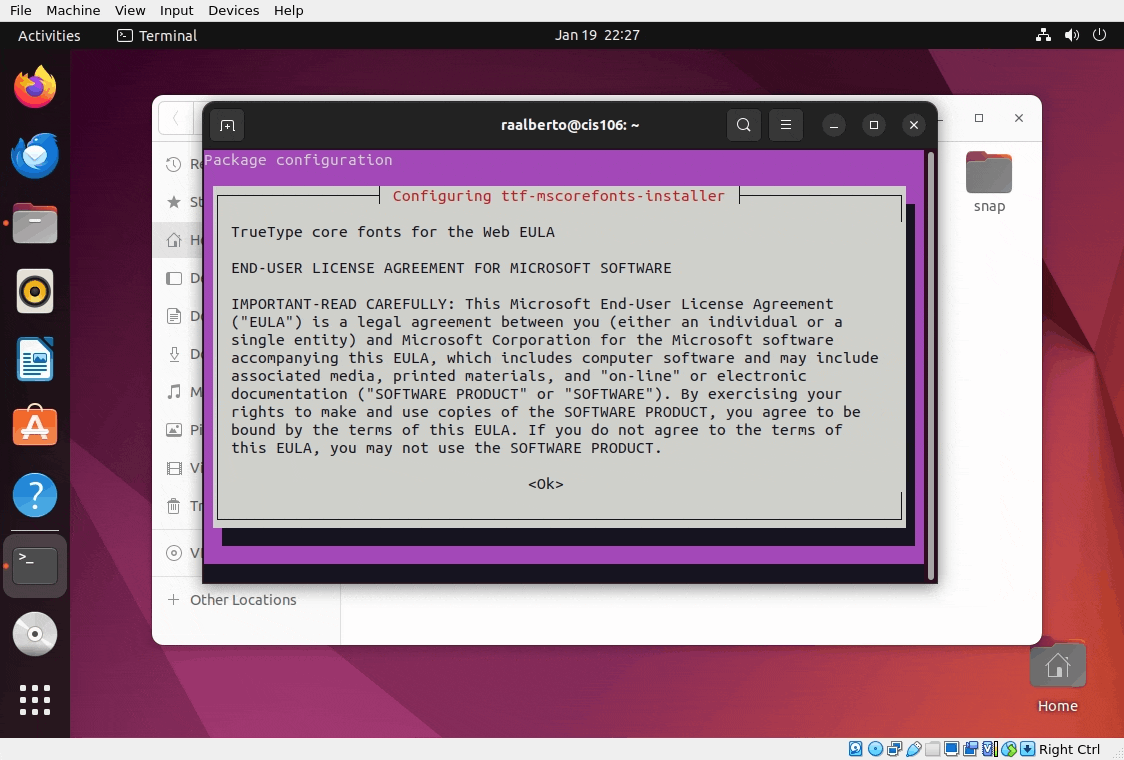
- Install Ubuntu Restricted Extras
sudo apt install ubuntu-restricted-extras ubuntu-restricted-addons -y
When you see the screen below, use the tab key to select OK, the space key instead of enter, the arrow keys to select yes and the space bar again to agree to the terms and conditions:
Step 6: Setting up Gnome Screenshot Tool
Note: The default screenshot application does not work for us. However, gnome-screenshot gives us what we need. In the past, we used to use flameshot, however, it is still not supported under Wayland therefore we will move away from Flameshot for the time being. To setup Gnome-Screenshot, follow these steps:
- Install gnome screenshot: use the following command
sudo apt install gnome-screenshot -y - Open the keyboard settings in Ubuntu.
- Settings -> Keyboard -> View Customize shortcuts -> Custom Shortcuts -> Click the + icon to add a new shortcut
- In the dialog box add the following:
- Name:
gnome-screenshot - Command:
gnome-screenshot -i
- Name:
- Click the set screenshot button and press the print screen key in your keyboard or any other keyboard combination of your choosing.
- Click the replace button.
- Press the print screen key to test. Did it work? Chances are it did not.
- For some weird reason this does not work the first time we do it, therefore, repeat the process and make sure to spell the command correctly. See the gif for reference!
Step 7: Setup VS Code
Install the following extensions:
- Markdown All in One by Yu Zhang
- Markdown by starkwang
- Markdown PDF by yzane
- Markdown Preview Enhanced by Yiyi Wang
- PDF Preview by Analytic Signal Limited
- Code Spell Checker by Street Side Software
Step 8: Setup Git and Github
- Sign in to your Github account.
- Open a terminal window and run the following commands:
- Set your username:
git config --global user.name 'your username here' - Set your email address:
git config --global user.email 'your email here' - Setup SSH authentication
- Generate an ssh key:
ssh-keygen -t ed25519 -C "your_email@example.com"
This creates a new SSH key, using the provided email as a label. When you’re prompted to:
"Enter a file in which to save the key,"
press Enter. This accepts the default file location. At the prompt, to type a secure passphrase, press enter for no passphrase. If you want to use a passphrase, go ahead as it provides an extra layer of security. However, for this course you do not need to add a passphase. - Use the following command to see your public ssh key:
cat ~/.ssh/id_ed25519.pub
copy the entire output of this command to the clipboard. - In your github page, go to
settings>SSH and GPG KeysHere add your ssh key that you copied to the clipboard in the step prior. Typeyes(the whole word) and press enter and you are done - Test you ssh connection by using this command:
ssh -T git@github.com - Clone your github repository. Use these commands:
cd; git clone git@github.com:yourGithub-User-Name-Here/your-Repository-Name-Here


Time to submit this lab
- First, lets organize the repository
- Open the file manager
- Create the following folders:
labs,weekReports,finalExam,cheatSheets,notes - move all the files related to lab 1 to the
labsfolder - Inside the lab folder create 2 folders:
lab1andlab2. From this point on, every lab will have its own folder and so will every week report. - Move all the lab 1 files to the
lab1folder - Repeat the process for the week report 1
- Open the
cis106folder in VS Code - Inside the
lab2folder, create a file namedlab2.md - Add the following markdown to the file:
# Lab 2 Submission
## Virtual Machine settings


- Open a terminal and run the following command:
cpufetch | pv -qL 200or simplycpufetch - Take a screenshot of the entire terminal window. Save the screenshot in the lab2 directory inside the cis106 directory. Name the screenshot
cpufetch.png - Clear the terminal with the command:
clearand run the following command:curl -s https://cis106.com/assets/scripts/lab2_system_info.sh | bash - Take a screenshot of the entire terminal window. Save the screenshot in the lab2 directory inside the cis106 directory. Name the screenshot
script.png - Save and convert the file
lab2.mdfile to pdf - Open the vs code terminal and enter the following commands to commit and push your changes to github:
git pull
git add .
git commit -m 'lab2 finished'
git push
- In blackboard submit the following:
- The URL to the
lab2.mdfile in github - The
lab2.pdffile
- The URL to the
![]()
Known issues:
- Markdown PDF converter does not work:
- Solution: Install Chromium-browser:
sudo apt install chromium-browser - Open the extensions settings:
- Navigate to the executable path and type:
/snap/bin/chromium - If the machine freezes at this step, reboot and force close the Virtual Machine and UTM.
- Navigate to the executable path and type:
- Solution: Install Chromium-browser:
- Ghosting when typing in the VS Code integrated Terminal:
- Workaround:
- Open a regular terminal
- Navigate to the cis106 directory:
cd cis106 - Run the git commands from there:
git pullgit add .git commit -m "changes"git push
- Note: I have not found a real solution for this yet.
- Workaround:
Special Note
You are going to be using the git commands a lot. Here is a quick reference:
git clone repository/url/here: is the command to clone a repository where cloning means downloading a repository to your computergit pull: to pull/synchronize your repository from github to your local machine. Always run this command BEFORE you start working VS Codegit add .: to track all the changes made to your file.git commit -m "label for your changes here": this command will label all the changes you added with theaddcommandgit push: will send all your changes to your github repository
Always run the commands in this order:
pull=>add=>commit=>pushNever use the github website to make changes to your repository unless you know what you are doing and can remember to pull the changes before working on your local repository!
![]()
Special Note Regarding the final exam:
- The final exam is in person.
- The exam is performance based and will require access to a Linux Virtual Machine.
- If you do not have a laptop/computer you can bring to school, a Linux Computer will be made available to you.