Bash Variables
What is a variable?
- A variable is a placeholder for data that can be reused and changed later on in your program. In general, bash uses 2 types of variables:
- Environment variables
- These are used by the shell to story system and user session information.
- To see a list of environment variables, use the command
env
- User defined variables
- these are created by the user and exist only in the shell script and any subshell that runs said script
- When creating variables, follow these rules:
- variable names cannot start with a number
- variable names can be up to 20 characters long
- variables are case sensitive (name is not the same thing as NAME)
- values are assigned using an = sign and no spaces (name=”bob”)
- Bash stores all values as string but you should still use “”
- Bash is technically untyped, which means that there are no other data types other than string.
- There are exceptions to this rule but we should leave those for another lecture
- Environment variables
What is string?
A string is a type of data in programming that represents text. It is made up of letters, numbers, symbols, or spaces and is usually enclosed in quotes (" or '). Strings are not the only types of data used in programming. You also have numbers which can be floating point or integers. You also have boolean which is only true or false. There is also arrays which are a list of values. Depending on the programming language, you will also encounter other types of data.
So why do we say that bash is untyped?
We say that Bash is untyped (or dynamically typed with weak typing) because it does not have explicit data types like other programming languages. Instead, bash defaults everything to string. This means that the following variables are all strings:
#!/bin/bash
name="bob"
age=35
student=true
height=5.9
Does that mean that I cannot do math in bash?
NO! Bash can do math but values need to be explicitly treated as numbers. One way is to user arithmetic expansion:
#!/bin/bash
number1=2
number2=2
sum=$(( number1 + number2 ))
echo "The sum of $number1 and $number2 is: $sum"
We will cover math in bash in a later lecture.
How do I use a variable?
Regardless of the type (environment or user defined), to use a variable, you must first put a $ and then the variable name. That is call “accessing a variable”. Here is an example:
#!/bin/bash
# Using an environment variable:
echo "Current user is $USER"
# Using a user defined variable:
name="bob"
echo "Their name is $name"
Practice 1: Environment Variables
Practice env or printenv command first
- Open a terminal emulator and run the
envcommand to display all the environment variables. You can also use theprintenvcommand. - Using the echo command display the content of the following variables:
- USER, HOME, SHELL, PWD
- There are some environment variables that become available as you start using your system. For example
OLDPWDwhich stores the absolute path of the previous working directory. Change your current working directory to~/Downloadsthen display the content of the variable OLDPWD
Scripting part
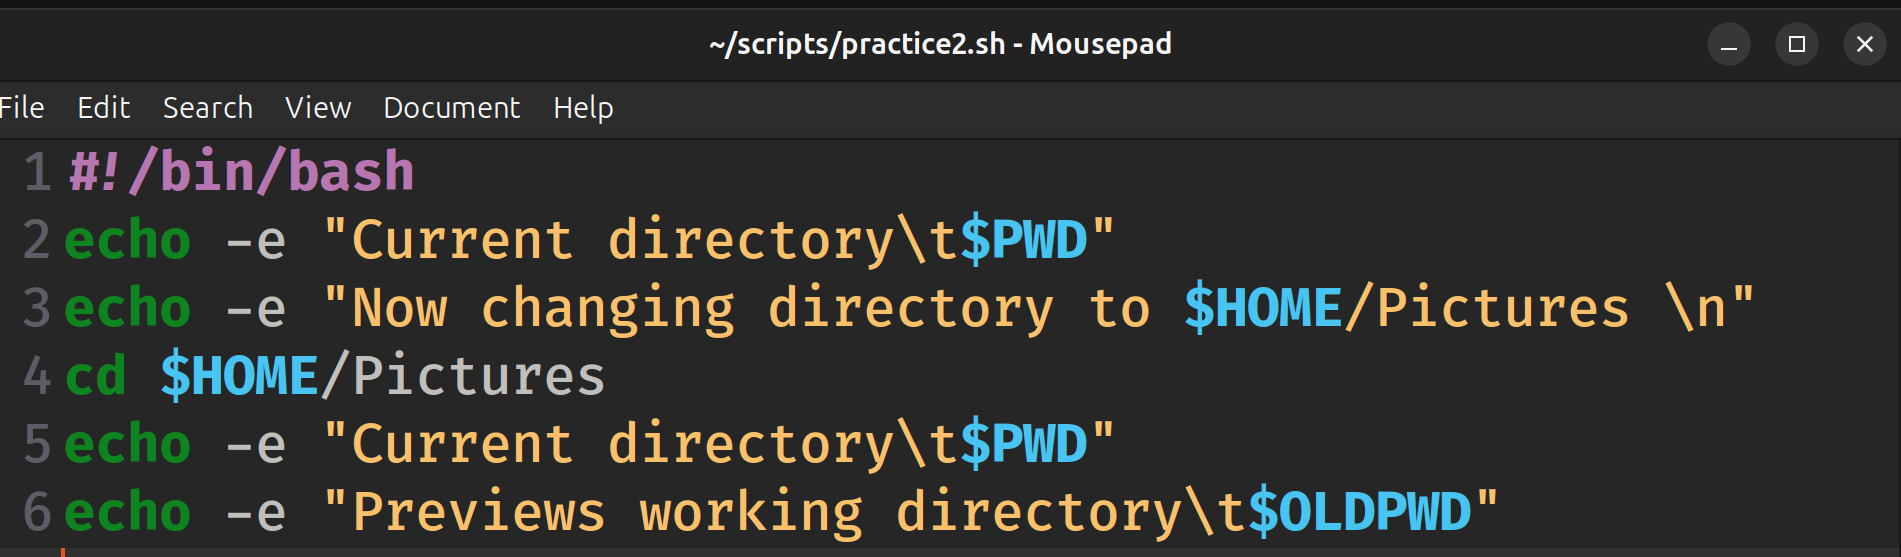
- Create a shell script that will display the following output:
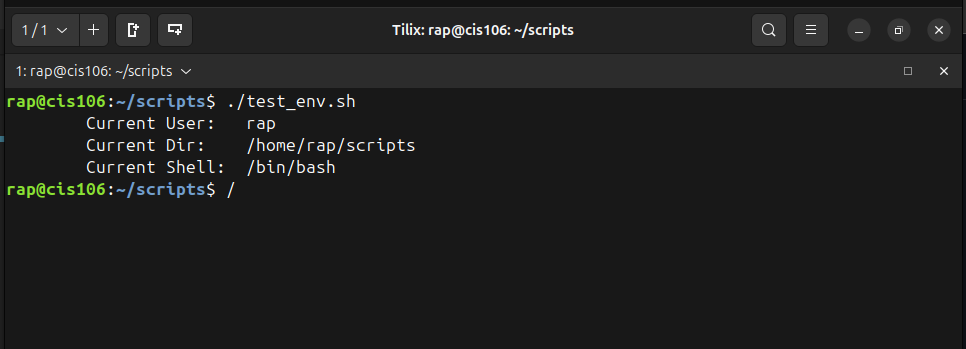
- Notice that the script is using tabs at the beginning of every line and before the variables.
- Save and execute your script.

If you are doing this activity for the extra credit. Take a screenshot of the output of your script (terminal)
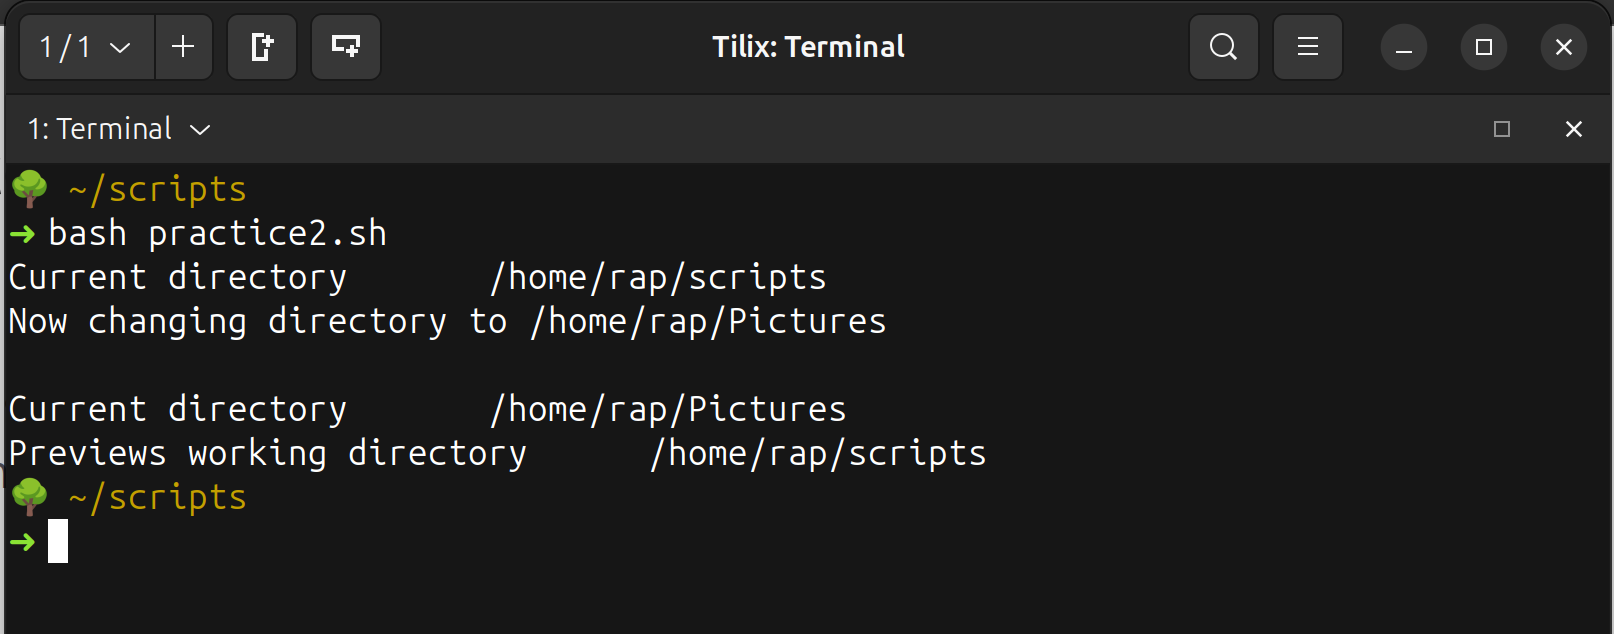
Practice 2: Using Environment Variables part 2
- Create a shell script that uses the HOME, PWD and OLDPWD environment variables to produce the following output
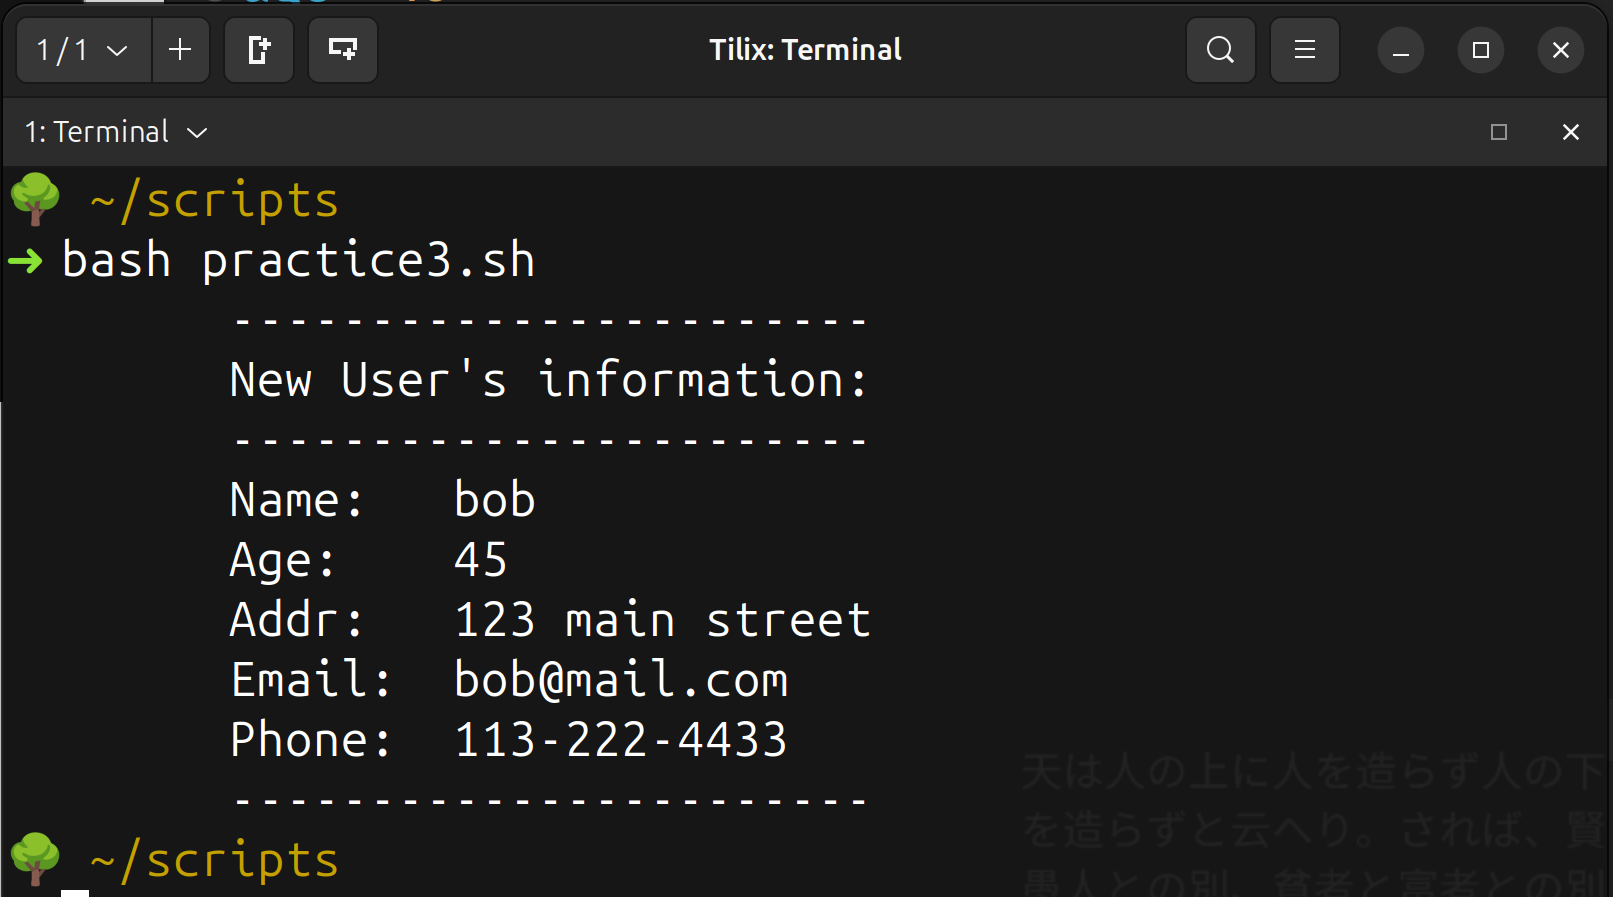
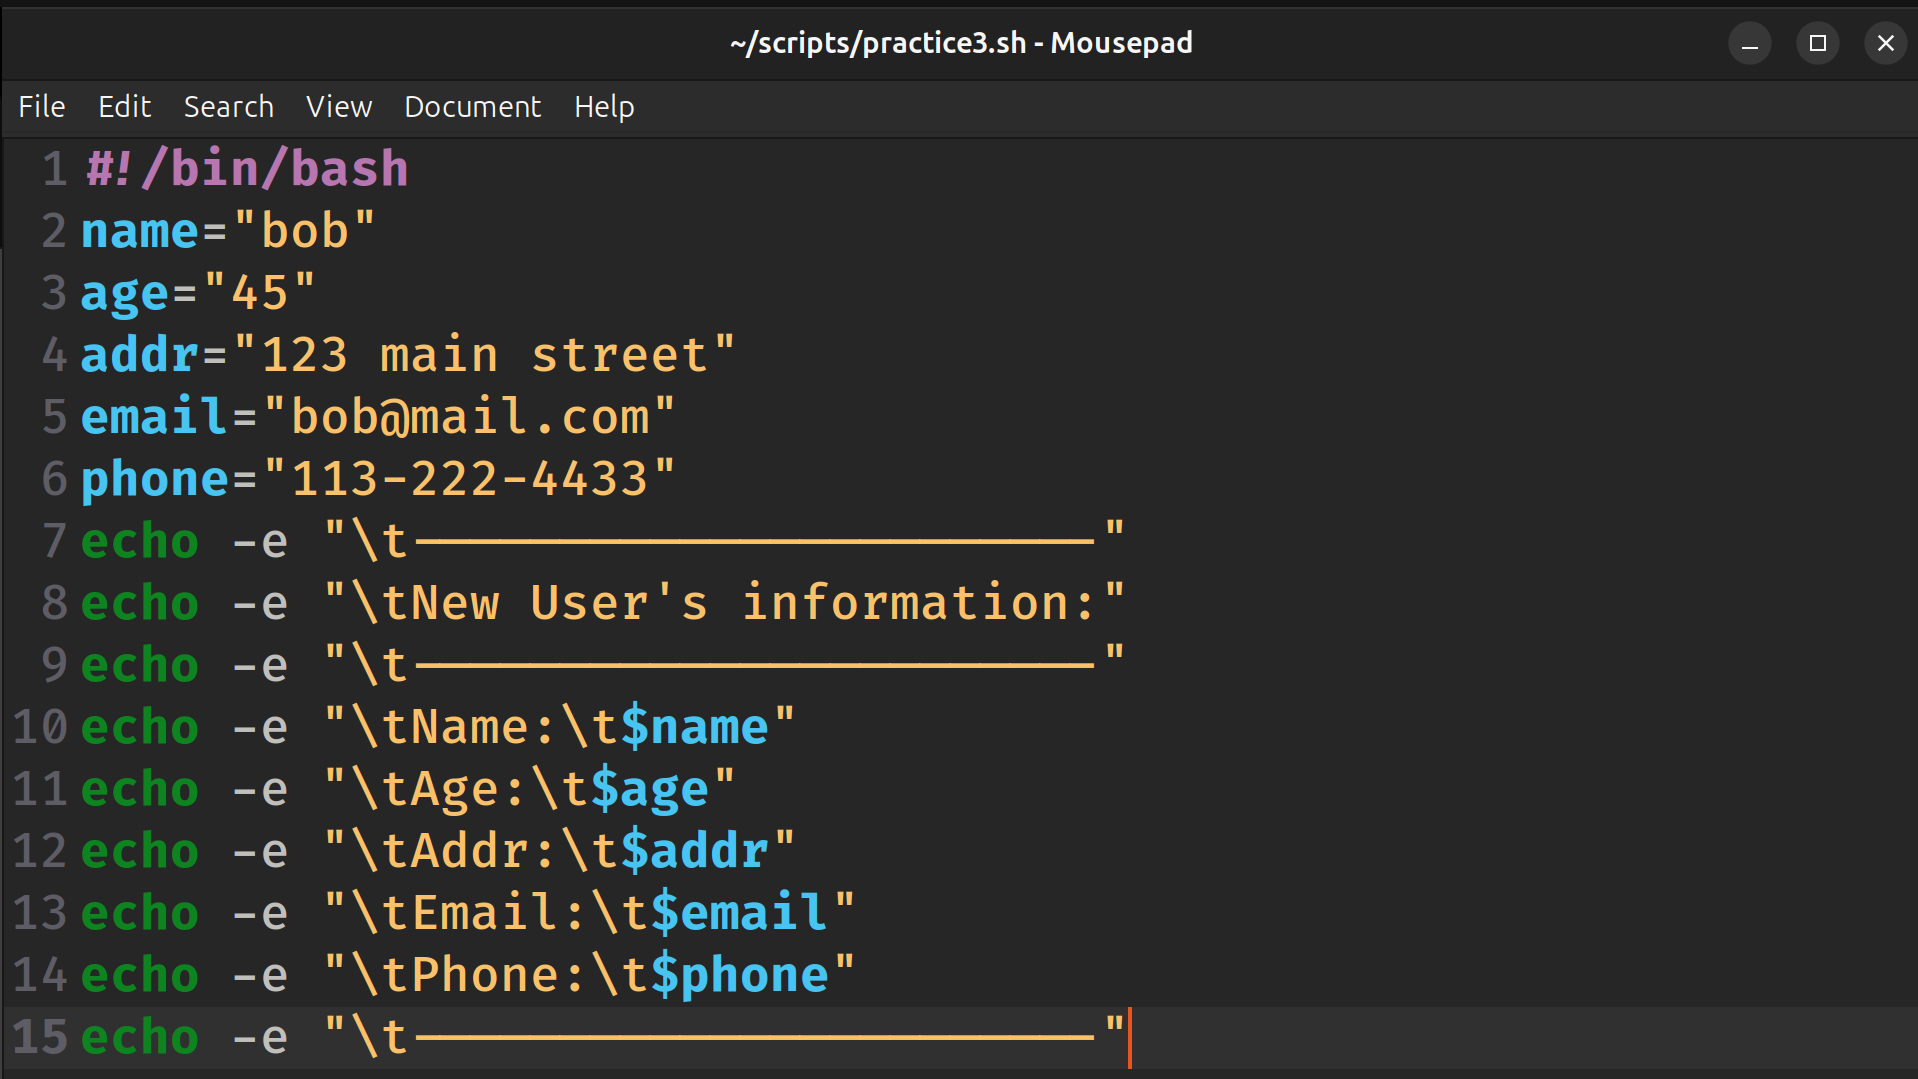
Practice 3: User defined variables
Create a script that uses user defined variables to generate the following output:
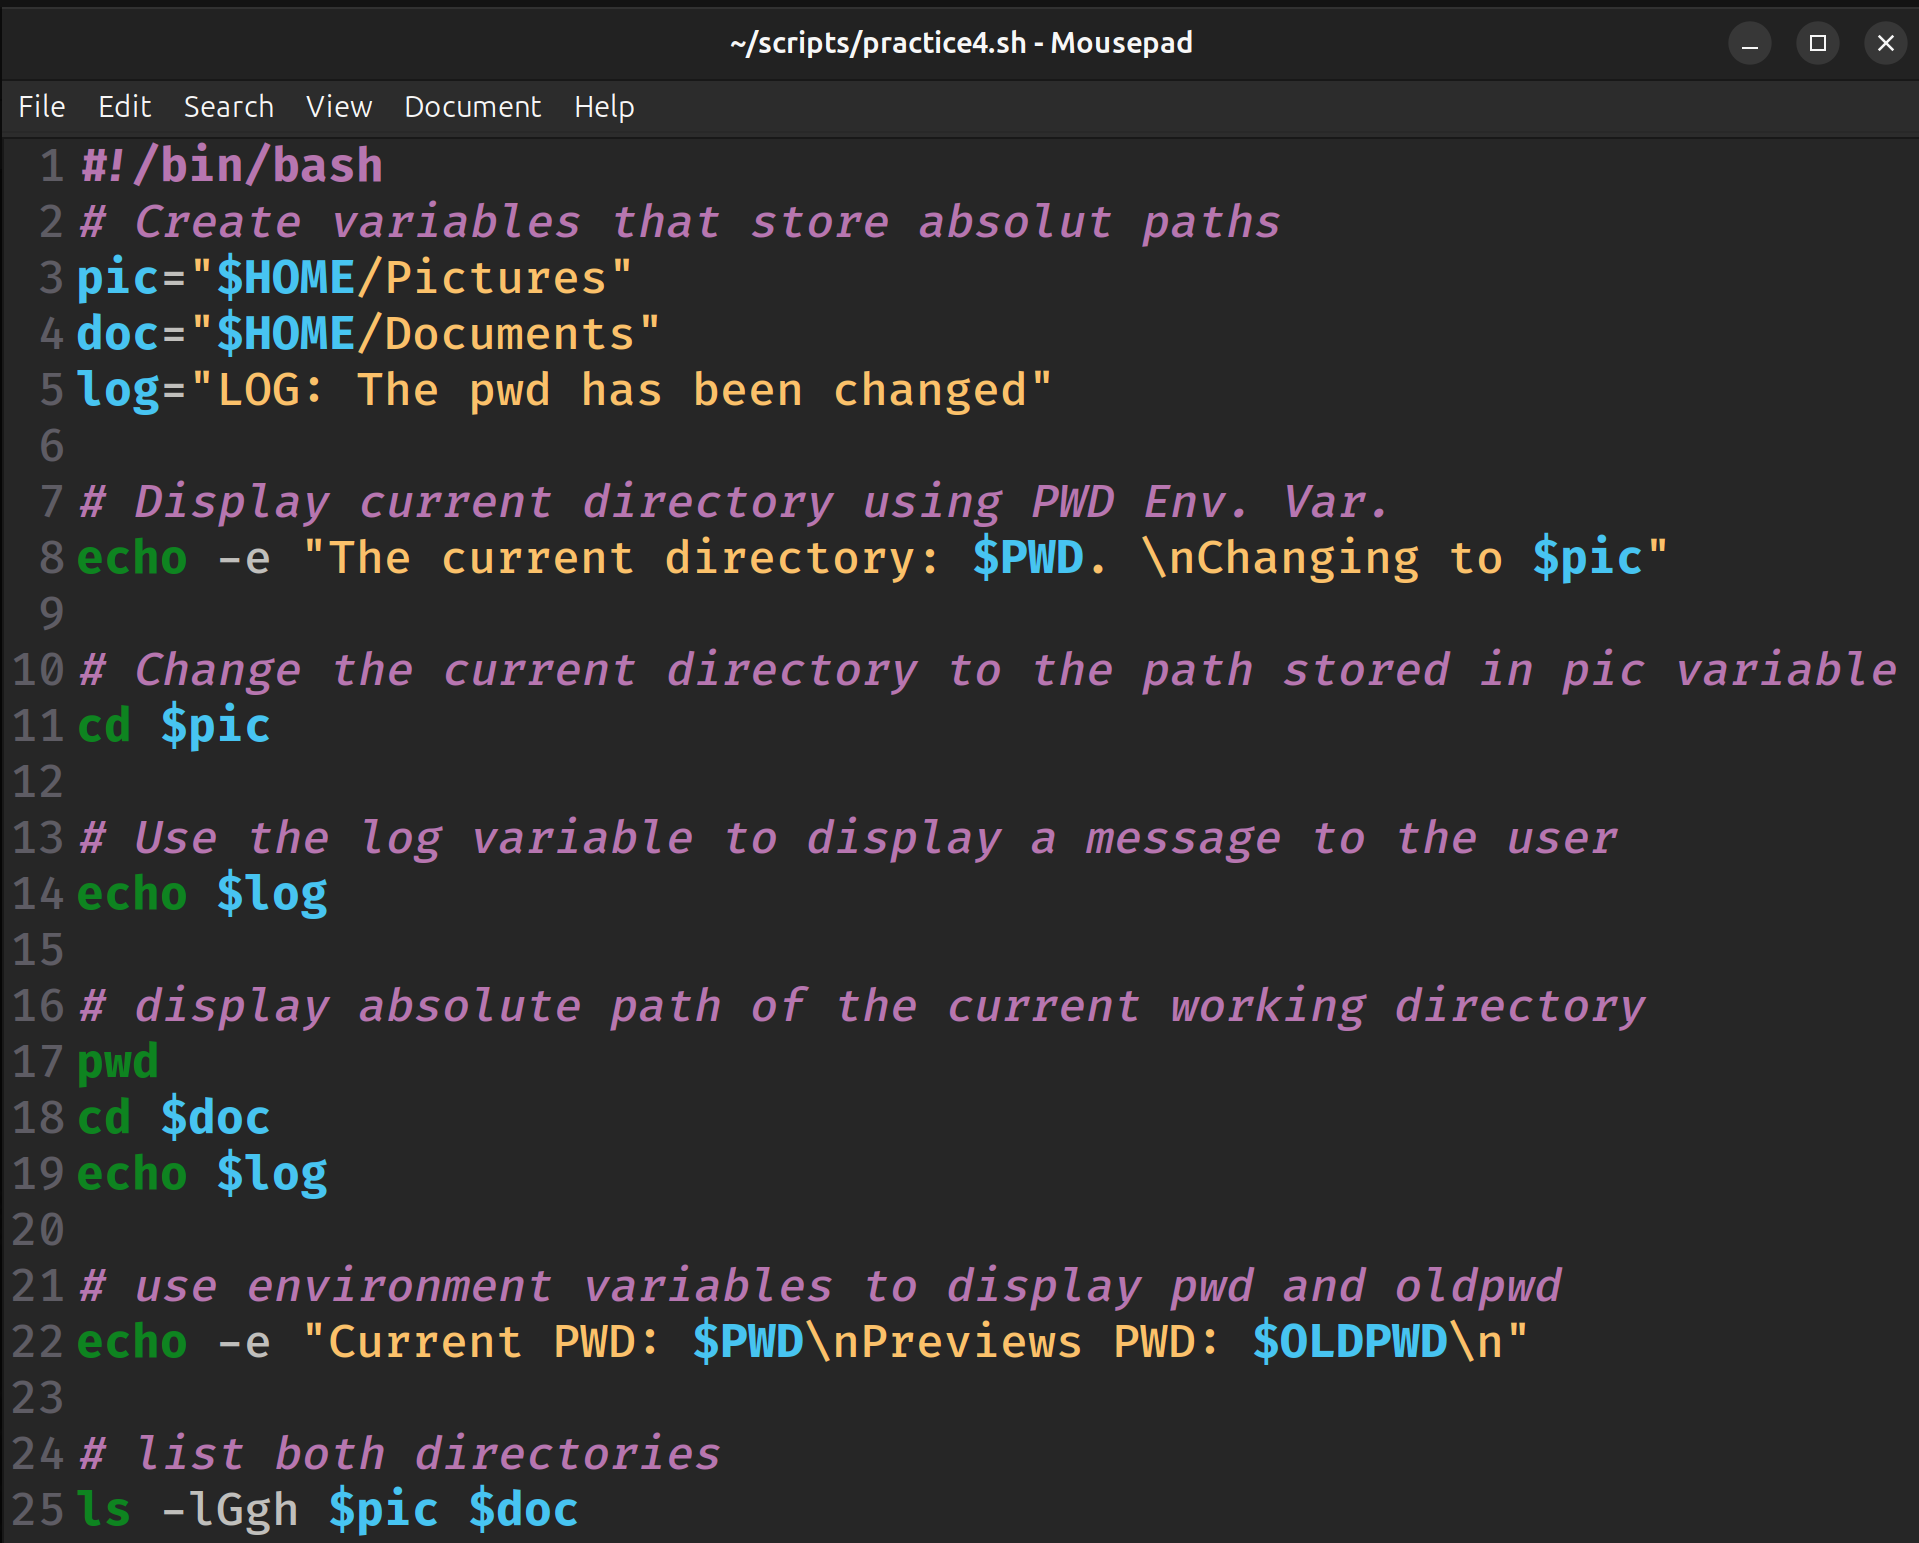
Practice 4: Bring it all together
Create a shell script that will generate the following output:
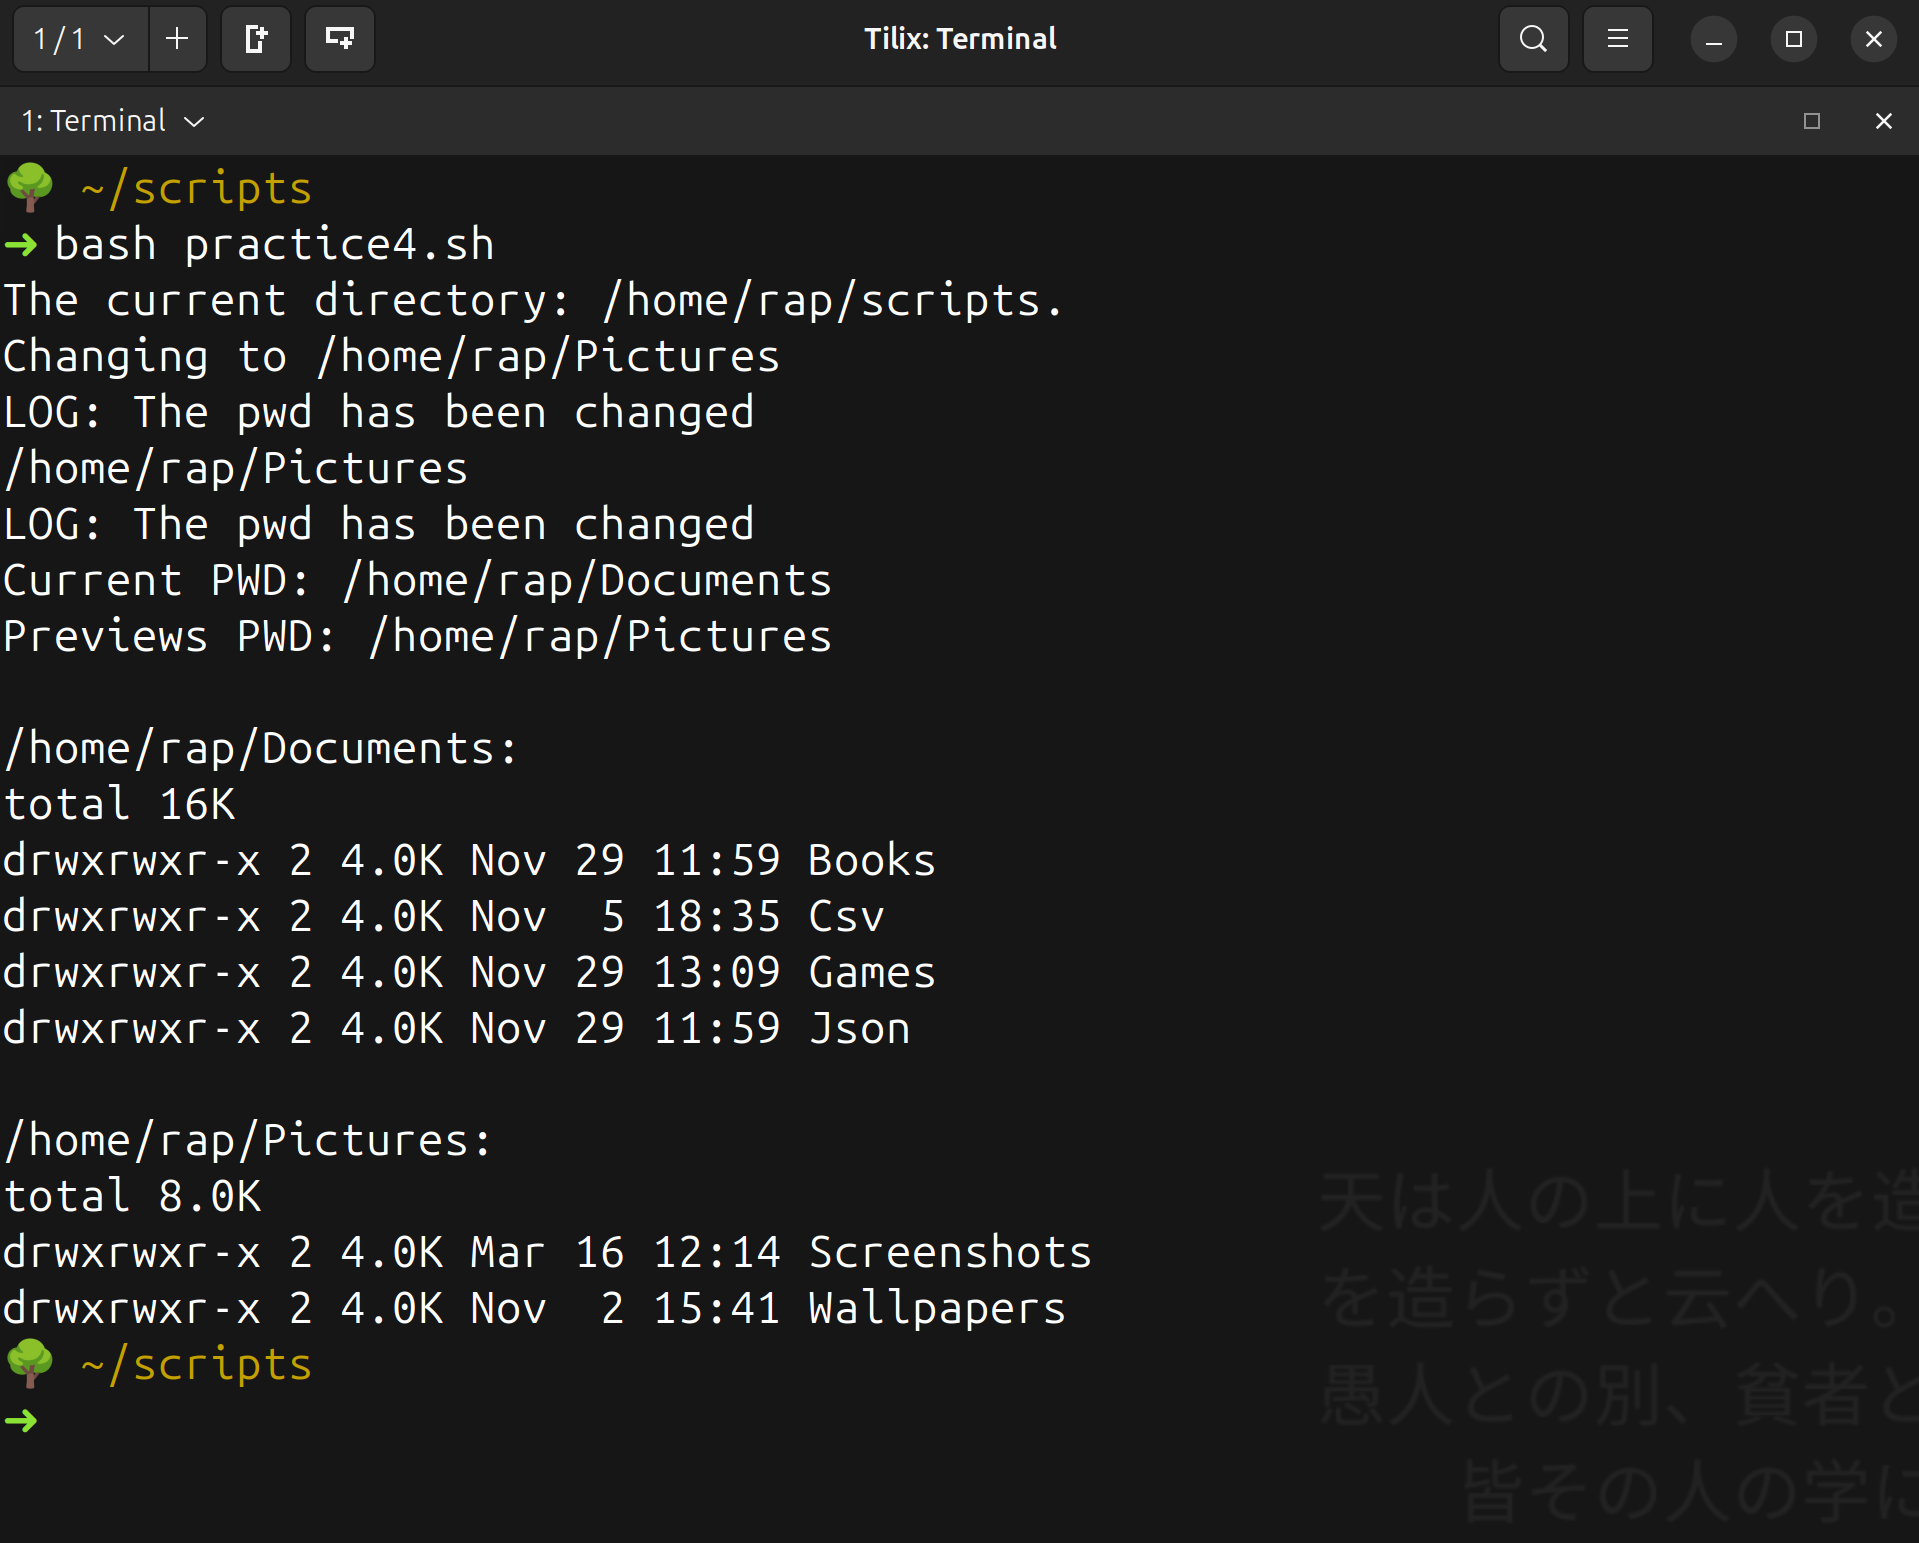
The script must use the following:
- Environment variables
- User defined variables
- The commands: pwd, ls, and cd
What will you submit for extra credit
- In your cis106 directory/local repository, create a new directory called “ExtraCredit” (One word no spaces in file names pleases!)
- Inside “
ExtraCredit”, create another directory called “extra4” - Open your cis106 directory/local repository in VS Code
- Inside “
extra4” create a markdown file called “extra4.md” - Add all the screenshots to “extra4.md” using proper markdown syntax and labeling each screenshot using heading 2 formatting. Save the markdown file.
- Your markdown document should start with the following heading1:
# Extra Credit 4: Bash Variables - Convert your file to PDF
- Run the github commands, in VS Code Terminal, to push all your changes to github:
gid add .git commit -m "Completed Extra 4"git push
- In blackboard submit the following:
- The URL of
extra4.md - The PDF file
extra4.pdf
- The URL of