Lab 2 - Installing Debian 13
- Lab 2 - Installing Debian 13
- READ ME FIRST!
- Video Guide Here
- Presentations:
- Requirements
- Step 1: Enable Virtualization
- Step 2: Install Virtualbox
- Step 3: Create the virtual machine
- Step 4: Install Debian 13
- Step 5: Update and Install Essential Software
- Step 6: Install Guest Additions
- Step 7 Set up Git \& GitHub
- Step 8: Set up screenshot tool
- Prepare your submission
- Special Note 1 – Practice with Virtual Machines
- Special Note 2 – Git Command Quick Reference
- Special Note Regarding the Final Exam
READ ME FIRST!
- This lab uses VirtualBox 7.1 as the hypervisor.
- This guide is designed for students whose host operating system is Windows or macOS.
- It supports both:
- x86_64 (Intel/AMD processors)
- Apple Silicon (M1, M2, M3, etc.)
- Whenever an instruction applies only to Windows or only to macOS, it will be clearly marked at the start of the step in bold colored text.
- Important: Because your computer setup may differ from mine, unexpected issues may occur. If you run into problems, alternative versions of this lab can be created upon request, and I am available to assist via Zoom or in person. Please do not wait until the last minute!
- If you encounter too many problems with VirtualBox, you may use VMware Workstation Player 17 instead. I plan to create a separate guide for VMware Player in the future.
Video Guide Here
Presentations:
- The basics of Virtualization
- Using VirtualBox
- Debian Installer
- Screenshots - creating a virtual machine
- Screenshots - Debian installer
Requirements
- This lab is accompanied by several presentations that act as an extra resource for you. I recommend that you take a quick look at them just in case you get lost you will know where to find help aside from the video
- Please go slow and take your time to do this lab. It is long but it is the core of this course.
- If you do not have a computer that meets the recommended criteria, please reach out to me and stop doing this lab.
NOTE!
- If your computer does not meet the required hardware, you will have a hard time completing all the work and the final project therefore be ready for some slow downs!
Step 1: Enable Virtualization
Before you can create virtual machines, you need to confirm that your computer supports virtualization and meets the required specifications. Follow these steps:
Check your computer’s hardware:
- CPU model and number of cores
- Amount of RAM
- Available free storage space
Compare your hardware to the requirements below.
If your system does not meet these requirements, stop here and contact me. We can discuss possible alternatives on a one-on-one basis.
Required Specifications
- CPU: Quad-core processor or higher
- RAM: 8 GB or more
- Free Storage: 60 GB or more
![]()
If your system is slightly below the requirements, you may still be able to complete the course. However, performance will be slow, so be mindful of how many applications you have open at once. One requirement that you cannot overlook is your CPU. A quad-core or higher is required.
[macOS / Apple Computers ONLY]
If your computer meets the above specifications, you can skip enabling virtualization—macOS enables it by default. If your Mac does not meet the requirements, it cannot be used for this class. Contact me so we can discuss possible solutions.
[WINDOWS ONLY]
If your computer meets or exceeds the above specifications, you must check whether virtualization is enabled:
-
Follow this guide to check and enable virtualization.
-
You can also use Speccy to confirm whether virtualization is enabled.
If you run into trouble enabling virtualization, let me know immediately. Do not wait until the last minute! This step can take time.
Step 2: Install Virtualbox
Follow these steps to download and install everything you need before creating your virtual machine.
1. Download the necessary files
Which Debian ISO Should You Download?
| Your Computer Type | CPU Type | ISO File to Download | Download Link |
|---|---|---|---|
| Windows 11/10 | Intel or AMD (x86_64) | debian-13.0.0-amd64-netinst.iso | Download -> Click the black Download button |
| macOS (Intel) | Intel (x86_64) | debian-13.0.0-amd64-netinst.iso | Download -> Click the black Download button |
| macOS (Apple Silicon) | ARM (arm64) | debian-13.0.0-arm64-netinst.iso | Direct Link |
ATTENTION MACOS USERS
If your mac computer has an Apple Sillicon CPU (M Series), the latest version of virtualbox 7.2 is not working. Please download version 7.1 instead. To obtain the installer for 7.1, follow these steps:
- In virtualbox download page, scroll down to “Previews releases”
- Select Virtualbox 7.1
- Then select macOS / Apple Silicon hosts
- Also download the Extension Pack
2. Install Microsoft Visual C++ Redistributable (Windows Only)
- Run the installer you downloaded in step 1.4.
- You may need to restart your computer after installation.
3. Install VirtualBox
- Install VirtualBox like any other application on your system.
- macOS users: During installation, VirtualBox will request permissions. Grant all requested permissions, otherwise some features will not work.
4. Install the VirtualBox Extension Pack
- Double-click the downloaded
.vbox-extpackfile (e.g.,Oracle_VM_VirtualBox_Extension_Pack-7.0.26.vbox-extpack). - Follow the prompts to install it.
5. Restart VirtualBox
Close VirtualBox completely, then reopen it before continuing to the next step.
Tip: If you need a visual walkthrough for this step, refer to the provided video guide.
Step 3: Create the virtual machine
1. Open VirtualBox
- Launch VirtualBox if it’s not already open.
- When prompted to choose between Basic and Expert mode, select Expert (this gives you all the settings in one screen).
2. Start the New VM Wizard
Click the New button to begin creating a virtual machine.
3. Fill in the Wizard Settings
| Setting | Value to Enter | Notes |
|---|---|---|
| Name | Debian 13 - Desktop | You can name it something else, but keep it clear. |
| Folder | Default location | Only change if you need to store the VM elsewhere. |
| ISO Image | Select your downloaded Debian 13 ISO | If you can’t find it, you may not have downloaded it or opened (mounted) it instead. |
| Type | Linux | Should be auto-detected. |
| Version | Debian (64-bit) | If 64-bit is missing, virtualization is not enabled—go back to Step 1. |
| Unattended Installation | Skip unattended installation | We will install Debian manually. |
| RAM | 4096 MB recommended | 2048 MB minimum (not recommended). |
| CPU | 2 CPUs | You may assign more if your host has 4+ cores, but 2 is enough. |
| Hard Disk Size | 50 GB | 40 GB minimum. For faster performance, enable Pre-allocate full size. |
| Hard Disk Type | VDI | VirtualBox’s native format. |
4. Adjust Additional VM Settings
After creating the VM, select it and click Settings, then change the following:
- General -> Advanced
- Shared Clipboard: Bidirectional
- Drag & Drop: Bidirectional
- General -> Description
- Add notes for your chosen hostname, username, and password.
- Display -> Screen
- Enable 3D Acceleration (If you see flickering or driver issues later, come back here and disable it).
- Video Memory: Set to maximum.
- Audio: Disable it.
5. Need Help?
Refer to the Visual Guide if you have trouble finding these settings.
Step 4: Install Debian 13
- Start your virtual machine in VirtualBox.
- Follow the installation steps shown in the Visual Guide:
- View the Visual Guide Here
- Complete the installation exactly as shown. This will ensure your Debian setup matches the rest of the course instructions.
Step 5: Update and Install Essential Software
At this point, Debian 13 is installed and your virtual machine has rebooted. You should now see a login screen similar to this:
Follow these steps to prepare your system for the semester:
Here is a visual guide to help you complete these step.
1. Sign In & Take the Tour
- Log in with the credentials you set during installation.
- A “Welcome to Debian 13” tour will appear. This is a quick slideshow about the GNOME desktop. Take a moment to go through it.
2. Disable the Debian Installer DVD Source
This will prevent package installation errors later.
- Open the Software Center:
- Press the Windows/Super key or click Activities in the top-left corner.
- Search for Software Center and open it. (It’s also in the favorites bar.)
- Click the hamburger menu (three horizontal lines) in the top-right.
- Select Software Repositories.
- Find and disable the “Debian 13 DVD installer” source.
- Close the Software Center.
3. Prevent the VM from Sleeping
This avoids issues, especially for macOS users, where the VM becomes unresponsive.
- Open Settings:
- Click the System Menu in the top-right (battery/network/volume icons).
- Click the gear icon next to the screenshot button.
- Go to Power -> Power Saving.
- Turn off Automatic Power Saver and Automatic Screen Blank.
4. Update the System via Terminal
- Open the Terminal (search for “Terminal” in Activities).
- Run the following command:
sudo apt update && sudo apt upgrade -y
- Enter your password when prompted (no characters will appear—that’s normal).
- If you mistype, it will simply ask again.
5. Install Essential Programs
Run these commands to install required tools:
wget https://cis106.com/assets/scripts/essentials.sh
chmod +x essentials.sh
./essentials.sh -a
Note: This may take a while depending on your internet speed.
6. Install VS Code and Extensions
wget https://cis106.com/assets/scripts/vscode.sh
chmod +x vscode.sh
./vscode.sh
Note: This will install Visual Studio Code along with all the extensions needed for the course.
When done, restart your virtual machine to ensure all updates and installations are applied.
Step 6: Install Guest Additions
Right now, your virtual machine cannot fully utilize your host computer’s screen. While you could increase the display scaling from the Virtual Machine menu, that only enlarges the view — it doesn’t properly fit the screen.
To enable full-screen mode (and other useful features), you need to install Guest Additions. Follow these steps:
- Insert the Guest Additions ISO
- In the Virtual Machine window menu, click Devices → Insert Guest Additions CD Image.
- Open the GNOME File Manager and access the inserted disk
- Search for and launch the Files application.
- In the left sidebar, click the Vbox CD entry.
- Run the Guest Additions installer
- In the file manager, click the Run Software button at the top-right corner.
Step 7 Set up Git & GitHub
We’ll now configure Git on your virtual machine and connect it to your GitHub account using SSH. This will make it easier to upload files to GitHub since we wont need to manually upload files via the web interface.
1. Sign in to your Github account
- Open your web browser and log in to your GitHub account.
- Debian 13 comes preloaded with Firefox. You can use the Software Center to install other Web Browsers however, we will use Firefox the entire semester.
2. Configure your Git Identity
- Open the Terminal Application
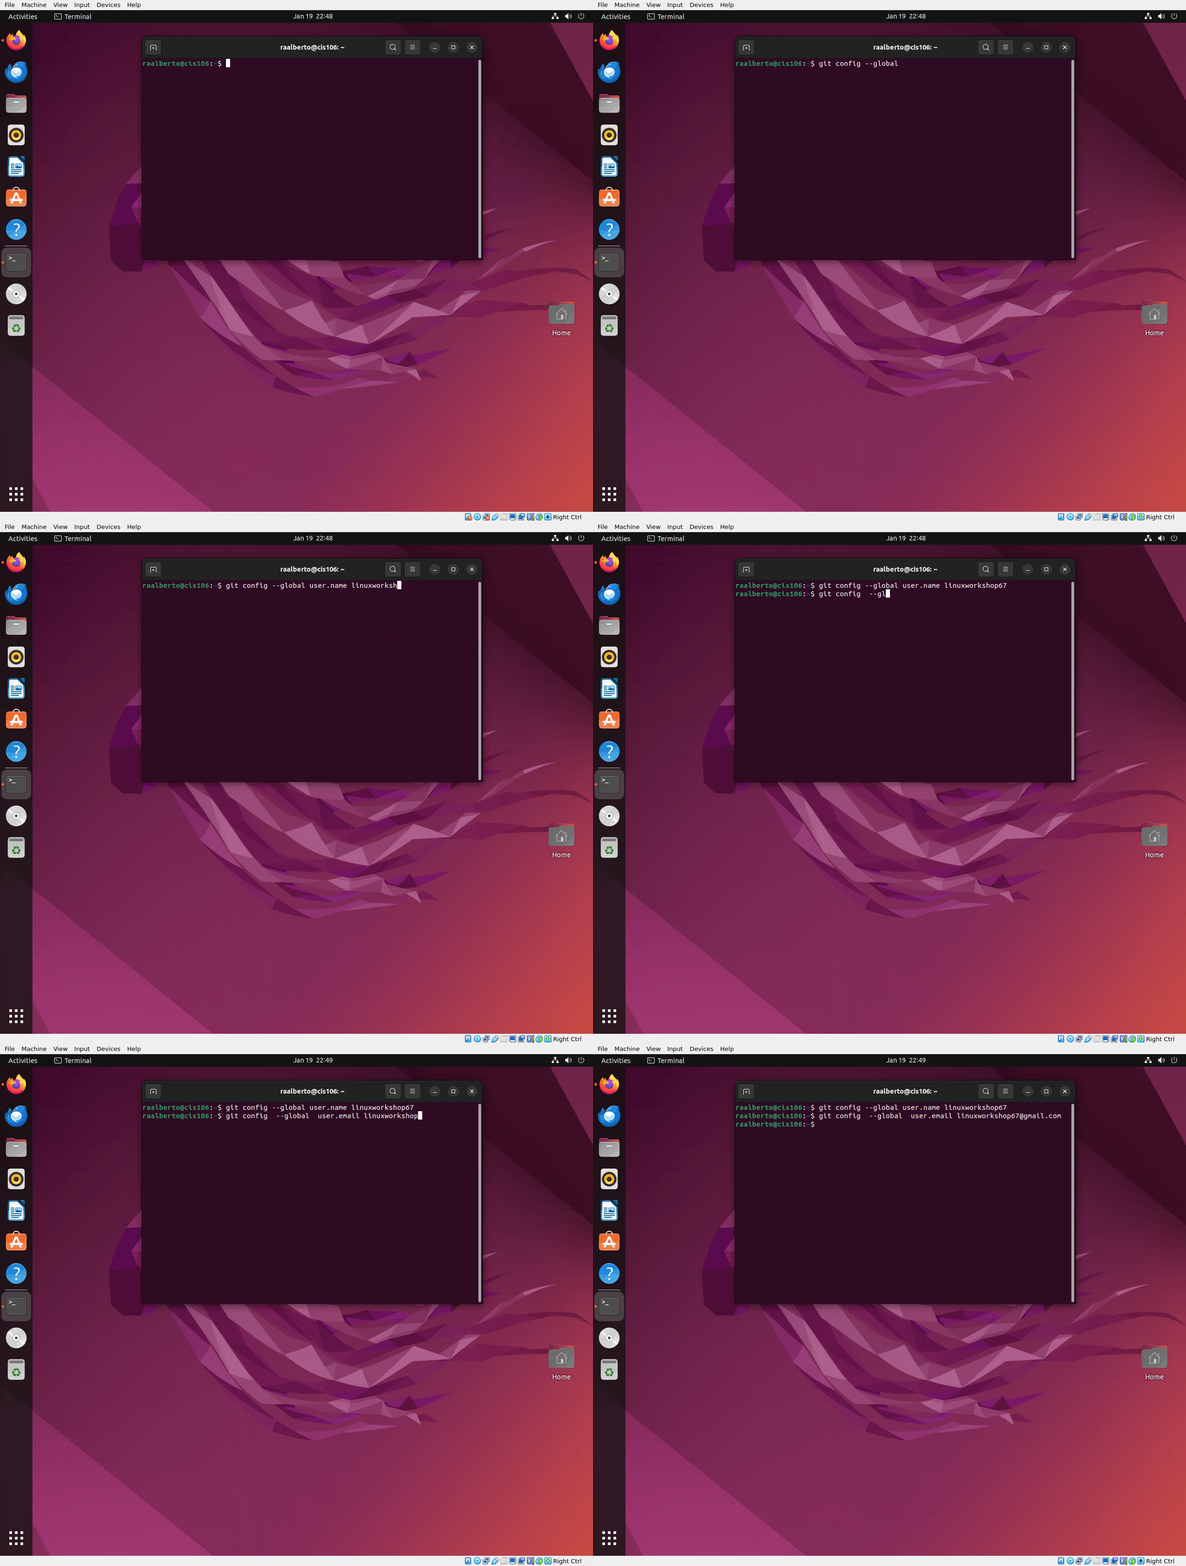
- Run the following commands, replacing the placeholders with your actual information. These tell Git who you are, which is important for tracking your commits.
git config --global user.name "Your Name"
git config --global user.email "your_email@example.com"
3. Generate an SSH Key
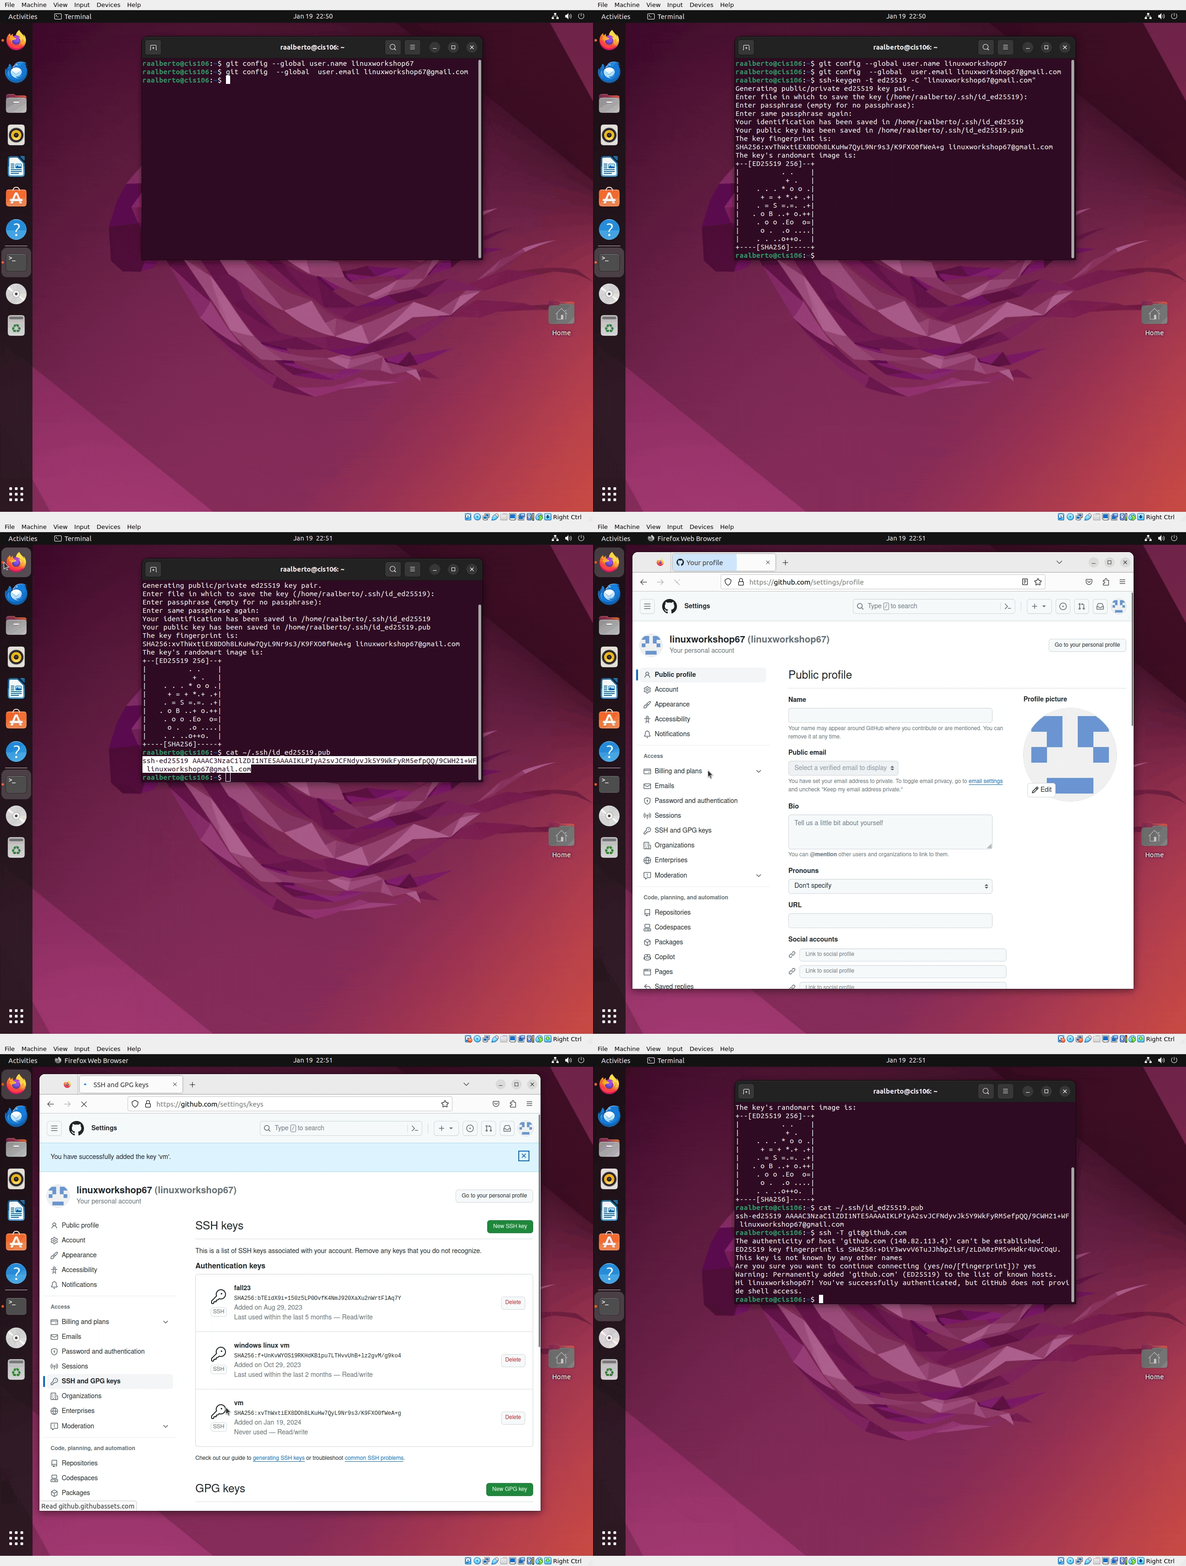
This SSH key will be how we connect to GitHub. Think of this as a password but much more secure. Run this command on your terminal. Remember to replace the placeholder information with your own.
ssh-keygen -t ed25519 -C "your_email@example.com"
When prompted:
- “Enter a file in which to save the key” -> Press Enter to accept the default location.
- “Enter passphrase” -> Press Enter for no passphrase (optional).
A passphrase adds extra security, but for this course it’s not required.
4. Copy Your Public SSH Key
Run the following command:
cat ~/.ssh/id_ed25519.pub
Highlight and copy the entire output to your clipboard.
5. Add Your SSH Key to GitHub
- In GitHub, go to Settings -> SSH and GPG Keys.
- Click New SSH Key.
- Paste your key into the text box and save.
- Make sure that there are no trailing spaces
6. Test Your Connection
Run this command:
ssh -T git@github.com
Type yes when prompted.
7. Clone Your Repository
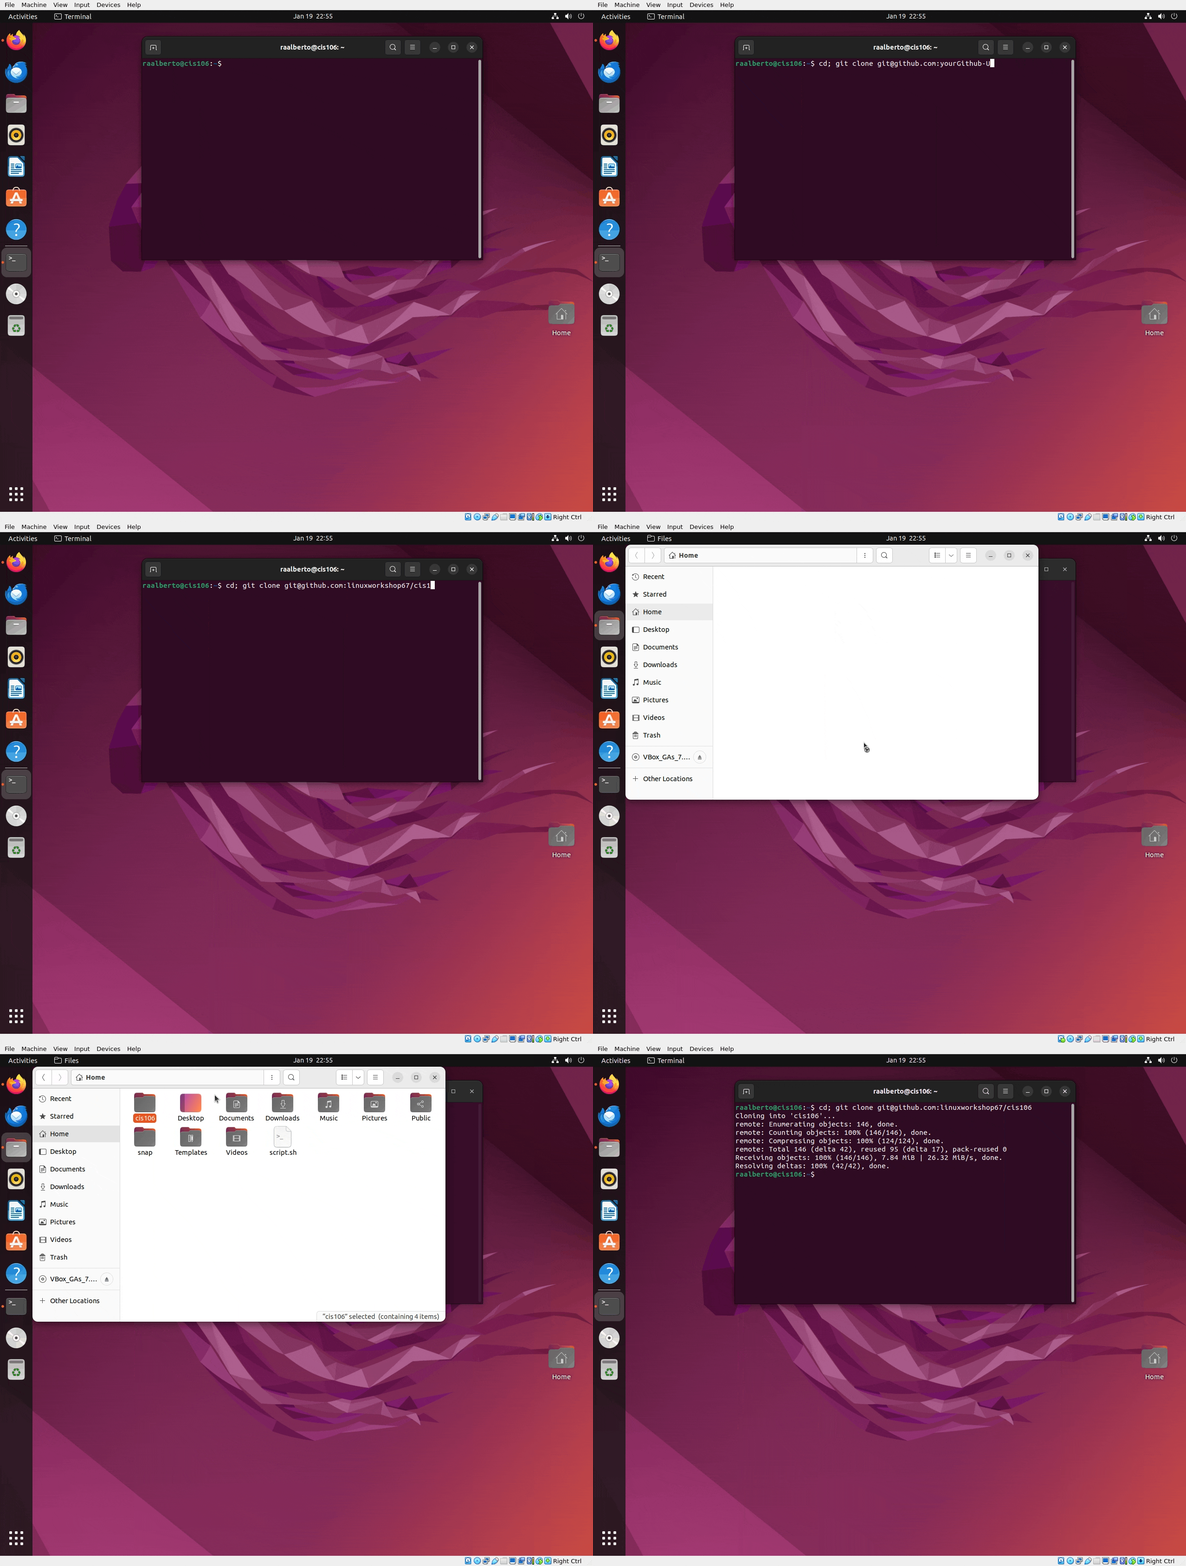
Run these command. Remember to replace the placeholders with your actual GitHub username and repository name:
cd
git clone git@github.com:YourGitHubUsername/YourRepositoryName.git
8. Visual Guides
These recordings were made in Ubuntu 24.04 but they will work the same for Debian 13.


Step 8: Set up screenshot tool
Note: The default screenshot application in Debian does not meet our needs. Instead, we will use gnome-screenshot, which provides the required functionality.
- Open Keyboard Settings in Debian:
- Settings → Keyboard → View and Customize Shortcuts → Custom Shortcuts
- Click the + icon to add a new shortcut.
- In the dialog box, enter the following:
- Name: gnome-screenshot
- Command: gnome-screenshot -i
- Assign your shortcut:
- Click the Set Shortcut button.
- Press the Print Screen key on your keyboard (or any other key combination of your choice).
- If prompted, click Replace to override the existing shortcut.
- Test your shortcut:
- Press the Print Screen key.
- If it doesn’t work, repeat the steps above.
- Visual Guide:
Prepare your submission
Organize your repository
- First, let’s organize your repository. We want to have a folder for labs, week reports, notes, and cheat sheets. It is important to have a project properly organized because as the project grows, the harder it becomes to manage files if they do not have some sort of organizational structure.
- In the cis106 folder (also known as a directory in the Unix/Linux World), create the following folders (all lowercase please):
- labs
- week_reports
- notes
- cheat_sheets
- In the cis106 folder, you have a zip file for lab 1, week report 1 and notes 1. You also have several pdf and markdown files from the previews week. Remove the pdf and markdown files and unzip all the zip files.
- Move the unzipped folders to their corresponding folder. For example, lab1 should moved to labs.
Create your submission
- Inside the labs folder create a new folder for lab 2 called: lab2
- Open the cis106 folder in VS Code
- Inside the lab2 folder, create a new markdown file called lab2.md
- Paste the following markdown text in the file:
# Lab 2 Submission
## Virtual Machine settings


- Open a terminal and run the following command:
cpufetch 2> /dev/null - Take a screenshot of the entire terminal window. Save the screenshot in the lab2 folder
- Clear the terminal with the command:
clearand run the following command:curl -s https://cis106.com/assets/scripts/lab2_system_info.sh | bash - Take a screenshot of the entire terminal window. Save the screenshot in the lab2 folder. Name the screenshot
script.png - Save and convert the file
lab2.mdfile to pdf - Open the VS Code terminal and enter the following commands to commit and push your changes to github:
git pull
git add .
git commit -m 'lab2 finished'
git push
Submit in Blackboard
In blackboard submit the following:
- The URL to the
lab2.mdfile in github - The
lab2.pdffile
![]()
Special Note 1 – Practice with Virtual Machines
This lab is a canonical lab - meaning it’s foundational for your learning. You’ll be creating more virtual machines (VMs) later in this course and your career, so now is the time to get comfortable with the process.
I recommend experimenting:
- Try installing Windows 10. First, research its minimum requirements so you can adjust your VM settings accordingly.
- Install other Linux distributions to compare features and interfaces.
- You do not need to keep these practice VMs. Once you’re done experimenting:
- Delete them using the option “Delete all files” rather than just removing them from VirtualBox.
- This ensures your hard drive space is fully recovered.
Special Note 2 – Git Command Quick Reference
You’ll be using Git frequently this semester. Here’s a quick reminder of the most common commands:
| Command | Purpose |
|---|---|
git clone repository/url/here | Download a GitHub repository to your computer. |
git pull | Synchronize your local repository with the latest changes from GitHub. Always run this before starting work in VS Code. |
git add . | Track all changes made to your files. |
git commit -m "description here" | Save a snapshot of your tracked changes with a short description. |
git push | Send your committed changes to GitHub. |
Command Order:
git pull
git add .
git commit -m "message"
git push
⚠️ Warning: ⚠️
Avoid making changes directly in the GitHub website unless you:
- Know exactly what you are doing, and
- Remember to run git pull before working locally.
Special Note Regarding the Final Exam
- The final exam will be in person.
- It is performance-based and requires access to a Linux Virtual Machine.
- If you do not have a laptop/computer you can bring to school:
- A Linux workstation will be available on campus.
- Request it early—available computers are limited.